Announcement

Collapse
No announcement yet.

'91 Festiva, fun daily build

Collapse
X
 
  • Filter
  • Time
  • Show
Clear All
new posts

  • Advancedynamix
    replied
    Originally posted by parrainx View Post
    Yes they did, but I saw a photo of struts assembled without them on here and followed it as an example. Will re-do them. Thanks for catching that.


    Thank you all for the compliments.
    You'll have to run the adjusters all the way down to install the spring, and then even squish the spring a bit, but it all does fit. That should improve how the car steers.
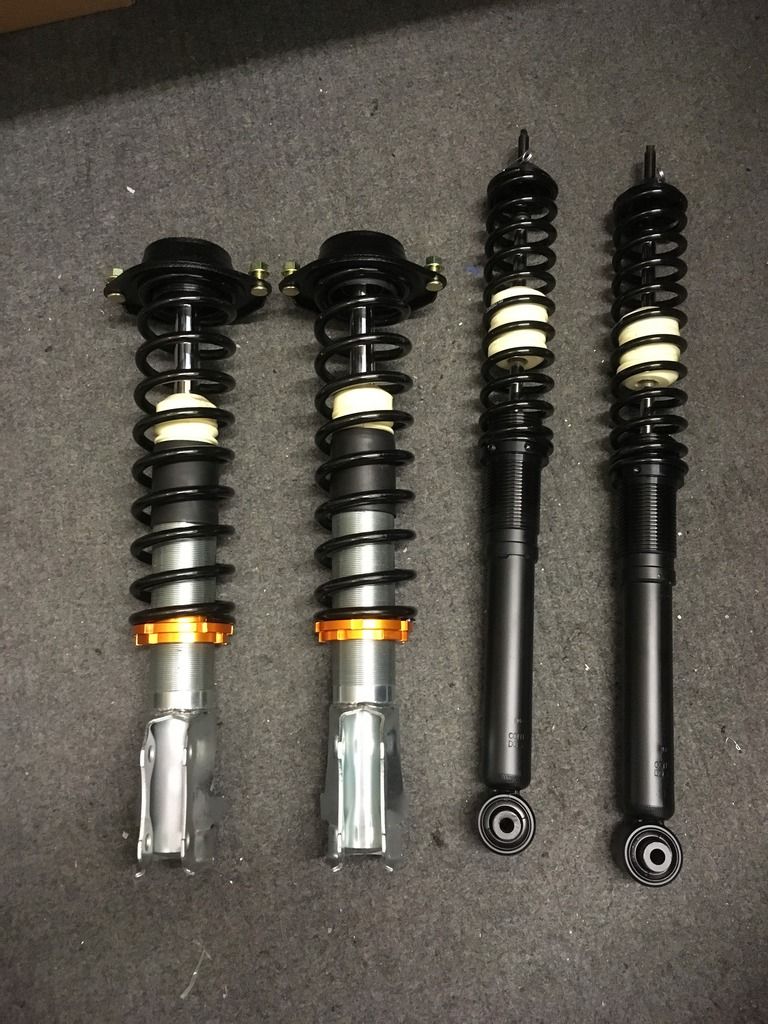
    In the rear, how did you support the bottom of the rubber shock bushing? It's important that this bushing works correctly or you'll have premature shock wear. I've never tried using that style of rear spring hat, but I have a pair of them somewhere.
    The rear seam that you speak of, is that where the rear bumper attaches?

    Leave a comment:


  • firebush357
    replied
    Originally posted by TominMO View Post
    Isn't that going to make it susceptible to all the stuff the tire throws onto it?
    Sorry, I made that sound confusing... I just moved it to inside the Rear Panel where all of the Brake Light Wiring goes.

    Leave a comment:


  • TominMO
    replied
    Originally posted by firebush357 View Post
    I relocated my Fuel Cutoff thingy to the inside of the fender to clean things up a bit. Just make sure that it is mounted facing the same direction if you do that because if it is Sideways or upside down it will trip much easier.
    Isn't that going to make it susceptible to all the stuff the tire throws onto it?

    Leave a comment:


  • firebush357
    replied
    I relocated my Fuel Cutoff thingy to the inside of the fender to clean things up a bit. Just make sure that it is mounted facing the same direction if you do that because if it is Sideways or upside down it will trip much easier.

    Leave a comment:


  • parrainx
    replied
    Originally posted by Advancedynamix View Post
    Didn't your front coilovers come with upper spring hats? That's why your steering is binding, you need spring hats so that the spring and shock shaft turn with the bearing in the strut mount.
    Like these. You can see the aluminum spring hat between the spring and strut mount. The spring needs to rotate with the shock. I also put a 5/8" washer between the hat and strut mount so that the bearing isn't supported by the soft aluminum.
    Your car looks awesome with those bottle caps BTW!
    Yes they did, but I saw a photo of struts assembled without them on here and followed it as an example. Will re-do them. Thanks for catching that.


    Thank you all for the compliments.

    Leave a comment:


  • Advancedynamix
    replied
    Didn't your front coilovers come with upper spring hats? That's why your steering is binding, you need spring hats so that the spring and shock shaft turn with the bearing in the strut mount.

    Like these. You can see the aluminum spring hat between the spring and strut mount. The spring needs to rotate with the shock. I also put a 5/8" washer between the hat and strut mount so that the bearing isn't supported by the soft aluminum.
    Your car looks awesome with those bottle caps BTW!
    Last edited by Advancedynamix; 11-22-2016, 10:44 PM.

    Leave a comment:


  • festyfreak39
    replied
    man that looks unreal!!!! good job!!!!!!!!!!!!!!!!!!!!! beautiful!

    Leave a comment:


  • Festiver
    replied
    Originally posted by parrainx View Post
    SHIFTER ::

    Installed the Civic short shifter, no pics as we all know what it is. Does anybody have specs for the proper bolt to use since the stock bolt does not fit in the hole and I used what I had in my random box of bolts for now, its smaller then the hole and probably not ideal. I guess I will take it out again and go to ACE hardware to find something that will be snug.

    SUSPENSION AND WHEELS ::

    Installed wheels then rolled the fenders.


    Assembled the suspension.


    Slammed look before I adjusted the suspension.


    For those that wonder, I don't think its possible to be this low because the toe adjustment was maxed out and I still had plenty of toe out. Do different tie rod ends allow for that? There's also about an 1" of clearance at the pinched panels inside the wheel well, I suppose these can be hammered out of the way, but I'm not about that life, plus who knows how well it'll ride at that height. I also had to use a washer at the back and I'm sure that added some toe in and thus extra wear on the rear tires.


    Adjusted the suspension, it sits at about 21 1/2" or so in the front. Camber was eye balled. Toe was eye balled.
    Once I rebuild the rack and pinion I will have it aligned at the shop. Removed the washer from the back, no rubbing so far.


    Does anybody knows what this sensor/box is?


    Also I drove it on the highway at the adjusted height and I had something weird happening to steering as if it was binding at the center. Like when I would try to turn, it would be nothing then it'd sorta snap and turn.

    I drove it again today on the streets and did not notice anything weird with the steering, so maybe it went away on its own, or its still a problem just manifests itself on the freeway.

    Can be due to tie rods angle? Too straight? Looks like some cars are at this height or lower have they done some adjustments?

    On the miata I was able to space the rack higher to avoid bump steer when I lowered it, but the way the rack is mounted I don't think there's any possibility for adjustments to create some angle.

    I guess I'll see if its still a problem when I'm on the highway next time.
    Wow that's beautiful

    Sent from my XT1585 using Tapatalk

    Leave a comment:


  • TominMO
    replied
    Originally posted by parrainx View Post
    Does anybody knows what this sensor/box is?

    That is the fuel pump safety disconnect thingy. If you have an accident, that will trip (pop up) to shut off the fuel. Then you just push it down again to reset it.

    Car is looking good!
    Last edited by TominMO; 11-22-2016, 07:28 PM.

    Leave a comment:


  • parrainx
    replied
    SHIFTER ::

    Installed the Civic short shifter, no pics as we all know what it is. Does anybody have specs for the proper bolt to use since the stock bolt does not fit in the hole and I used what I had in my random box of bolts for now, its smaller then the hole and probably not ideal. I guess I will take it out again and go to ACE hardware to find something that will be snug.

    SUSPENSION AND WHEELS ::

    Installed wheels then rolled the fenders.


    Assembled the suspension.


    Slammed look before I adjusted the suspension.


    For those that wonder, I don't think its possible to be this low because the toe adjustment was maxed out and I still had plenty of toe out. Do different tie rod ends allow for that? There's also about an 1" of clearance at the pinched panels inside the wheel well, I suppose these can be hammered out of the way, but I'm not about that life, plus who knows how well it'll ride at that height. I also had to use a washer at the back and I'm sure that added some toe in and thus extra wear on the rear tires.


    Adjusted the suspension, it sits at about 21 1/2" or so in the front. Camber was eye balled. Toe was eye balled.
    Once I rebuild the rack and pinion I will have it aligned at the shop. Removed the washer from the back, no rubbing so far.


    Does anybody knows what this sensor/box is?


    Also I drove it on the highway at the adjusted height and I had something weird happening to steering as if it was binding at the center. Like when I would try to turn, it would be nothing then it'd sorta snap and turn.

    I drove it again today on the streets and did not notice anything weird with the steering, so maybe it went away on its own, or its still a problem just manifests itself on the freeway.

    Can be due to tie rods angle? Too straight? Looks like some cars are at this height or lower have they done some adjustments?

    On the miata I was able to space the rack higher to avoid bump steer when I lowered it, but the way the rack is mounted I don't think there's any possibility for adjustments to create some angle.

    I guess I'll see if its still a problem when I'm on the highway next time.

    Leave a comment:


  • TominMO
    replied
    Originally posted by Advancedynamix View Post
    I didn't even know there was a 155/55-14 tire available. That's awesome!
    The build is looking great! You'll need some negative camber to flush mount a 5mm offset. I'd guess -3 degrees.
    Right here! Economists, but H-rated, not V.
    Last edited by TominMO; 11-21-2016, 11:56 AM.

    Leave a comment:


  • Advancedynamix
    replied
    I didn't even know there was a 155/55-14 tire available. That's awesome!
    The build is looking great! You'll need some negative camber to flush mount a 5mm offset. I'd guess -3 degrees.
    Last edited by Advancedynamix; 11-21-2016, 11:33 AM.

    Leave a comment:


  • FestYboy
    replied
    Looking good! That spindle nut is a common issue with these cars and inexperienced mechanics, you're lucky the spindle was still good, they're getting scarce.

    Leave a comment:


  • parrainx
    replied
    Got some more stuff done last night and tonight.

    PO had installed new CV axles, front brakes, newish battery, gave me drums and shoes.

    BRAKES ::

    Checked front brakes and lubed everything, replaced shoes and drums and cleaned it all up as well. Bearings and seals looked good, so I ended up re-using them, but replaced the grease.

    Passenger side rear spindle nut was completely stripped, so I ended up driving back to the junk yard to get one, this one is the reverse thread nut.

    WHEELS ::

    Found 14" wheels. I wasn't looking for anything in particular, so ended up with BMW bottle caps, 14x6 30mm offset (with the adapters I will be at 5mm offset, should be a nice flush look), these will look good and only paid $30. Tires were shot, so ended up picking up some 155/55/14 for that low profile look, $36 a piece. I should weight them and see the difference between the stockers. I want to paint them dark gray.


    GASKETS VALVE COVER / OIL PAN ::

    Replaced oil pan and valve covers gaskets, checked plugs and gapped to .040 (any recommendations for NGK part#?). Ended up stripping one of the studs on the exhaust when I took the downpipe off to do the oil pan, so I had to pull the manifold off, drill and tap. All good, just a small snag.


    INTERIOR ::

    Painted almost all of the trim and panels inside. Truck bed liner for rear panels. Flat black AB pillar trim, kick panel, door sill, window crank, and door handle.


    Made new door cards out of textured ABS plastic from local plastic shop. Got 2 sheets roughly size of the door. Stripped out old door card and used it as a template and then cut it with sheet metal scissors. Used hole saw for speaker, arm rest, and window crank holes. Used jigsaw for the door handle cutout. Put some sound deadening around the speaker for good measure. I think those Escort arm rests looks pretty good. I painted them black with vinyl paint. Got front seat covers installed.


    Black carpet will finish the interior off pretty good.

    Leave a comment:


  • parrainx
    replied
    Originally posted by Advancedynamix View Post
    Are you in CA? What part? We have meet ups in San Diego once a year and you're welcome to come hang out. I had the same blue 89L that I restored and sold to a guy in San Diego. Thanks for posting your progress!
    Hi,

    Meet would be awesome, but I'm in San Francisco, going to be quite a trip. When does the meet take place? It might be a possibility if the time is right.

    Leave a comment:

Working...
X