 Tweet
Tweet
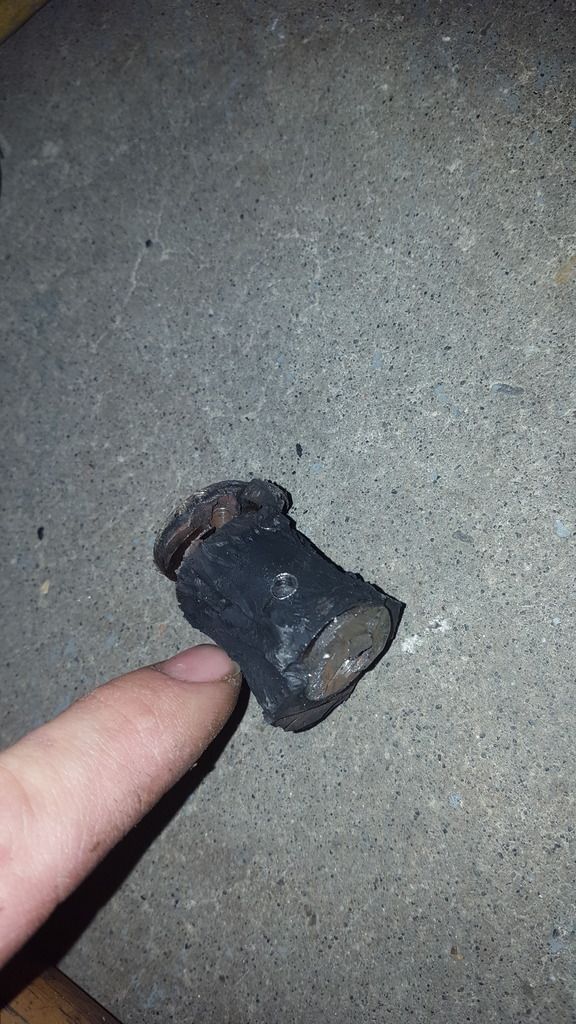
1. you have already found out their siezed
2. A week before you want to remove the struts drill a hole into each right through the bolt. I didnt go deep enough and missed by about 1/16th. Use a smaller bit and drill right through it. Then spray pb blaster or your favorate penatrating fluid every day for a week. Also spray it onto the captive nut and the part of the bolt thats sticks through it every day.
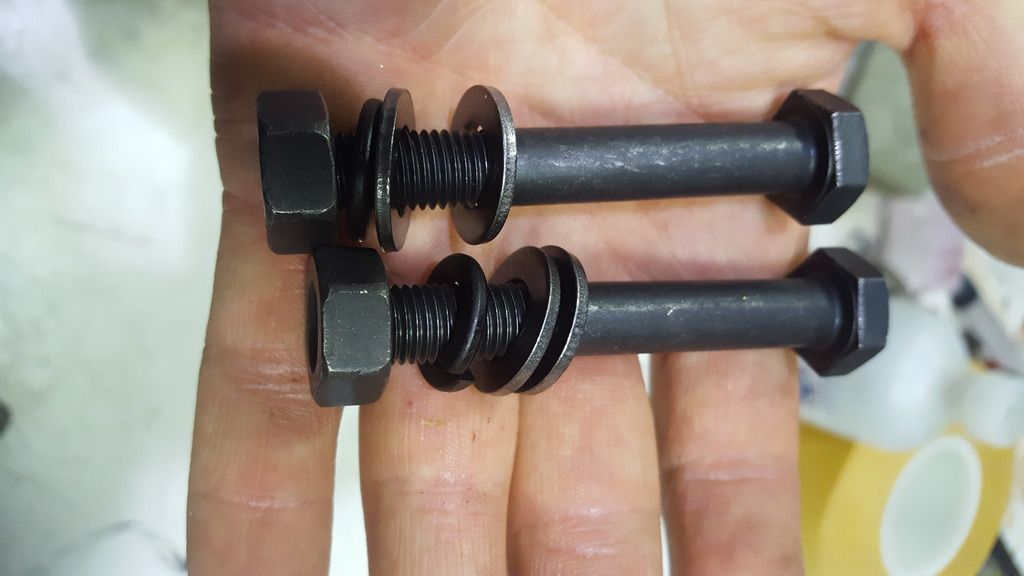
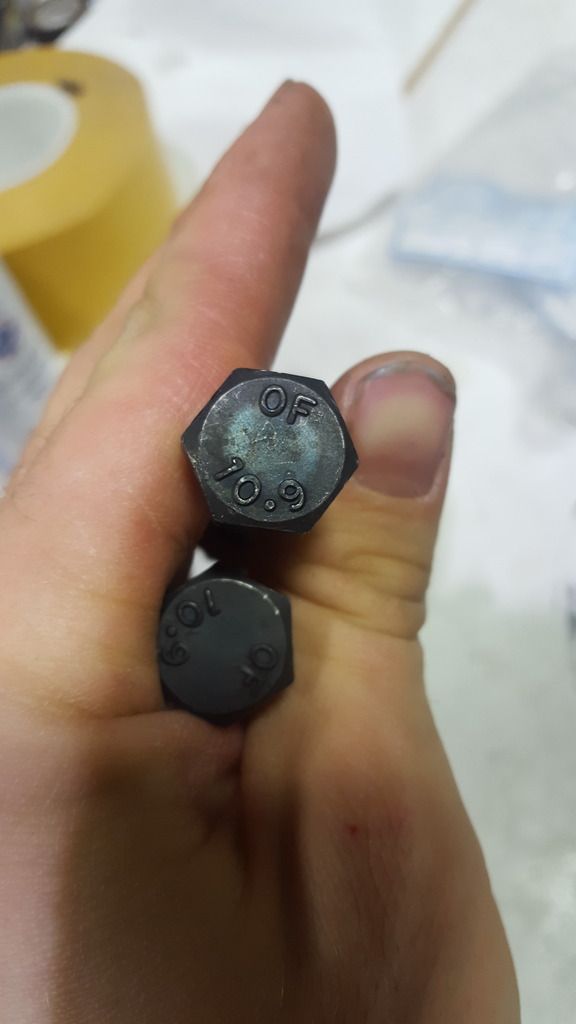
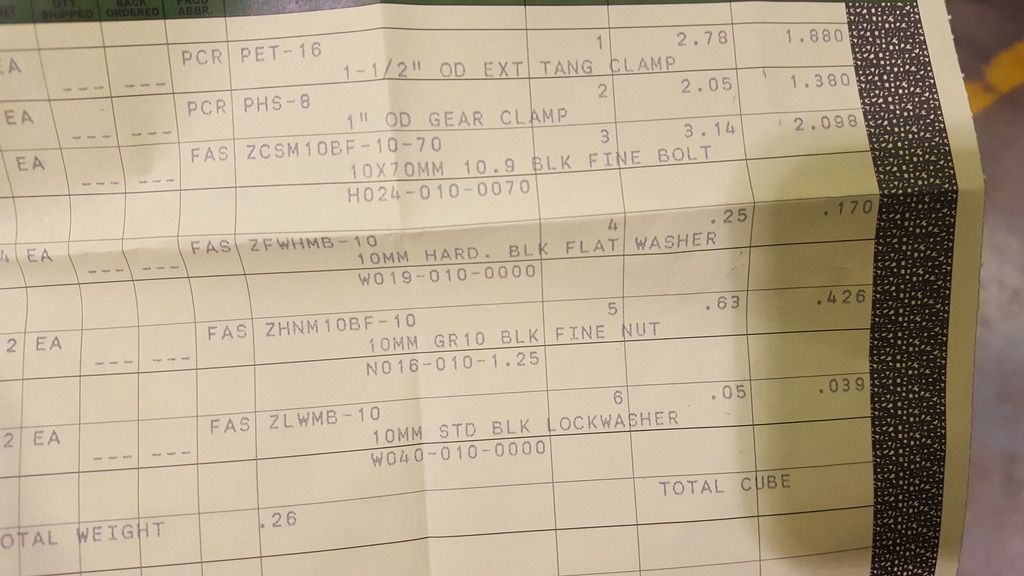
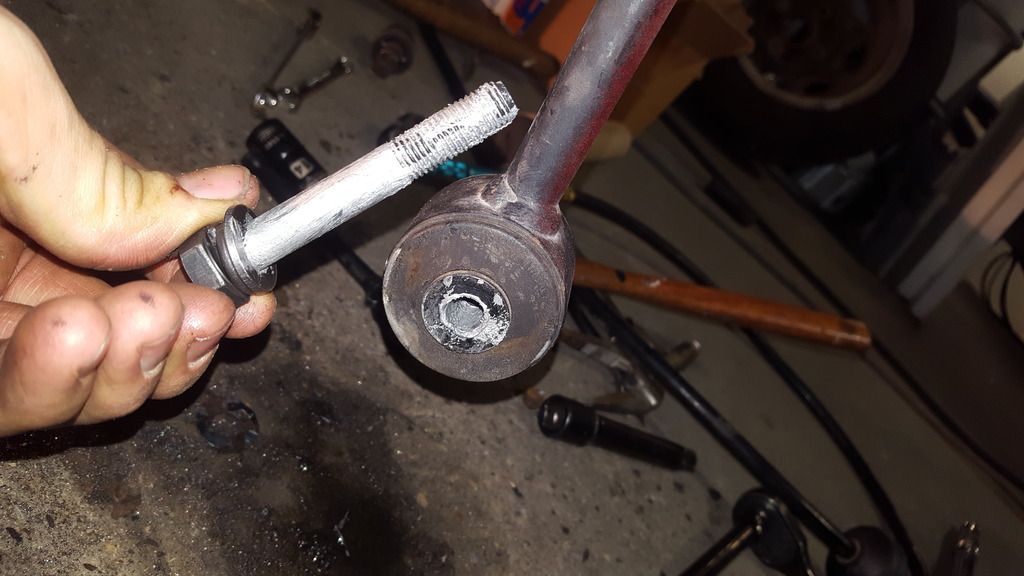
3. Buy new bolts and washers. Also new nuts just in case. 10mm x 1.25 threads, 70mm long grade 10.9. These are part numbers from greggs distributors.
The grade 10 washers do not have a very large OD. Get a grade 8 w�sher as well with a larger OD i still have to do that yet.
4. Try to remove it and It come right off and your done. Or if it didnt or you didnt have a week go to the next step.
5. Work the bolt back and forth with a ratchet or an impact thats not powerful enough to twist off the bolt until its loose on the captive nut. It will still be tight on the strut bushing. Use penatrating fluid back on the captive nut while doing this.
6. Once its nice and loose its time to cut the bolt. I did one side with a sawzall (aka reciprocating saw) and it took 2 hours and i cut into the axle in 2 spots that i didnt want to. Went through a lot of blades, it was a lot of work and i wasnt happy with the result.
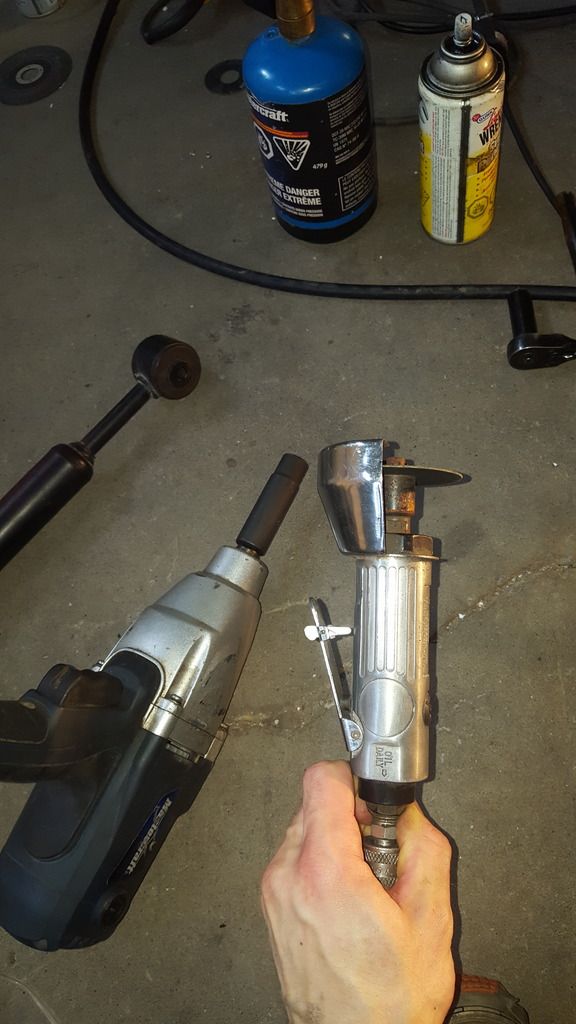
Do yourself a favour and buy one of these air tools that spin a 3inch diameter cut off wheel at 30k rpm. You can get a cheap one for probly $20. Get a pack of cut off wheels, 5 minimum because they need to stay close to the 3inch diameter to work. Once they start getting smaller they dont reach far enough. The 3in diameter allows you to get in there nicely without cutting the rear beam. Get 1/32 thick cut off wheels.

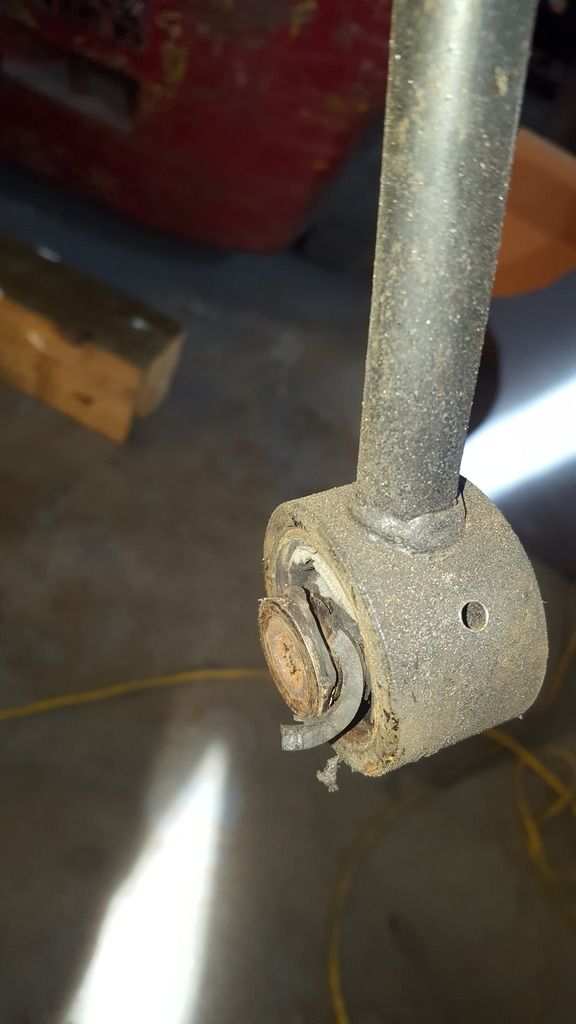
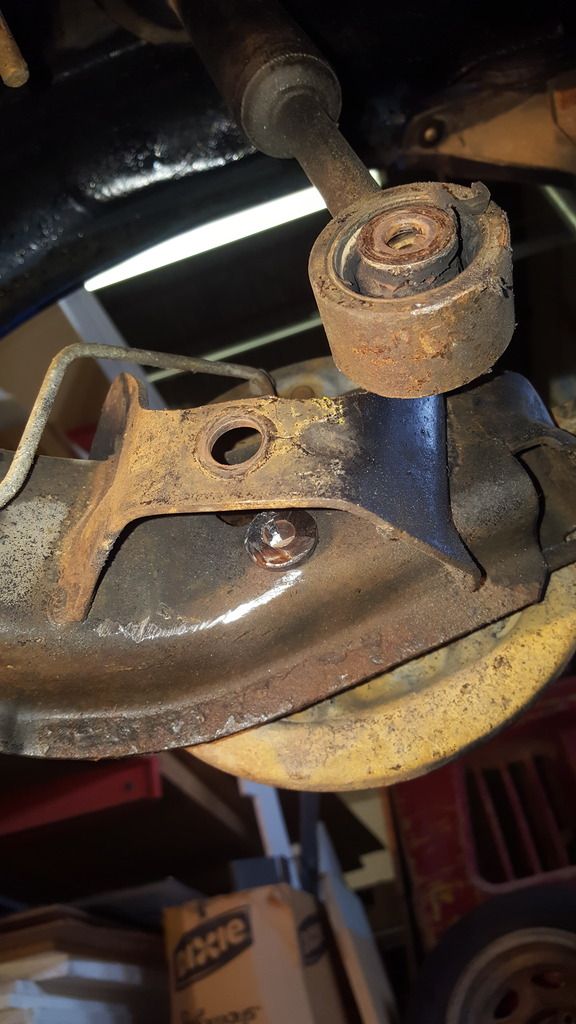
7. Start on the side closest to the wheel (which is removed). From the bottom Cut half way through the bushing. Cut as close to the strut as you can rather than the axle so that your less likely to cut the beam and so you can turn the bolt out after.
Then either take a breaker bar and turn the bolt untill the rubber part of the bushing twists free or light it on fire. I found twisting it off was nicer.
Then turn the bolt so your cut moves 45 degrees. Cut again, turn 45 degrees, repeat until you have done all 4 sides. If its not all the way through take a chisel and hammer it a bit. Then take your impact on the bolt and go back and fort till it snaps free where you cut.
8. Loosen but do not remove nuts at the top of the strut.
9. Push strut toward tire so you have more room to cut on the inner side.
Do the same thing there. Cut, turn 45 degrees, cut, repeat. Same thing again. Chisel and punch, then spin it with the impact while twisting it around till it snaps free.
10. Remove strut.
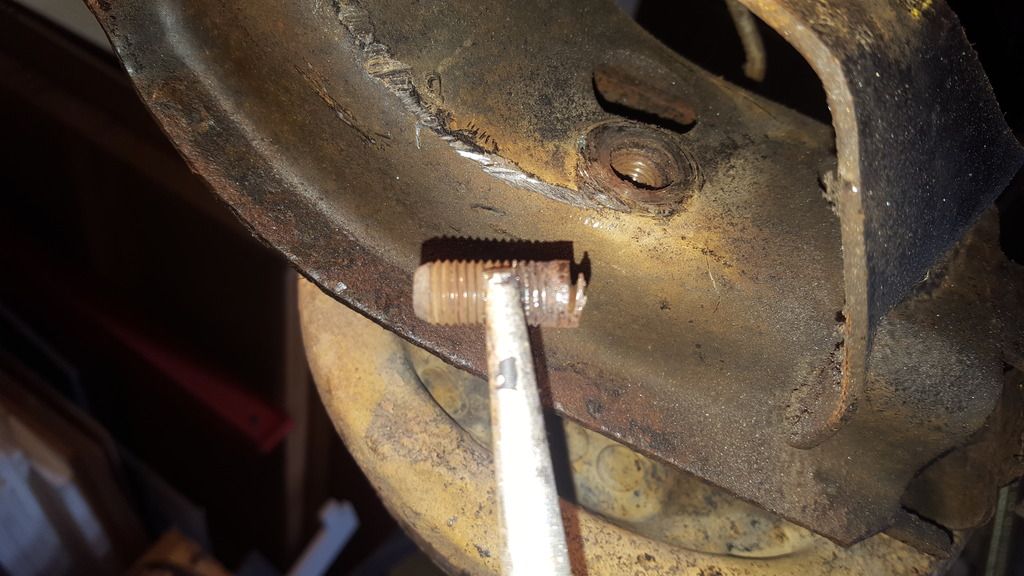
11. Theres a piece of the bolt left in the captive nut. Heat the captive nut with a torch. Take needle nose vicegrips and turn the bolt out. This part was easy for me. No need to pound out the captive nut. But if for some reason you have to thats why you bought the nuts.
12. If your going to take the spindle off to adjust camber you do it while the strut is off. Remove drum so you dont melt the seal.
Heat each bolt and remove with an impact. Remove spindle and clean up studs with a wire brush on a drill. Put antieze on them. Either reinstall or start your camber adjustment. Also heat that 10mm bolt that holds the brake line clamp before you snap it off.
13. Put a ton of anti zieze on the new strut bolt and inside the strut bushing and into the captive nut.
14. Install strut bolts hand tight.
15. Service your brakes and repack your bearings.
16. Reinstall drum and tires.
17. Lower car, then tighten strut bolts.
First time i did this was 6 or 7 years ago, took 2 of us 7 or 8 hours and involved cutting off the bracket that wraps around the strut and welding it back on after, smashing a brake line with an air chisel and having to stretch and re-flare it.
This first side with the sawzall took 2hrs, second side took me an hour but if i were to do another i would guess half an hour.
Sent from my SM-G920W8 using Tapatalk
2. A week before you want to remove the struts drill a hole into each right through the bolt. I didnt go deep enough and missed by about 1/16th. Use a smaller bit and drill right through it. Then spray pb blaster or your favorate penatrating fluid every day for a week. Also spray it onto the captive nut and the part of the bolt thats sticks through it every day.


3. Buy new bolts and washers. Also new nuts just in case. 10mm x 1.25 threads, 70mm long grade 10.9. These are part numbers from greggs distributors.
The grade 10 washers do not have a very large OD. Get a grade 8 w�sher as well with a larger OD i still have to do that yet.


4. Try to remove it and It come right off and your done. Or if it didnt or you didnt have a week go to the next step.
5. Work the bolt back and forth with a ratchet or an impact thats not powerful enough to twist off the bolt until its loose on the captive nut. It will still be tight on the strut bushing. Use penatrating fluid back on the captive nut while doing this.
6. Once its nice and loose its time to cut the bolt. I did one side with a sawzall (aka reciprocating saw) and it took 2 hours and i cut into the axle in 2 spots that i didnt want to. Went through a lot of blades, it was a lot of work and i wasnt happy with the result.
Do yourself a favour and buy one of these air tools that spin a 3inch diameter cut off wheel at 30k rpm. You can get a cheap one for probly $20. Get a pack of cut off wheels, 5 minimum because they need to stay close to the 3inch diameter to work. Once they start getting smaller they dont reach far enough. The 3in diameter allows you to get in there nicely without cutting the rear beam. Get 1/32 thick cut off wheels.


7. Start on the side closest to the wheel (which is removed). From the bottom Cut half way through the bushing. Cut as close to the strut as you can rather than the axle so that your less likely to cut the beam and so you can turn the bolt out after.
Then either take a breaker bar and turn the bolt untill the rubber part of the bushing twists free or light it on fire. I found twisting it off was nicer.
Then turn the bolt so your cut moves 45 degrees. Cut again, turn 45 degrees, repeat until you have done all 4 sides. If its not all the way through take a chisel and hammer it a bit. Then take your impact on the bolt and go back and fort till it snaps free where you cut.
8. Loosen but do not remove nuts at the top of the strut.
9. Push strut toward tire so you have more room to cut on the inner side.
Do the same thing there. Cut, turn 45 degrees, cut, repeat. Same thing again. Chisel and punch, then spin it with the impact while twisting it around till it snaps free.
10. Remove strut.

11. Theres a piece of the bolt left in the captive nut. Heat the captive nut with a torch. Take needle nose vicegrips and turn the bolt out. This part was easy for me. No need to pound out the captive nut. But if for some reason you have to thats why you bought the nuts.

12. If your going to take the spindle off to adjust camber you do it while the strut is off. Remove drum so you dont melt the seal.
Heat each bolt and remove with an impact. Remove spindle and clean up studs with a wire brush on a drill. Put antieze on them. Either reinstall or start your camber adjustment. Also heat that 10mm bolt that holds the brake line clamp before you snap it off.
13. Put a ton of anti zieze on the new strut bolt and inside the strut bushing and into the captive nut.

14. Install strut bolts hand tight.
15. Service your brakes and repack your bearings.
16. Reinstall drum and tires.
17. Lower car, then tighten strut bolts.
First time i did this was 6 or 7 years ago, took 2 of us 7 or 8 hours and involved cutting off the bracket that wraps around the strut and welding it back on after, smashing a brake line with an air chisel and having to stretch and re-flare it.
This first side with the sawzall took 2hrs, second side took me an hour but if i were to do another i would guess half an hour.
Sent from my SM-G920W8 using Tapatalk

 had to take it to the pros
Comment