Hi everyone!
Well, I had mentioned here before that I was going to do a sound insulation project on the Deathegg ('88 L+), and said that if it worked, I would do a write-up on it.
Well, it works pretty well, so here it is!!
I was getting quite tired of the high sound level on my car. I know engine noise is a main cause, but in this project i concentrated on road noise first. I plan to insulate the interior from the engine noise soon.
After reading up on various methods of insulation, I found that there are different frequencies entering the car from different sources, and many different methods of insulation depending on who you talk to, so I took in all this info and made up my own sound insulation package employing different materials.
Step one was to basically gut the entire interior. pretty much everything came out so all the different materials could go in. The only parts I did not insulate on this project were the doors, since I had already put Dyna-mat in them a few years ago.
First was Dynamat (or in my case a cheap substitute). I know you don't have to cover everything with this material in order for it to be effective, but since I got it cheap, I DID cover pretty much everything in the car.
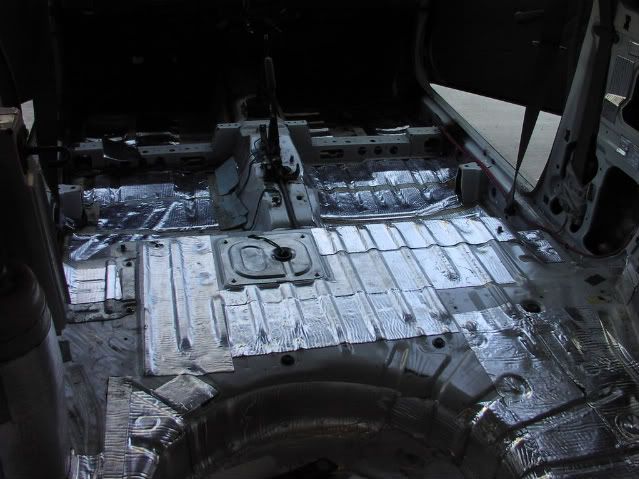
In this pic I don't yet have everything covered, but I did cover everything: floor, inner panels, inner wheel wells, spare tire well, etc. Even did as much of the interior of the hatch as I could.
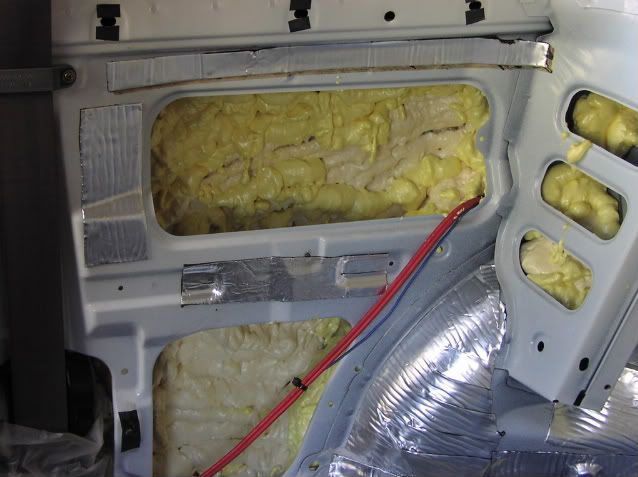
Next was taking care of the inner quarter panels areas; the area between the actual fender and the inner panel where the plastic interior pieces attach to. I have read different ways of doing this: expanding foam, rigid insulation, etc. I decided on two materials: spray foam insulation, and actual fiberglass insulation, commonly used for homes.
The spray foam takes a few practice "beads" to get used to how it adheres and how much it expands. There are two versions of this foam; one is a little harder and expands more than the other. I tried both, and found that it really doesn't matter. They seem to expand in the same way, and adhere the same too. As you can see in the pics, there are many "beads" of foam on the inside of the quarter panels. Again, Everything that i could reach was covered in that area, and put lots of it down near the rocker panel area.
Then the fiberglas insulation over that. This is 3" thick insulation, so it just holds itself in place against the braces you see. This is just one pic, but again, it also went in the rear near the taillamps, and also into the void under the hatch latch.
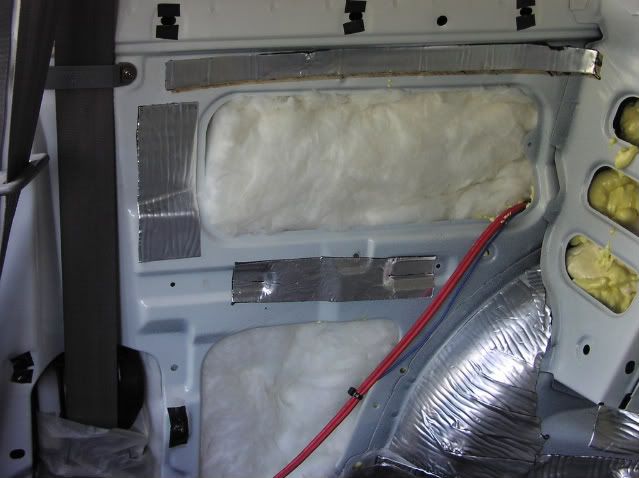
So, that took care of the side structures.
Now the floor. I went to the local fabric supplier,and found two types of jute backing. One is a black jute, 1/2" thick, and a grey jute with a foil backing, much the same as OEM. It's much more dense than the black type, and more than twice the price, so i only used it on the front half of the floor and parts of the tunnel:
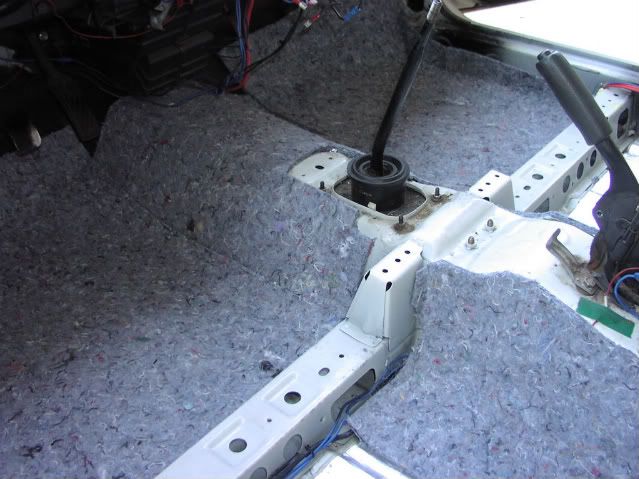
I used 3M spray adhesive for these materials. Just spray both sides, wait a few secs for it to set, and press into place. Using this stuff, you will NOT have a second chance to get it in the right place, so be sure you have the jute in the right place before you actually set it in place!!
On the rest of the floor (from the front seat brace ALL THE WAY TO THE REAR OF THE CAR), I used the black 1/2" jute:
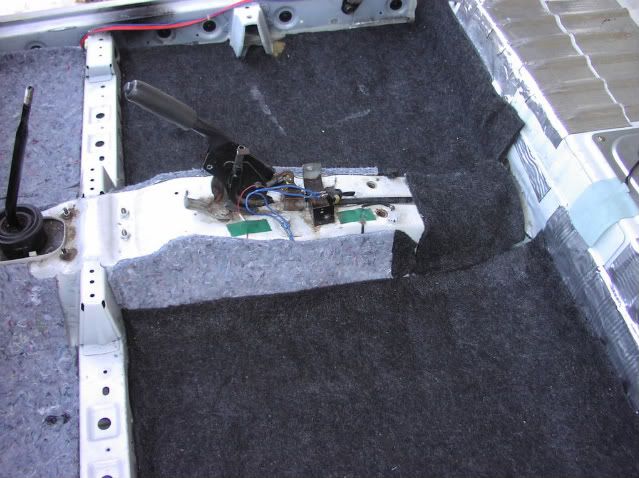
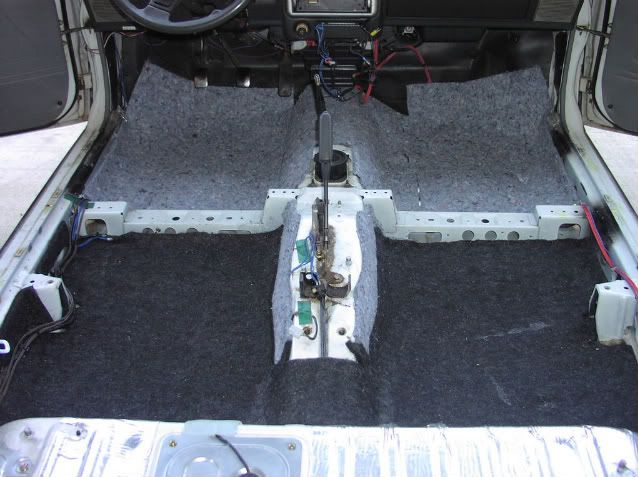
I'll say it again: it's not shown on these two pics, but EVERYTHING from the front seat brace to the hatch latch plate is done with this, including the spare tire well. I did cut out sections to fit the filler neck plate and the plate for the electrical connection for the gas tank, and fit jute pad to these parts individually, so I can still remove them if necessary if I have to, yet still have the insulation on these areas.
Then, I decided to do the actual interior panels. These took forever, since they are all curvy, and have a combination of different ways of attaching them to the car. These various clips, screw holes and alignment posts have to be cut out individually, or else the panel will not fit flush, or may not attach at all. As you can see, the jute pad has to be cut into portions to fit the curves, so it looks like a piece-meal job, but it has to be. But the important thing is to cover as much as you can. I used the same adhesive for these parts too.
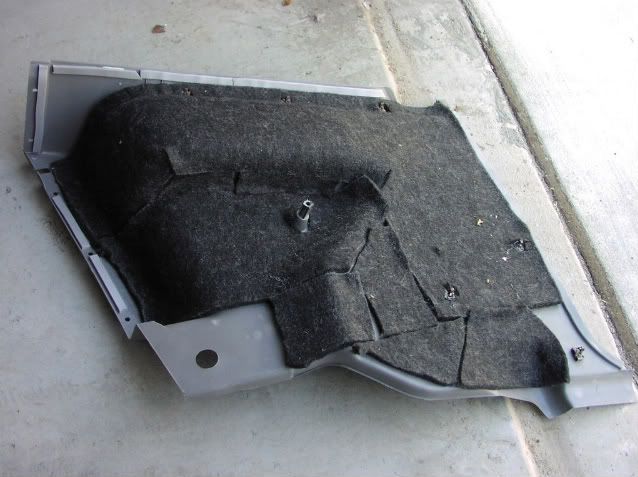
This is just one panel, but this was done to all 4 panels.
Take a close look at the very edge of the panel. I had a feeling that these parts were rubbing against each other and making noise, so I went to Lowes and got some 1/2" wide foam insulation, usually used for home use (door jambs, windows, etc). This stuff is self-adhesive; just take off the backing and apply. I also used this on the speaker assemblies.
A few more things:
*I also used the spray expanding foam on the inside of the hatch behind the license plate, and removed the little rubber grommets and filled the edges of the hatch on either side of the rear window.(put those grommets back on while the foam is still setting!)
*Expanding foam also went...ready? into the rocker panels! I found that one of the reasons the really expensive cars (Bentley, etc) are so quiet is that foam is used in the rockers, the A pillers, etc, etc. I couldn't do everything, but I wanted to do the rocker panels.
* I put small rubber grommets on the rear of the license plate to prevent rattles.
* I re-undercoated the wheelwells with 3M rubberized undercoating
* the jute pad with the foil backing was used as far under the dash as I could get.
* the original fiberboard spare-tire cover was replaced with a custom made 1/2" plywood version, also insulated with the black jute.
So.. thats it.
The big questions are: how much did all this cost and does it work?
Price for all materials was about $150. This was about 6 yards of the black jute, 3 yards of the foil-backed jute, the spray foam (about 5 cans), spray adhesive, the thin foam strips used on the panel edges, and 3 rolls of the roofing flashing I used instead of Dynamat. (I got this stuff at a local TruValue hardware store; the local Home Depot or Lowes does not have it)
How does it work? Really well! It's not a Lexus, but it makes a big difference. I do not have a sound decibel meter, but it is noticeably quieter in the car, especially when I have all the windows closed. Where before I had to put the radio on sound level 45 to hear it to my satisfaction, (I only have two speakers, both in the rear) now i can set it to 40. Also there are no rattles coming from the rear cargo area! This confirms what I thought about the plastic panels rubbing, not only on each other but the metal structure of the car as well. It really does make it easier to drive, since all that road noise can make me mentally tired after a while.
All in all, I think it's a worthwhile project, and would only take a weekend or less.
Well, I had mentioned here before that I was going to do a sound insulation project on the Deathegg ('88 L+), and said that if it worked, I would do a write-up on it.
Well, it works pretty well, so here it is!!
I was getting quite tired of the high sound level on my car. I know engine noise is a main cause, but in this project i concentrated on road noise first. I plan to insulate the interior from the engine noise soon.
After reading up on various methods of insulation, I found that there are different frequencies entering the car from different sources, and many different methods of insulation depending on who you talk to, so I took in all this info and made up my own sound insulation package employing different materials.
Step one was to basically gut the entire interior. pretty much everything came out so all the different materials could go in. The only parts I did not insulate on this project were the doors, since I had already put Dyna-mat in them a few years ago.
First was Dynamat (or in my case a cheap substitute). I know you don't have to cover everything with this material in order for it to be effective, but since I got it cheap, I DID cover pretty much everything in the car.

In this pic I don't yet have everything covered, but I did cover everything: floor, inner panels, inner wheel wells, spare tire well, etc. Even did as much of the interior of the hatch as I could.
Next was taking care of the inner quarter panels areas; the area between the actual fender and the inner panel where the plastic interior pieces attach to. I have read different ways of doing this: expanding foam, rigid insulation, etc. I decided on two materials: spray foam insulation, and actual fiberglass insulation, commonly used for homes.
The spray foam takes a few practice "beads" to get used to how it adheres and how much it expands. There are two versions of this foam; one is a little harder and expands more than the other. I tried both, and found that it really doesn't matter. They seem to expand in the same way, and adhere the same too. As you can see in the pics, there are many "beads" of foam on the inside of the quarter panels. Again, Everything that i could reach was covered in that area, and put lots of it down near the rocker panel area.

Then the fiberglas insulation over that. This is 3" thick insulation, so it just holds itself in place against the braces you see. This is just one pic, but again, it also went in the rear near the taillamps, and also into the void under the hatch latch.

So, that took care of the side structures.
Now the floor. I went to the local fabric supplier,and found two types of jute backing. One is a black jute, 1/2" thick, and a grey jute with a foil backing, much the same as OEM. It's much more dense than the black type, and more than twice the price, so i only used it on the front half of the floor and parts of the tunnel:

I used 3M spray adhesive for these materials. Just spray both sides, wait a few secs for it to set, and press into place. Using this stuff, you will NOT have a second chance to get it in the right place, so be sure you have the jute in the right place before you actually set it in place!!
On the rest of the floor (from the front seat brace ALL THE WAY TO THE REAR OF THE CAR), I used the black 1/2" jute:


I'll say it again: it's not shown on these two pics, but EVERYTHING from the front seat brace to the hatch latch plate is done with this, including the spare tire well. I did cut out sections to fit the filler neck plate and the plate for the electrical connection for the gas tank, and fit jute pad to these parts individually, so I can still remove them if necessary if I have to, yet still have the insulation on these areas.
Then, I decided to do the actual interior panels. These took forever, since they are all curvy, and have a combination of different ways of attaching them to the car. These various clips, screw holes and alignment posts have to be cut out individually, or else the panel will not fit flush, or may not attach at all. As you can see, the jute pad has to be cut into portions to fit the curves, so it looks like a piece-meal job, but it has to be. But the important thing is to cover as much as you can. I used the same adhesive for these parts too.

This is just one panel, but this was done to all 4 panels.
Take a close look at the very edge of the panel. I had a feeling that these parts were rubbing against each other and making noise, so I went to Lowes and got some 1/2" wide foam insulation, usually used for home use (door jambs, windows, etc). This stuff is self-adhesive; just take off the backing and apply. I also used this on the speaker assemblies.
A few more things:
*I also used the spray expanding foam on the inside of the hatch behind the license plate, and removed the little rubber grommets and filled the edges of the hatch on either side of the rear window.(put those grommets back on while the foam is still setting!)
*Expanding foam also went...ready? into the rocker panels! I found that one of the reasons the really expensive cars (Bentley, etc) are so quiet is that foam is used in the rockers, the A pillers, etc, etc. I couldn't do everything, but I wanted to do the rocker panels.
* I put small rubber grommets on the rear of the license plate to prevent rattles.
* I re-undercoated the wheelwells with 3M rubberized undercoating
* the jute pad with the foil backing was used as far under the dash as I could get.
* the original fiberboard spare-tire cover was replaced with a custom made 1/2" plywood version, also insulated with the black jute.
So.. thats it.
The big questions are: how much did all this cost and does it work?
Price for all materials was about $150. This was about 6 yards of the black jute, 3 yards of the foil-backed jute, the spray foam (about 5 cans), spray adhesive, the thin foam strips used on the panel edges, and 3 rolls of the roofing flashing I used instead of Dynamat. (I got this stuff at a local TruValue hardware store; the local Home Depot or Lowes does not have it)
How does it work? Really well! It's not a Lexus, but it makes a big difference. I do not have a sound decibel meter, but it is noticeably quieter in the car, especially when I have all the windows closed. Where before I had to put the radio on sound level 45 to hear it to my satisfaction, (I only have two speakers, both in the rear) now i can set it to 40. Also there are no rattles coming from the rear cargo area! This confirms what I thought about the plastic panels rubbing, not only on each other but the metal structure of the car as well. It really does make it easier to drive, since all that road noise can make me mentally tired after a while.
All in all, I think it's a worthwhile project, and would only take a weekend or less.

Comment