 Tweet
Tweet
Why do you need studs? Well, if you're using anything other than the stock alloy wheels or most steel wheels, you'll need to upgrade to something that will give you the ability to mount alloys to your car in a safe manner. Why? The truth is that your studs are too short. Even if they are long enough to thread into your hubs/drums/discs with the new alloy rims on, they don't go in far enough to provide a solid enough grip for your new (and often times larger and heavier) wheels. This is where studs come into play. Studs come in several different widths, lengths, and threads. Some studs have whats called a knurled base, which looks like a much smaller version of the ends of a CV axle. This type of stud is intended to be hammered into the back of a disc brake or wheel hub as though it were a nail. Here is an example.
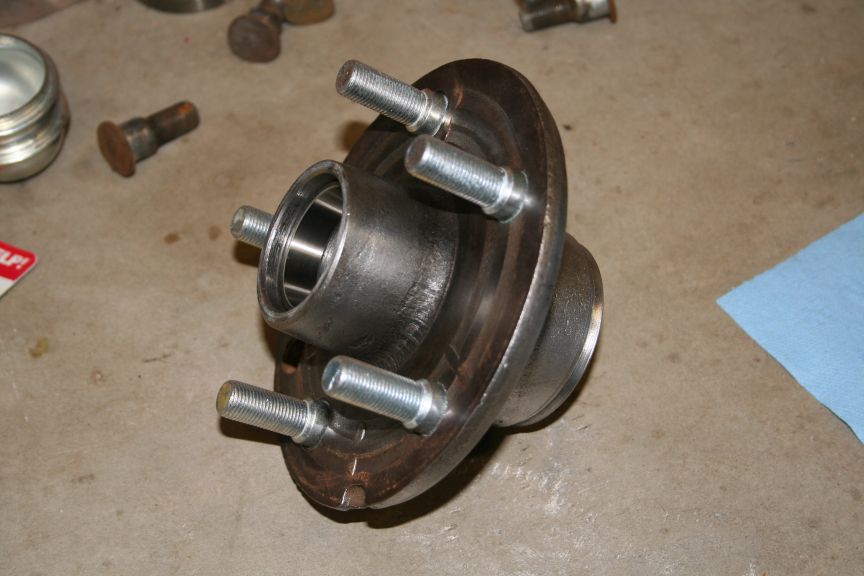

If you'll notice, this type of hub sometimes has a recessed location for the head of the stud to sink into and keep it away from anything that may shave it off.
However, this isn't the right kind of stud for our application. The kind of stud that we would use has a threaded base with an either purposely marred or raised section that is designed to stop the stud from going any farther into the hole where your original lugs were screwed in. These screw-in studs are secured with a hex key/wrench, and can be reused when you change discs by simply unscrewing the stud from the hole. Ill share more on that later.
Before you get your new studs and nuts, consider how long your studs should be. This is based on the wheels you've chosen, as well as the lugs necessary to work with those particular wheels. You will also need to think about whether or not to include spacers in your measurements. A good rule is that you want 1/2 an inch of the stud to be reserved for insertion into the disc/drum, and then enough thread remaining to give the nut enough grip after the stud has passed through the wheel, so 1/2" + spacer(1/4")? + wheel + lug nut depth center cover limitation.
Lets start with the wheels that you've got in mind. Different types of wheels are seated in different ways, meaning that there are different styles of lug nuts that will fit different styles of wheels. Take a look at these diagrams below.
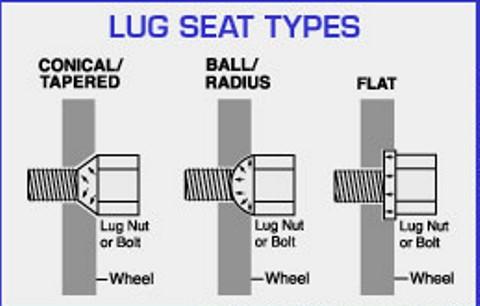
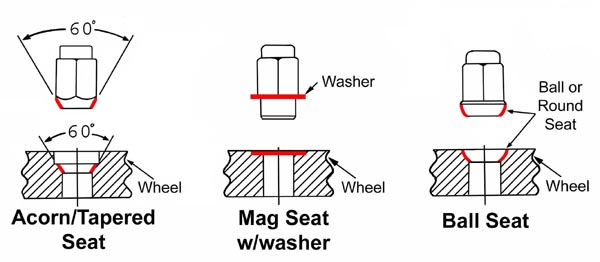
The tapered (conical) seat and the ball (spherical/radius) seat are most commonly found on newer wheels, but those of you looking into the old-school rims may run into the third type of nut which is absolutely necessary if there's no visibly sunken area for the lug nut to settle into (i.e., Toyota & Mitsubishi). Some wheel designs hide the entire center of the wheel, and so you'll need to look at that aspect as well. Both the ball and the tapered nuts come in acorn and standard styles. Acorn nuts differ from the standard style in that acorn lug nuts have a cap on them to hide the end of the stud. This type of lug nut probably isn't necessary or desirable if you plan to hide them, since the acorn cap may impede the wheel center covers ability to do what they were intended to do. However, if you have wheels without center covers, the acorn style is best. Some tuner wheels have holes so small that you need a special lug nut that needs a hex head wrench to install them, in which case you'll most likely be able to purchase those nuts and the tool from the business where you purchased your wheels.
If you have the Aspire suspension (or at least the struts) underneath the rear of your Festiva, you may still need to use spacers, depending on the offset of your chosen rims, but you will definitely need spacers if you are still using the stock Festiva rear suspension. Spacers are just rings of aluminum designed to slip over your studs and effectively LOWER the offset of the wheels. Any time you want to move the rim away from the suspension, you want to lower your offset. For those of you who aren't certain about what offset is, take a minute to read this article from TireRack.
Now that you know what kind of lug shape and style to use, and whether or not to use spacers, Ill let you know that the best size stud for a covered-lug wheel without a spacer is 1.5 inches long. Uncovered wheels or wheels that require spacers need studs that are 1.75 inches to 2 inches long. Knowing length is only part of what you need to know about the studs you're about to purchase. The thread pitch and overall stud width is important.
YOU WILL NEED TO PURCHASE M12x1.5mm STUDS AND THE LUG NUTS TO FIT.
When you've purchased all your parts, you're almost ready to install them. Its not always necessary to do this preparation, but I always do, because a clean installation is a good installation. I'm talking about tapping the holes of the drums and discs to ensure that you have clean threads that will receive your new studs. Tapping is easy, and is money well spent. There's no need to go out and buy an entire tap kit unless you want to, but whatever you buy, make sure it includes the corresponding M12x1.5mm tap, which can be found at Ace Hardware or online. The tap looks like this:

BOTTOMING HAND TAP
The squared end of the tap will fit into the end of a power drill, but DO NOT DO THAT! If for any reason the drill gets away from you, or if the tap isn't straight when it goes in, it will shear all the threads from the hole before you know what happened, or bind and misalign the threads. The correct thing to do is to cover the tap in liquid wrench or WD-40 to lubricate the tap and then insert the tap into the holes with the appropriate handle attached, or insert it with your fingers and then use a small wrench to turn the tap. You don't need to run the tap all the way to the end. Halfway is enough. You just want to make sure that you've cleaned the holes for your studs. Run the tap in and out about two times to ensure you've properly cleaned the threads in the holes.
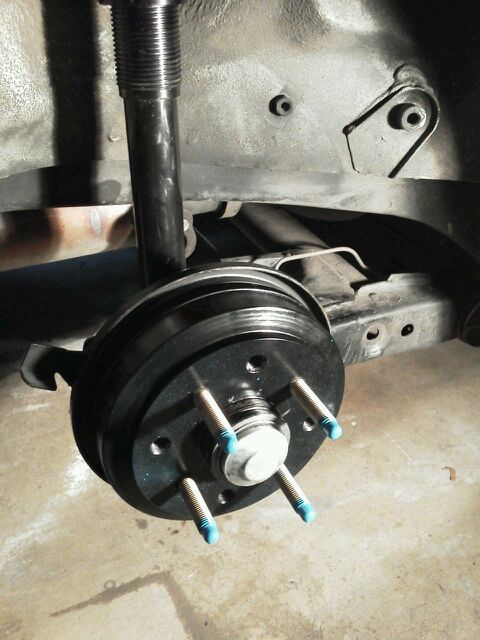
Now you can install the studs! Take your hex key/wrench, insert it into the end of the stud, and apply a drop of blue Loc-Tite to the base of the stud. Then twist the stud to ensure that the Loc-Tite has surrounded the base, and screw it into one of the holes in the disc/drum. Don't over-tighten! Snug works. What if you're going to unscrew the lug nuts from the studs? Wont they come out? Yes, they will if they're not secured, but this is where Loc-Tite comes into play. The blue squeeze tube of Loc-Tite found in the auto parts store is enough to keep your studs from becoming unscrewed while you remove your lug nuts. It puts up enough resistance to keep your studs put until you want to remove them. At that point, you use the hex key/wrench again, and SLOWLY unscrew the studs. The faster you try to remove them, the more resistance you'll get, and you could strip the top of the studs before they begin to back out.
You've done it! Your studs are in! Just mount your spacers if you need them, and then mount your wheels! Torque your lugs to spec, and go show off!
SHORT LIST
-16 1.5 to 2 inch threaded M12x1.5mm studs.
-16 corresponding lug nuts
-Blue Loc-Tite
-1 M12x1.5mm hand tap.
-Liquid Wrench or WD-40.
-Spacers if necessary.
*For any questions concerning your particular installation, consult your local wheel specialists.
If you'll notice, this type of hub sometimes has a recessed location for the head of the stud to sink into and keep it away from anything that may shave it off.
However, this isn't the right kind of stud for our application. The kind of stud that we would use has a threaded base with an either purposely marred or raised section that is designed to stop the stud from going any farther into the hole where your original lugs were screwed in. These screw-in studs are secured with a hex key/wrench, and can be reused when you change discs by simply unscrewing the stud from the hole. Ill share more on that later.
Before you get your new studs and nuts, consider how long your studs should be. This is based on the wheels you've chosen, as well as the lugs necessary to work with those particular wheels. You will also need to think about whether or not to include spacers in your measurements. A good rule is that you want 1/2 an inch of the stud to be reserved for insertion into the disc/drum, and then enough thread remaining to give the nut enough grip after the stud has passed through the wheel, so 1/2" + spacer(1/4")? + wheel + lug nut depth center cover limitation.
Lets start with the wheels that you've got in mind. Different types of wheels are seated in different ways, meaning that there are different styles of lug nuts that will fit different styles of wheels. Take a look at these diagrams below.
The tapered (conical) seat and the ball (spherical/radius) seat are most commonly found on newer wheels, but those of you looking into the old-school rims may run into the third type of nut which is absolutely necessary if there's no visibly sunken area for the lug nut to settle into (i.e., Toyota & Mitsubishi). Some wheel designs hide the entire center of the wheel, and so you'll need to look at that aspect as well. Both the ball and the tapered nuts come in acorn and standard styles. Acorn nuts differ from the standard style in that acorn lug nuts have a cap on them to hide the end of the stud. This type of lug nut probably isn't necessary or desirable if you plan to hide them, since the acorn cap may impede the wheel center covers ability to do what they were intended to do. However, if you have wheels without center covers, the acorn style is best. Some tuner wheels have holes so small that you need a special lug nut that needs a hex head wrench to install them, in which case you'll most likely be able to purchase those nuts and the tool from the business where you purchased your wheels.
If you have the Aspire suspension (or at least the struts) underneath the rear of your Festiva, you may still need to use spacers, depending on the offset of your chosen rims, but you will definitely need spacers if you are still using the stock Festiva rear suspension. Spacers are just rings of aluminum designed to slip over your studs and effectively LOWER the offset of the wheels. Any time you want to move the rim away from the suspension, you want to lower your offset. For those of you who aren't certain about what offset is, take a minute to read this article from TireRack.
Now that you know what kind of lug shape and style to use, and whether or not to use spacers, Ill let you know that the best size stud for a covered-lug wheel without a spacer is 1.5 inches long. Uncovered wheels or wheels that require spacers need studs that are 1.75 inches to 2 inches long. Knowing length is only part of what you need to know about the studs you're about to purchase. The thread pitch and overall stud width is important.
YOU WILL NEED TO PURCHASE M12x1.5mm STUDS AND THE LUG NUTS TO FIT.
When you've purchased all your parts, you're almost ready to install them. Its not always necessary to do this preparation, but I always do, because a clean installation is a good installation. I'm talking about tapping the holes of the drums and discs to ensure that you have clean threads that will receive your new studs. Tapping is easy, and is money well spent. There's no need to go out and buy an entire tap kit unless you want to, but whatever you buy, make sure it includes the corresponding M12x1.5mm tap, which can be found at Ace Hardware or online. The tap looks like this:
BOTTOMING HAND TAP
The squared end of the tap will fit into the end of a power drill, but DO NOT DO THAT! If for any reason the drill gets away from you, or if the tap isn't straight when it goes in, it will shear all the threads from the hole before you know what happened, or bind and misalign the threads. The correct thing to do is to cover the tap in liquid wrench or WD-40 to lubricate the tap and then insert the tap into the holes with the appropriate handle attached, or insert it with your fingers and then use a small wrench to turn the tap. You don't need to run the tap all the way to the end. Halfway is enough. You just want to make sure that you've cleaned the holes for your studs. Run the tap in and out about two times to ensure you've properly cleaned the threads in the holes.
Now you can install the studs! Take your hex key/wrench, insert it into the end of the stud, and apply a drop of blue Loc-Tite to the base of the stud. Then twist the stud to ensure that the Loc-Tite has surrounded the base, and screw it into one of the holes in the disc/drum. Don't over-tighten! Snug works. What if you're going to unscrew the lug nuts from the studs? Wont they come out? Yes, they will if they're not secured, but this is where Loc-Tite comes into play. The blue squeeze tube of Loc-Tite found in the auto parts store is enough to keep your studs from becoming unscrewed while you remove your lug nuts. It puts up enough resistance to keep your studs put until you want to remove them. At that point, you use the hex key/wrench again, and SLOWLY unscrew the studs. The faster you try to remove them, the more resistance you'll get, and you could strip the top of the studs before they begin to back out.
You've done it! Your studs are in! Just mount your spacers if you need them, and then mount your wheels! Torque your lugs to spec, and go show off!
SHORT LIST
-16 1.5 to 2 inch threaded M12x1.5mm studs.
-16 corresponding lug nuts
-Blue Loc-Tite
-1 M12x1.5mm hand tap.
-Liquid Wrench or WD-40.
-Spacers if necessary.
*For any questions concerning your particular installation, consult your local wheel specialists.

 Perfect candidate for Sticky!!!!


Comment