 Tweet
Tweet
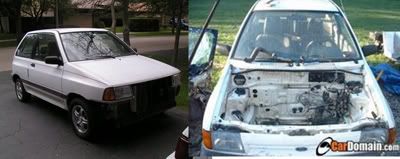
Not sure where this should go, but since this is the first step in changing around the front suspension/brakes on my non-streetable BP drag racer under construction, I thought I'd put it here..
I have a donor car that has a BP engine and a cable G25 trans. I've been building RED with the intention of swapping all the BP stuff into him. One of the changes I want to do is re-arrange a lot of the front end parts so that I can remove the engine and trans in one piece from the bottom of the car - mainly for ease of maintenance.
Step #1 was to properly cut and box the front frame rails so there is lots of clearance for the transmission and the front engine pulleys. On my donor car the frame rails had been smashed in with a sledge hammer to gain clearance. It looked pretty crappy and had really distorted the sheet metal. But since the engine/trans fit in the car, I was able to get measurements for how much to modify the frame rails.
I marked what I had to remove and then carefully cut the sections out using a thin cutting disc on a mini grinder. WARNING: No matter how careful you are, you will have at least on of the cuttings disc's explode, so be sure to wear heavy gloves, long sleeve shirt and pants, boots and a full face shield on a helmet. The parts hurt like hell when they hit you, but so far no bleeding injuries!
Once the piece is cut out, you can using a regular grinding disc to straighten out a curves. You can use the pieces you cut out for making a basic pattern (make it out of construction paper) but you will have to change it a couple of times to get it correct. I used 1/8" steel plate to make pieces to fill in the original cut frame and for the major section to be boxed in.
I used a gas mig welder but it would also be handy to have a small stick welder for using very small rods (3/32"). You have to be careful with your heat settings as you are welding 2 really different thickness metals. I found starting a bead on the thick metal and then moving to the thin metal worked pretty good. The welds were more like a series of "spot welds" but in a couple of areas I was able to make longer beads (when welding 2 pieces of 1/8 metal together).
You will spend a lot of time welding/grinding/welding/grinding to get strong joints and looking good.
For the bottom edge in the wheel well, I mechanically fasten all the pieces together using 1/4 in bolts and then went back and tack welded the edges together.
I think it came out pretty good and it is strong. While you do get rid of some of the "box" you replace it with a triangular shaped structure. For straight like drag racing, I don't think I will have a problem and it is probably strong enough for auto-x or road racing.
----------------------------------------------------------------------------
The next project will be to remove the lower radiator frame and replace it with a removable 2" x 3" x .125" steel tube. More to follow as work continues.
--------------------------------------------------------------------------------
Comments / criticism welcomed.
Comment