The winner for April is........ Icedawg with his car icetiva!!!!!
Congratulations!!!!!
His Submission:
Congratulations!!!!!
His Submission:
Originally posted by Icedawg
Festiva's are a favourite for Ice Racers in Alberta, and after a few years of running an older, heavier Dodge Omni
I decided to build IceTiva, #59. The car has a modified B6T, a G25mr tranny from a 323 GT donor,
a 2 & 1/4 inch free flow Magnaflow exhaust, Festiva Motorsports suspension bushings, new springs and shocks,
13 inch Mazda alloy wheels, Bridgestone Blizzacks, a full roll gage and racing seat, a collection of gauges,
and a variety of other mods. Very special thanks go to Hiroki C. for the swap mount design and fab,
as well as installation help on some really cold nights. Thanks also to Glen N of West Mountain Automotives,
Edmonton, Steve M, Julian P, and Randy B for help, advice and ideas along the way. Thanks also to all
those on this site who provided enough info that I felt brave enough to take on my first engine swap project.
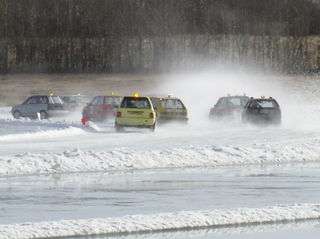
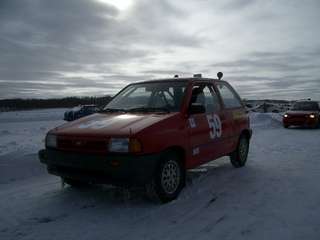
This car was an exercise in blood sweat and tears, with not so much of the love I see going into various Festi streetcar
builds. But it raced well. I finished third out of 12 in the cars first race, and it ran really well in the practices
leading up to that race. Unfortunately, it is no longer pretty and straight. A Chevette spun out in front of me during
the cars second practice, and as the snow cleared I was staring at two headlights pointed right at me from 10 feet
away. The steel in a Chevette is pretty crappy (I know, I used to own one and a pothole put the front strut through
the shock tower), but the IceTiva is even softer, and I lost. We attached a chain to the bumper and pulled the
front end and wheel back into place before the first race, by attaching the other end to my trailer and driving
backwards hard 5 times. All race cars need some tape to look the part anyhow!

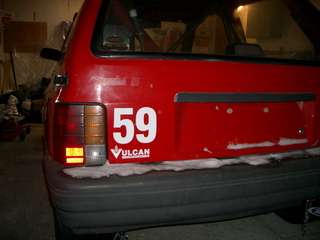
For the build a roller with a dead tranny was brought home with almost no rust on the body.
Check out where the car is from originally. It should be a car afire!
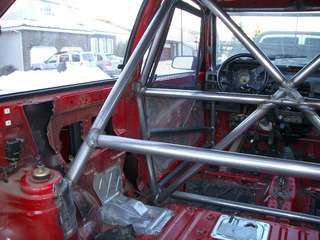
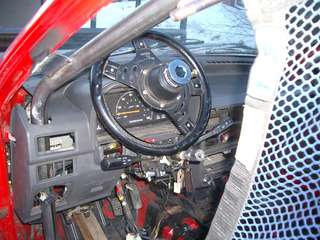
No race car can be without a roll cage. Note the rear seat brace supports were cut off, with a combination of sawzall,
tin snips and cursing. You might as well add a good solid rear strut tower brace while you're at it, eh!
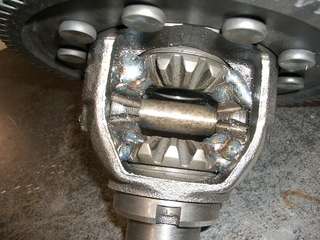
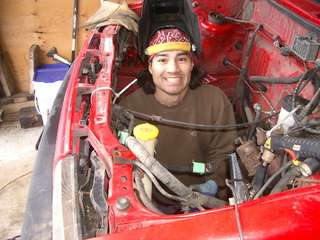
The first major power train mod was to take apart the Mazda G25mr transaxle and weld the differential.
While a Quaife or Mazdaspeed limited slip would be nice, they are rather pricey for an ice racer, so I went for
the Lincoln locker. New bearings were put on the diff as it will bear the greatest load. My fellow racer, and
excellent friend, Hiroki, did the diff weld. He also designed the mount for the G25 tranny and B6T in the Festiva,
built a set of parts for himself, and then for me.
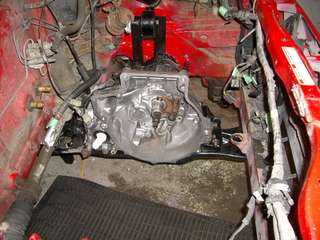
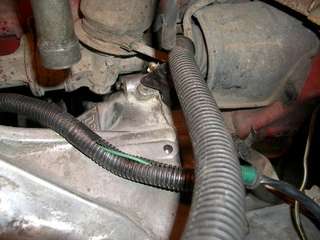
To get the B6T and G25mr to fit, Hiroki had to adjust the following:
-lower the cross member an inch to allow the tranny to clear the steering rack.
-cut a small amount out of the sheet metal on the drivers side frame rail to fit the tranny
-make a new engine mount for the passenger side
-cut and reweld the rear tranny mounts and make a fourth mount
-cut and reweld the front mount on the tranny, and build a new circular mount to the subframe using
an end of a lower control arm of a GM car, in order to clear the sway bar
-finally we had to switch to an Aspire sway bar in order to clear the lowered sub-frame. The Aspire bar goes up
and over the sub-frame unlike the Festi bar, but it did not clear the standard front tranny mount,
which is why the GM control arm part was used.
Using the G25mr tranny allows use of the 323 GT front half axles, since the splines are the same as the
Festiva wheel hub splines.
Wiring followed the guide authored by Michael Farnbach, available at a web address given on the Festiva.com
forum by Matt Swabb - home.comcast.net/~mattswabb/b6t_swap_guide.pdf.
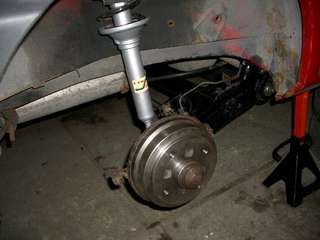
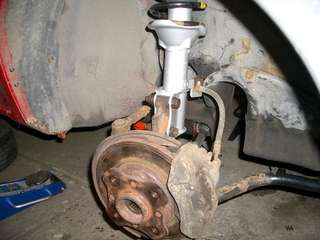
The springs were shot on the car, so a set of 1994 Aspire front and rear springs were swapped in along with
KYB GR2, making it a wee bit stiffer to compensate for the increased engine weight.
The rubber in the front suspension was replaced with high durometer rubber from Festiva Motorsports.
An Aspire rear axle was swapped in to get the stiffer “anti-sway bar” effect, but I kept the Festiva brakes.
Since the axle to hub bolt pattern does not match drilling it out to fit was a real pain.
The first tears came when I discovered the donor engine was a dud and would not start. It needed to be redecked,
new pistons, rings, several valves, head gasket and so on. The cost was too high and the project was shelved
for the 2007 season. For the 2008 season I decided to rebuild the B6T head, and put it on a junkyard
MX3 DOHC B6 block. Does this combo work? Yeah, but it is not quite bolt on, and you need parts from the B6T
bottom end. But these bottom ends are more easily available in Canada than the B6T.
Here is where some of the sweat comes in.
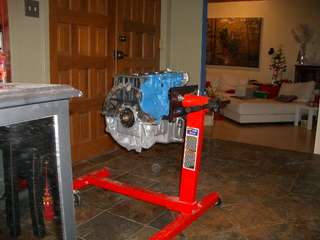
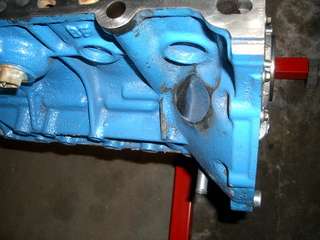
Oil Pan Swap and the Foyer
Not only did my wife have to put up with an engine in the foyer so the JB Weld could set, she had to help me
carry it in! But besides earning nights on the couch the photo above shows the B6T oil pan on the MX3 block.
This swap had to happen, because the MX3 oil pan does not mate to the B6T G25mr series tranny, and the
pan already has the turbo oil return tap in place. With the swap done the G25mr tranny bolts right on.
The pics above also show the extra oil return galleys on the exhaust side.
They were plugged with blind plugs and JB weld, and the engine bell on the MX3 was ground away to
clearance the turbo.
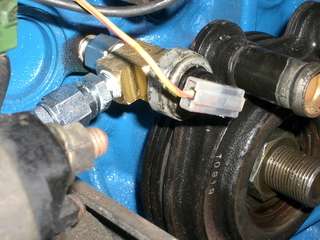

Turbo Oil and Coolant
The oil galley line for the oil feed was not on the MX3 block. I assembled an oil feed line similar to
the Flyin Miata product. Turbo coolant was sourced from the manifold-to-oil cooler hose.
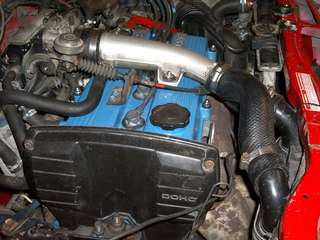
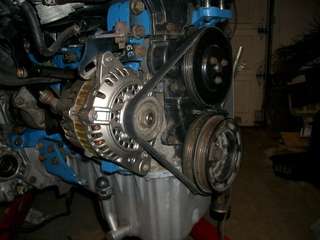
Pulleys The MX3 long nose crank fittings are a lot different than those on the short nose B6T, and the
timing belt drive, crank, water pump and alternator pulleys from the MX3 had to be used.
Other Mods
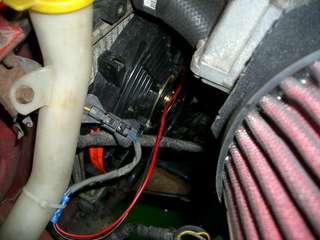
Rad- Festiva automatic rad with a new Trimline 108 10-inch fan
Exhaust - A 2 1/4 inch open exhaust with Magnaflow open muffler were used. The pipe bent 90 degrees
to exit just in front of the rear axle on the passenger side.
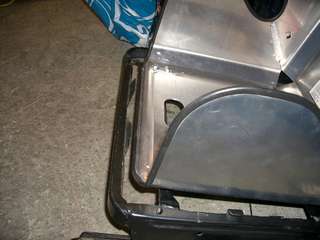
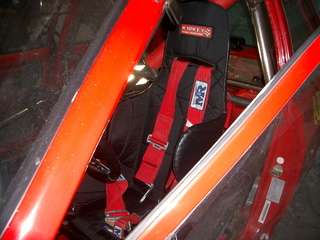
Seat – Modified stock seat frame with Kirkey race seat.
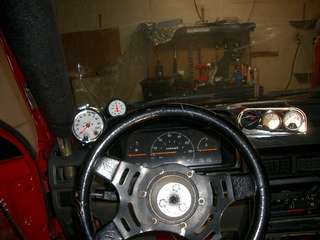
Gauges - A tach and vacuum/boost gauge were installed on the left, and an oil pressure and coolant
temp gauge on the right.
Steering Wheel removable Allstar steering wheel adaptor & 12 inch diam wheel
Wheels – 88-91 Mazda 323 13inch alloy with Bridgestone Blizzacks
Tar - The sound insulating "tar" on the floor pan was sure easy to chip off in large sheets at -10 deg C.
Beats removing it in the summer.
More Tears – sadly the next race weekend the engine seized in the car’s second race. It was again running
in third at the time. That was after a Rabbit spun in front on me in corner 1, so the recently straightened corner
was pushed back again. It even bent the 1 inch thick Aspire sway bar! A trip to Pic-n-Pull has provided new
bumper, fender, corner light, Aspire sway bar, and an MX3 SOHC B6ZE bottom end for rebuilding for next
season. I still need a turbo though. It looks like the turbo oil seal failed, dropped the oil pressure and that
blew the bearings. On the sweet side, I took the seized bottom end back to Pic-n-Pull a day before the 90 day
exchange policy ran out and got the money back for it!
So IceTiva is put away until summer when it will get its engine rebuild and frame straightening.
Somehow this message below was added to my own post instead of appearing on its own.
(actually about half those cars are early Rabbits)

So there is where ALL the FESTIVAS are :lol: :lol:
NICE !!!!


I decided to build IceTiva, #59. The car has a modified B6T, a G25mr tranny from a 323 GT donor,
a 2 & 1/4 inch free flow Magnaflow exhaust, Festiva Motorsports suspension bushings, new springs and shocks,
13 inch Mazda alloy wheels, Bridgestone Blizzacks, a full roll gage and racing seat, a collection of gauges,
and a variety of other mods. Very special thanks go to Hiroki C. for the swap mount design and fab,
as well as installation help on some really cold nights. Thanks also to Glen N of West Mountain Automotives,
Edmonton, Steve M, Julian P, and Randy B for help, advice and ideas along the way. Thanks also to all
those on this site who provided enough info that I felt brave enough to take on my first engine swap project.


This car was an exercise in blood sweat and tears, with not so much of the love I see going into various Festi streetcar
builds. But it raced well. I finished third out of 12 in the cars first race, and it ran really well in the practices
leading up to that race. Unfortunately, it is no longer pretty and straight. A Chevette spun out in front of me during
the cars second practice, and as the snow cleared I was staring at two headlights pointed right at me from 10 feet
away. The steel in a Chevette is pretty crappy (I know, I used to own one and a pothole put the front strut through
the shock tower), but the IceTiva is even softer, and I lost. We attached a chain to the bumper and pulled the
front end and wheel back into place before the first race, by attaching the other end to my trailer and driving
backwards hard 5 times. All race cars need some tape to look the part anyhow!


For the build a roller with a dead tranny was brought home with almost no rust on the body.
Check out where the car is from originally. It should be a car afire!


No race car can be without a roll cage. Note the rear seat brace supports were cut off, with a combination of sawzall,
tin snips and cursing. You might as well add a good solid rear strut tower brace while you're at it, eh!


The first major power train mod was to take apart the Mazda G25mr transaxle and weld the differential.
While a Quaife or Mazdaspeed limited slip would be nice, they are rather pricey for an ice racer, so I went for
the Lincoln locker. New bearings were put on the diff as it will bear the greatest load. My fellow racer, and
excellent friend, Hiroki, did the diff weld. He also designed the mount for the G25 tranny and B6T in the Festiva,
built a set of parts for himself, and then for me.


To get the B6T and G25mr to fit, Hiroki had to adjust the following:
-lower the cross member an inch to allow the tranny to clear the steering rack.
-cut a small amount out of the sheet metal on the drivers side frame rail to fit the tranny
-make a new engine mount for the passenger side
-cut and reweld the rear tranny mounts and make a fourth mount
-cut and reweld the front mount on the tranny, and build a new circular mount to the subframe using
an end of a lower control arm of a GM car, in order to clear the sway bar
-finally we had to switch to an Aspire sway bar in order to clear the lowered sub-frame. The Aspire bar goes up
and over the sub-frame unlike the Festi bar, but it did not clear the standard front tranny mount,
which is why the GM control arm part was used.
Using the G25mr tranny allows use of the 323 GT front half axles, since the splines are the same as the
Festiva wheel hub splines.
Wiring followed the guide authored by Michael Farnbach, available at a web address given on the Festiva.com
forum by Matt Swabb - home.comcast.net/~mattswabb/b6t_swap_guide.pdf.


The springs were shot on the car, so a set of 1994 Aspire front and rear springs were swapped in along with
KYB GR2, making it a wee bit stiffer to compensate for the increased engine weight.
The rubber in the front suspension was replaced with high durometer rubber from Festiva Motorsports.
An Aspire rear axle was swapped in to get the stiffer “anti-sway bar” effect, but I kept the Festiva brakes.
Since the axle to hub bolt pattern does not match drilling it out to fit was a real pain.
The first tears came when I discovered the donor engine was a dud and would not start. It needed to be redecked,
new pistons, rings, several valves, head gasket and so on. The cost was too high and the project was shelved
for the 2007 season. For the 2008 season I decided to rebuild the B6T head, and put it on a junkyard
MX3 DOHC B6 block. Does this combo work? Yeah, but it is not quite bolt on, and you need parts from the B6T
bottom end. But these bottom ends are more easily available in Canada than the B6T.
Here is where some of the sweat comes in.


Oil Pan Swap and the Foyer
Not only did my wife have to put up with an engine in the foyer so the JB Weld could set, she had to help me
carry it in! But besides earning nights on the couch the photo above shows the B6T oil pan on the MX3 block.
This swap had to happen, because the MX3 oil pan does not mate to the B6T G25mr series tranny, and the
pan already has the turbo oil return tap in place. With the swap done the G25mr tranny bolts right on.
The pics above also show the extra oil return galleys on the exhaust side.
They were plugged with blind plugs and JB weld, and the engine bell on the MX3 was ground away to
clearance the turbo.


Turbo Oil and Coolant
The oil galley line for the oil feed was not on the MX3 block. I assembled an oil feed line similar to
the Flyin Miata product. Turbo coolant was sourced from the manifold-to-oil cooler hose.


Pulleys The MX3 long nose crank fittings are a lot different than those on the short nose B6T, and the
timing belt drive, crank, water pump and alternator pulleys from the MX3 had to be used.
Other Mods
Rad- Festiva automatic rad with a new Trimline 108 10-inch fan
Exhaust - A 2 1/4 inch open exhaust with Magnaflow open muffler were used. The pipe bent 90 degrees
to exit just in front of the rear axle on the passenger side.
Seat – Modified stock seat frame with Kirkey race seat.
Gauges - A tach and vacuum/boost gauge were installed on the left, and an oil pressure and coolant
temp gauge on the right.
Steering Wheel removable Allstar steering wheel adaptor & 12 inch diam wheel
Wheels – 88-91 Mazda 323 13inch alloy with Bridgestone Blizzacks
Tar - The sound insulating "tar" on the floor pan was sure easy to chip off in large sheets at -10 deg C.
Beats removing it in the summer.


More Tears – sadly the next race weekend the engine seized in the car’s second race. It was again running
in third at the time. That was after a Rabbit spun in front on me in corner 1, so the recently straightened corner
was pushed back again. It even bent the 1 inch thick Aspire sway bar! A trip to Pic-n-Pull has provided new
bumper, fender, corner light, Aspire sway bar, and an MX3 SOHC B6ZE bottom end for rebuilding for next
season. I still need a turbo though. It looks like the turbo oil seal failed, dropped the oil pressure and that
blew the bearings. On the sweet side, I took the seized bottom end back to Pic-n-Pull a day before the 90 day
exchange policy ran out and got the money back for it!
So IceTiva is put away until summer when it will get its engine rebuild and frame straightening.
Somehow this message below was added to my own post instead of appearing on its own.
(actually about half those cars are early Rabbits)

So there is where ALL the FESTIVAS are :lol: :lol:
NICE !!!!



Comment