Announcement

Collapse
No announcement yet.

Lower Control Arm Bolt Solution

Collapse
X
 
  • Filter
  • Time
  • Show
Clear All
new posts

  • Lower Control Arm Bolt Solution

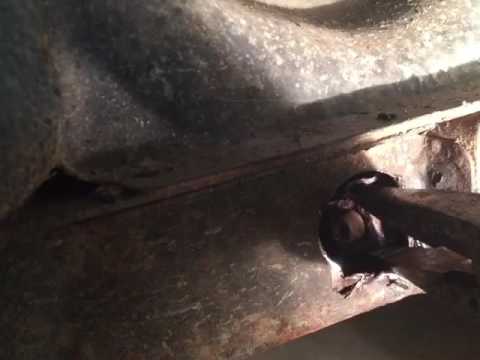
    I am working on my suspension today and a part of that is getting new lower control arms/ball joint ect...

    I read a lot of previous posts about the control arm bolt just spinning after you break it loose. A lot of people had to resort to cutting a hole in the frame to stop the nut from spinning.

    After reading all of these posts I decided to get my propane torch on the hidden nut for a couple minutes through the hole in the frame before trying to remove the bolt. I then gently and slowly applied my breaker bar to break it loose the bolt and backed it out with my wratchet, and it came right out. Hope this helps someone in the future.

    IMG_0384.jpg
    Last edited by Timothy; 12-29-2016, 05:33 PM.
    1992 Ford Festiva 1.3 L 4-cylinder

  • #2
    Timothy, when you put it back together, apply a liberal amount of Anti seize for easy part removal next time, use it on all nuts and bolts being removed, remember you are in the rust belt. Good luck
    An idea can turn to dust or magic, depending on the talent that rubs against it.

    Comment


    • #3
      Originally posted by sc72 View Post
      Timothy, when you put it back together, apply a liberal amount of Anti seize for easy part removal next time, use it on all nuts and bolts being removed, remember you are in the rust belt. Good luck
      I didn't even think of that. Thanks for the suggestion, cause I don't want to have to expend all the effort of removing stubborn bolts again.
      1992 Ford Festiva 1.3 L 4-cylinder

      Comment


      • #4
        I have tried a Dewalt electric impact gun on the right rear shock bolt.
        I will try an acetylene torch on it next. There is evidence of blue Loctitite on the threads of the left rear shock bolt. I will still apply a small amount of antisieze before I put it back in. I bought some 7/16" zinc plated thick fender washers today They are 2" in diameter and should fit nicely in the top cup. I am in the middle of the coilover install. Three shocks out. One to go.

        Comment


        • #5
          Originally posted by bravekozak View Post
          I have tried a Dewalt electric impact gun on the right rear shock bolt.
          I will try an acetylene torch on it next. There is evidence of blue Loctitite on the threads of the left rear shock bolt. I will still apply a small amount of antisieze before I put it back in. I bought some 7/16" zinc plated thick fender washers today They are 2" in diameter and should fit nicely in the top cup. I am in the middle of the coilover install. Three shocks out. One to go.

          Small amount of antiseize?

          Noob

          I slather it all through the passageway it travels through, that is where it actually seizes up on these, in my experience. Also on the threads of course. Also, shove some wax in the beam to keep moisture out. After spraying cavity wax inside the beam. This is a fine product to use.
          Contact me for information about Festiva Madness!
          Remember, FestYboy is inflatable , and Scitzz means crazy, YO!
          "Like I'm going to suggest we do the job right." ~Fecomatter May 28 2016.

          Comment


          • #6
            Ok don't listen to me. I just did the control arm on the other side the same way and that f-ing thing is just spinning in circles. Looks like it was beginners luck.
            1992 Ford Festiva 1.3 L 4-cylinder

            Comment


            • #7
              I'm trying to redeem myself here.

              So I took video of the fix everyone else does. I cut a 1/2 inch hole in the frame then heated then square nut nice and good with propane torch, grabbed with with some needle nose and got the bolt removed.

              First part of video is the spinning nut and second part of video is actually removing bolt.
              1992 Ford Festiva 1.3 L 4-cylinder

              Comment


              • #8
                There ya go. Small box end works even better.
                Last edited by jimdigs; 12-31-2016, 09:56 PM.

                Comment


                • #9
                  Originally posted by jimdigs View Post
                  There ya go. Small box end works even better.
                  Yes you are right. I should have posted this photo of how I tightened everything up. I got a little smarter on the reassembly cause those needle nose pliers weren't cutting it. I did end up using a box end wrench and I ditched the square bolt and used the one that came with the new control arm.

                  IMG_0408.jpg
                  Last edited by Timothy; 12-31-2016, 11:10 PM.
                  1992 Ford Festiva 1.3 L 4-cylinder

                  Comment


                  • #10
                    And here she is all put back together.


                    IMG_0411.jpg
                    Last edited by Timothy; 12-31-2016, 11:11 PM.
                    1992 Ford Festiva 1.3 L 4-cylinder

                    Comment


                    • #11
                      Are the lower control arms & bushings the same for both sides of the car? New owner/rookie question. I asked in another thread but didn't receive a reply.
                      I'm drawing up a parts list for a Rock Auto order. Thanks.

                      Comment


                      • #12
                        Yes. I think it was the same part number for both left and right. I'll double check for you in a little bit.
                        Last edited by Timothy; 01-01-2017, 02:39 PM.
                        1992 Ford Festiva 1.3 L 4-cylinder

                        Comment


                        • #13
                          Yes, exact same part. Can't really think of a single Festiva part that is different driver vs. passenger side (suspension/brake-wise, anyway). Nice, simple cars.

                          Joe
                          White '92 GL 5-speed BP, G series, Aspire/Rio swapped, "Nancy"
                          White '89 LX 5-speed, Aspire swapped, Weber carb
                          1988 LX 5-speed
                          ​​​1993 L 5-speed B8, E series, Aspire/Rio swapped

                          Gone:

                          1986 Chevrolet Sprint 1990 L Plus Auto

                          Comment


                          • #14
                            Thanks!

                            Comment

                            Working...
                            X