 Tweet
Tweet
Last week I decided wanted to rebuild my shifter. There are a few different ways to do this. I will try to make this guide as complete as possible.
Part numbers I used:
Buy these from a Kia dealership:
2 - KKY01-46052 (These are the two bushings that go on the bottom of your shift lever) .......Talk to Bravekozak for metal bronzoil bushings. They are expensive but will last much longer!
1 - KKY01-46090 (This is the rubber boot that goes on the bottom of the shifter)
1 - KKY02-46081 (This is one of the bushings that goes on the shifter ball. This piece is on top.)
1 - KKY01-46086 (This is one of the bushings that goes on the shifter ball. This piece is on bottom.)
Buy these from a Mazda dealership:
1 - GJ21-46-041 (This is the bushing that goes from one of the shifter arms to the transmission with a nut and stud)
1 - B092-46-047 (This is the bushing's sleeve)
1 - B001-46-133 (This is the bolt that goes through the bottom of the shifter. Note: It does not come with a nut or locking washer).
Step 1:
Twist off the shifter knob and remove the shifter boot. I had an escort console so I had to remove that as well.
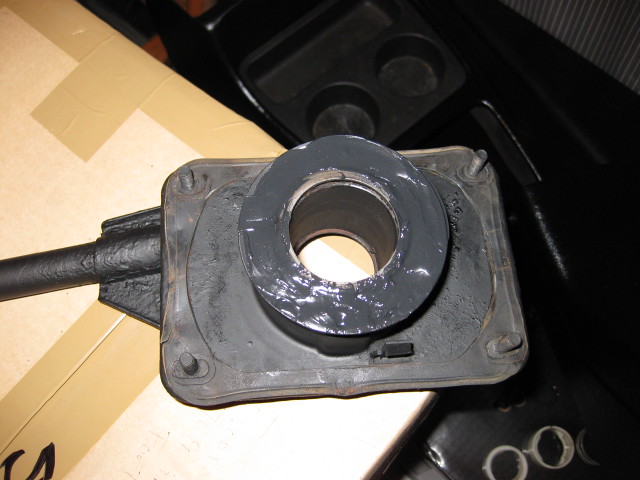
Step 2: Gently remove the rubber outer ring that surrounds the outside of the shifter and set it aside.
Step 3: Remove the spring that is keeping the shifter in the hole. You should see a slightly indented portion of it at the top, slightly above where the shifter ball is. Use a screwdriver and pull it out of it's grove without damaging it. It's not going to spring out at you so don't worry about that.
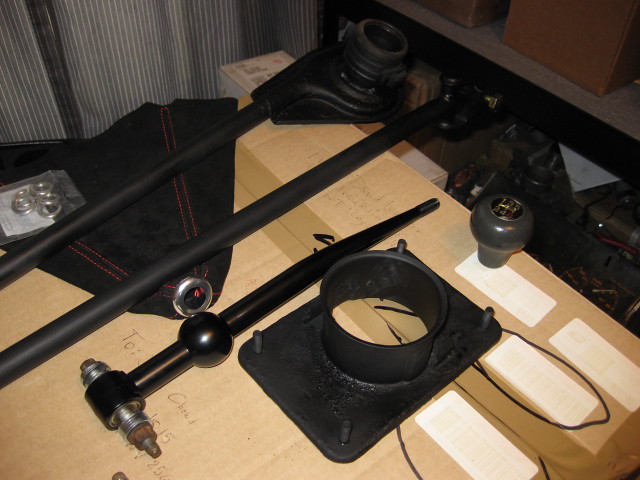
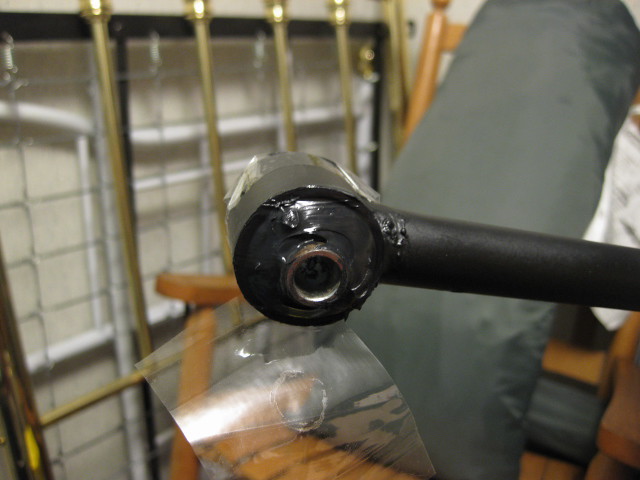
Step 4: Clean up the shifter rod. Wipe off all the old grease and get it nice.
Step 5: Once cleaned, it's time to reassemble the shifter rod assembly. Don't cut corners. Even if the boot doesn't have any cuts or anything, or the bushings don't have cracks, you already took it apart. Spend the $30 and just be done with it and enjoy your clean shift. Put the boot on first from the bottom. The fat part of the boot should be touching the ball. Don't put it on upside down like I did. It's a PITA to get back off.
Step 6: Read this very carefully. Many people mess this up and it will not allow you to reinstall the shifter if you have it wrong. The ball bushings/seals have to go in the correct way. Both need to have their smooth sides touching the ball. This means that the sides with the indents are opposite eachother. The thinner bushing (Part KKY02-46081[the part in the part's list I said was on top]), should have its indents facing up (towards the ceiling); and the other part (KKY01-46086 [the part in the part's list I said was on bottom]) should have it's indents facing down (towards the ground). This puts both bushing's smooth surface's against the ball. Make sure all of these bushings are well greased. Be sure to also fill the boot with a nice helping of it too. I used wheel bearing grease for this entire procedure.
Step 7: Remove the four bolts around the shifter from the inside and push the two plastic tabs in so the shifter mechanism will go through the floor. The shifter plate will fall a few inches.
Step 8: Get under the car and follow both of the shifter rods to the transmission. One goes to a link that has a bolt with a bushing, the other goes to a link that's held together with a rivet. Visit the one with the bolt and undo it, then pull the whole linkage arm off of the stud. Be sure to not lose the big washer, the nut, and it's locking washer. Do not install the new bushing yet. This will allow for more play to do the next step.
Step 9: Stay under the car and move to where the shifter rod is. Unbolt the Ujoint from the bottom of the shifter. Once the bolt is off and you are able to pull the Ujoint off of the shifter, you will be able to see your old bushings, or where they used to be (mine weren't there at all when I did this!). Take out the old ones, put some grease in the holes, grease up the new bushings inside and out and then install them by just pushing them in. You might need to tap them in with a screwdriver/hammer/ratchet/whatever is in your hand at the time. Install the new bolt and nut at this time.
Step 10: Now move back to the transmission bushing you took off a minute ago. Install the new bushing and rod and bolt the link back up to the transmission. Take a quick second to go back to where the shifter was and push up on the platform so that the two tabs will click in and make the shifter set back in the car.
Step 11: Get in the car and put two of the four bolts back into the floor to hold the shifter up and take weight off of the plastic tabs. Put them on opposite corners for even weight and a flat work surface.
Step 12: Take the shifter assembly that you put back together and shove it in the hole. It'll make a clicking sound when it's been pushed as far as it can go (it'll look almost the same as when you took it out). Now take the spring and work it in with your thumbs. This takes a little effort and finesse so don't be frustrated if you don't get it right away. It helps immensely if you can have a second person just to push once on the tab when you're holding the rest down. I can't count the amount of times I was super close but just needed a little extra umph. I got it on the first try when my dad came for literally 10 seconds to help put it in by using a thumb to push down on part of it. (I spent two hours doing this by myself when I setup the shifter the wrong way. I'm still regaining feeling in my thumbs!)
Step 13: With the shifter secured, fill in the shifter's hole with more grease. I almost completely filled mine, it won't hurt anything.
Step 14: Put the rubber ring back on that goes around the big shifter hole.
Step 15: Put the shifter boot back on with the shifter knob.
As for the unaddressed riveted piece that is attached to one of the shifter arms (we call this the "unserviceable joint") . Advanceddynamix has the best fix. You can find his thread on that here:

If your shifter has fallen through the floor, there are two common fixes for that.
One is by filling it with window weld, shown here by sketchman:
OR you can fix it by using a bolt and two nuts as shown here: Photos from BP-Festiva


Just drill a hole through the black dots and put a bolt through the hole with two nuts. Don't crank the first not down super tight because it will transfer the engine vibrations to the inside. Make it tight enough to hold up the shifter and then put the second nut on to secure it.
Hopefully this addresses all the known shifter problems. I was researching a bunch last week and finally got around to doing some of it myself a few days ago. I'll be finishing up the rest of the job when I get back home.
Part numbers I used:
Buy these from a Kia dealership:
2 - KKY01-46052 (These are the two bushings that go on the bottom of your shift lever) .......Talk to Bravekozak for metal bronzoil bushings. They are expensive but will last much longer!
1 - KKY01-46090 (This is the rubber boot that goes on the bottom of the shifter)
1 - KKY02-46081 (This is one of the bushings that goes on the shifter ball. This piece is on top.)
1 - KKY01-46086 (This is one of the bushings that goes on the shifter ball. This piece is on bottom.)
Buy these from a Mazda dealership:
1 - GJ21-46-041 (This is the bushing that goes from one of the shifter arms to the transmission with a nut and stud)
1 - B092-46-047 (This is the bushing's sleeve)
1 - B001-46-133 (This is the bolt that goes through the bottom of the shifter. Note: It does not come with a nut or locking washer).
Step 1:
Twist off the shifter knob and remove the shifter boot. I had an escort console so I had to remove that as well.
Step 2: Gently remove the rubber outer ring that surrounds the outside of the shifter and set it aside.
Step 3: Remove the spring that is keeping the shifter in the hole. You should see a slightly indented portion of it at the top, slightly above where the shifter ball is. Use a screwdriver and pull it out of it's grove without damaging it. It's not going to spring out at you so don't worry about that.
Step 4: Clean up the shifter rod. Wipe off all the old grease and get it nice.
Step 5: Once cleaned, it's time to reassemble the shifter rod assembly. Don't cut corners. Even if the boot doesn't have any cuts or anything, or the bushings don't have cracks, you already took it apart. Spend the $30 and just be done with it and enjoy your clean shift. Put the boot on first from the bottom. The fat part of the boot should be touching the ball. Don't put it on upside down like I did. It's a PITA to get back off.
Step 6: Read this very carefully. Many people mess this up and it will not allow you to reinstall the shifter if you have it wrong. The ball bushings/seals have to go in the correct way. Both need to have their smooth sides touching the ball. This means that the sides with the indents are opposite eachother. The thinner bushing (Part KKY02-46081[the part in the part's list I said was on top]), should have its indents facing up (towards the ceiling); and the other part (KKY01-46086 [the part in the part's list I said was on bottom]) should have it's indents facing down (towards the ground). This puts both bushing's smooth surface's against the ball. Make sure all of these bushings are well greased. Be sure to also fill the boot with a nice helping of it too. I used wheel bearing grease for this entire procedure.
Step 7: Remove the four bolts around the shifter from the inside and push the two plastic tabs in so the shifter mechanism will go through the floor. The shifter plate will fall a few inches.
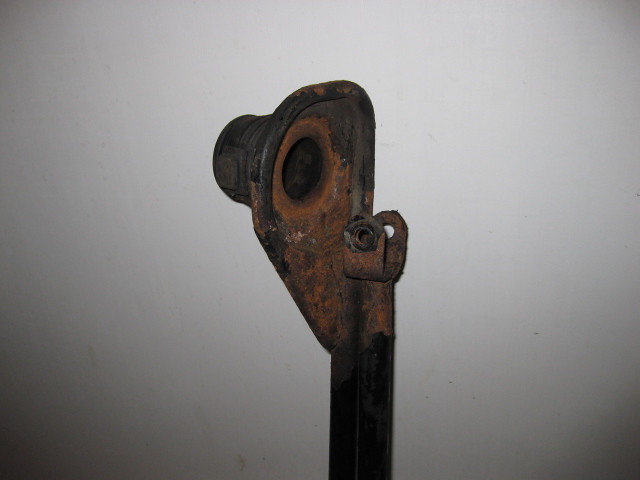
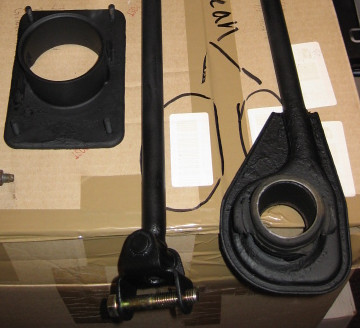
Step 8: Get under the car and follow both of the shifter rods to the transmission. One goes to a link that has a bolt with a bushing, the other goes to a link that's held together with a rivet. Visit the one with the bolt and undo it, then pull the whole linkage arm off of the stud. Be sure to not lose the big washer, the nut, and it's locking washer. Do not install the new bushing yet. This will allow for more play to do the next step.
Step 9: Stay under the car and move to where the shifter rod is. Unbolt the Ujoint from the bottom of the shifter. Once the bolt is off and you are able to pull the Ujoint off of the shifter, you will be able to see your old bushings, or where they used to be (mine weren't there at all when I did this!). Take out the old ones, put some grease in the holes, grease up the new bushings inside and out and then install them by just pushing them in. You might need to tap them in with a screwdriver/hammer/ratchet/whatever is in your hand at the time. Install the new bolt and nut at this time.
Step 10: Now move back to the transmission bushing you took off a minute ago. Install the new bushing and rod and bolt the link back up to the transmission. Take a quick second to go back to where the shifter was and push up on the platform so that the two tabs will click in and make the shifter set back in the car.
Step 11: Get in the car and put two of the four bolts back into the floor to hold the shifter up and take weight off of the plastic tabs. Put them on opposite corners for even weight and a flat work surface.
Step 12: Take the shifter assembly that you put back together and shove it in the hole. It'll make a clicking sound when it's been pushed as far as it can go (it'll look almost the same as when you took it out). Now take the spring and work it in with your thumbs. This takes a little effort and finesse so don't be frustrated if you don't get it right away. It helps immensely if you can have a second person just to push once on the tab when you're holding the rest down. I can't count the amount of times I was super close but just needed a little extra umph. I got it on the first try when my dad came for literally 10 seconds to help put it in by using a thumb to push down on part of it. (I spent two hours doing this by myself when I setup the shifter the wrong way. I'm still regaining feeling in my thumbs!)
Step 13: With the shifter secured, fill in the shifter's hole with more grease. I almost completely filled mine, it won't hurt anything.
Step 14: Put the rubber ring back on that goes around the big shifter hole.
Step 15: Put the shifter boot back on with the shifter knob.
As for the unaddressed riveted piece that is attached to one of the shifter arms (we call this the "unserviceable joint") . Advanceddynamix has the best fix. You can find his thread on that here:
If your shifter has fallen through the floor, there are two common fixes for that.
One is by filling it with window weld, shown here by sketchman:
Originally posted by sketchman
View Post
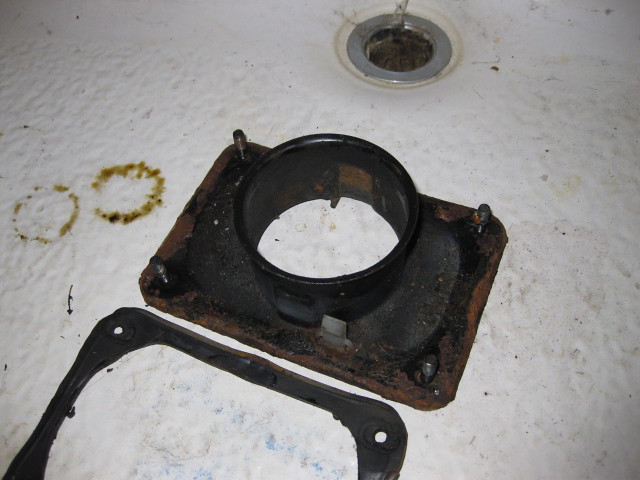
OR you can fix it by using a bolt and two nuts as shown here: Photos from BP-Festiva
Just drill a hole through the black dots and put a bolt through the hole with two nuts. Don't crank the first not down super tight because it will transfer the engine vibrations to the inside. Make it tight enough to hold up the shifter and then put the second nut on to secure it.
Hopefully this addresses all the known shifter problems. I was researching a bunch last week and finally got around to doing some of it myself a few days ago. I'll be finishing up the rest of the job when I get back home.

Comment