 Tweet
Tweet
That looks like a sweet start!! Ive been trying to figure out how to use the Capri gages from the parts car I bought. I might have to try something like what your doing here and see what happens
-
Paul
91GL
Menomonee Falls, WI -
fun part is going to be all the wiring, since I can't really use the old circuit board. However, I'm thinking I may just ditch all the little warning lights like oil (which never works) and seat belts (which doesn't work since I did my manual belt swap)... I'll probably keep the check engine one though, because it usually comes on when the oil gets low.
So I should be left with:
1. ground
2. left blinker
3. right blinker
4. illumination
5. fuel gauge
6. temp gauge
7. top tach wire
8. bottom tach wire
9. check engine light
that leaves me with only 9 wires to deal with... I don't plan on using the stock plugs, but I still need a way to unplug the cluster for removal when necessary. When I bought my old B6 it still had the engine wiring harness attatched, and it was a 13 wire plug. I lost that one, but monday when I'm at the jy I'm going to pick up a 10+ wire plug off of something for use as my gauge cluster plug.No festiva for me ATM...Comment
-
it looks very good "We can judge the heart of a man by his treatment of animals." -Mohandas Gandhi
Comment
-
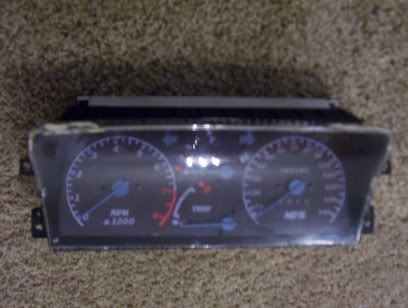
Ok, just got back from visiting family this weekend. Tonight I put the finishing cosmetic touches on my new tach cluster. Probably could have looked better if I'd spent more time, but at least it didn't cost much. I paid $11 total for the two gauges, and $1.50 to have the face printed on some kind of shiny adhesive paper (not transparent, the transparency machine couldn't handle all the black). The rest of the stuff is the two festy gauges (fuel and temp) and a piece of plexiglass that I already had laying around the garage. First, here is a picture of the back of the cluster, showing how everything fit together and how much wiring I still have to do, even though I cut the entire thing to the bare minimum.

And now for the good stuff... lemme know what you guys think...
Gauges mounted... I didn't really want to paint the needles blue, but I had two white needles from the protege and two orange ones from the festy and I figured they should all match... at least its the exact same blue I painted my car with

And here it is mounted in the little cluster cover/window/whatever-its-called thingy
 No festiva for me ATM...
Comment
-
:shock: SWEET :shock:
Definatly need a write up.
I'll try the same with my escort gt guages if I have some time. It's a good thing you don't read the stickies, you might of learned something.
 Poverty produces creativity
Comment
-
So how did you get it printed up on the plexiglass
&
How much.It's a good thing you don't read the stickies, you might of learned something.Poverty produces creativityComment
-
Way cool! Now you've given me some ideas.~Jeff
1988 Festiva LX Silver 5speed. 219,000 miles. My new daily driver.
1988 Festiva L Plus Red 2brl 4speed. 504,477 miles and holding till I get the speed-o fixed.
2003 Mustang GT 5speedComment
-
Its not actually printed on the plexiglass. I downloaded the graphic that I made up for the face onto a pen drive and took it to the school print shop. First we tried printing it on transparency, so I could backlight it, but because there was so much black it kept jamming the machine. So we wound up printing it on some kind of high quality adhesive paper for which they charged me $1.50 plus tax. So all I had to do was peel off the back of the paper and line everything up, and then just stick it to the plexiglass. Since it isn't transparent it can't be backlit, but as it turns out that will make my life much easier anyway because the top of the little cover/window thing already has the lights in it for toplighting, so all I have to do for lighting is wire those up to the old illumination wires.Originally posted by muscle_Car1
As for a write-up, I'll definitely do one once the whole thing is done. I have everything put together now, but until I do a whole lot of electrical tracing and wiring, the only thing that will work is the speedometer. The good news is that I'm finally learning not to rush through project without taking the time to document what I'm actually doing, so I will have pictures to use once write-up time gets here. Also, if anyone wants the graphic I made for the face I have a correctly scaled version (which may or may not print out with the correct scale, as I found out the hard way). Just PM me or email me if you want the graphic. I promise that if you use Protege BP gauges that everything will fit.No festiva for me ATM...Comment
-
Did you consider doing another color like white or something that was transparant? It looks like a nice set up though!Comment
-
I wanted transparent blue writing on a black field... looks normal during the day, with lights on at night its backlit. I tried inverting the colors and printing it with black writing on a white background... the printer couldn't get enough white on there to make it a solid enough color that you wouldn't see all the wiring and stuff in behind.No festiva for me ATM...Comment
-
So you want it to look like the newer VW gauges?It's a good thing you don't read the stickies, you might of learned something.Poverty produces creativityComment
-
That looks awesome!! Do you think you will have any difficulty trying to get everything wired up correctly?Paul
91GL
Menomonee Falls, WIComment
-
past tense now... I wanted it to look like the new VW gauges... I have already accepted the fact that for now it will have to stay toplit like my original cluster.Originally posted by muscle_Car1
the art of actually running the wiring will be the most difficult part... I'm thinking about trying to make my own plugs that plug into the stock festy dash plugs, but I'm not entirely certain how I'm going to do it yet. I already have a wiring diagram drawn up using what I found from the circuit board of my car, plus a little help on the tach wiring from the pics of w/tach circuit boards that muscle_Car1 posted, so I pretty much know which wires need to go where... now all I gotta do is figure out how to get them there :shock:Originally posted by PaulLehrNo festiva for me ATM...Comment
-
I took apart my escort gt gauges today.
Doesn't look like it will work
Looking at the back of the PCB, you might be able to make plugs outta your old PCB, either with or with out a tach, then just solder the wires on to the PCB.
:idea:
:idea:
:idea:
:idea:
Finally a use for those clusters. :idea:It's a good thing you don't read the stickies, you might of learned something.Poverty produces creativityComment
-
whats wrong with the escort gauges that they won't work?... and I won't be able to use my plugs from the circuit board, it didn't have a tach, so it doesn't have plugs in all the places that I need plugs...No festiva for me ATM...Comment
Comment