 Tweet
Tweet
To position the engine, you can bolt the stock festiva bracket and engine mount to the b6t, but space it from the block about 60mm. Then use the stock Festiva engine mount, bolted up like it normally does. This moves your engine 60mm forward. Now, straighten up the engine/trans to be parallel and you'll see how much you need to clearance the left frame rail in order to get it to fit. This should center your diff properly for Capri turbo axles.
-
Driving for me is neither a right nor a privilege. Driving is my passion, as it was for the people who invented the automobile, the people who paved the first roads and the people who continue to improve the automobile. Please respect this passion. -
This is an example of spacing the stock engine mount bracket. This is only 36mm though. You'll need to go further forward with the g series trans.
You'll need to remove the Capri engine mount bracketry. It's a boat anchor anyway.Driving for me is neither a right nor a privilege. Driving is my passion, as it was for the people who invented the automobile, the people who paved the first roads and the people who continue to improve the automobile. Please respect this passion.Comment
-
I have mounted similar to how you describe Charlie. Have modified the Capri crossmember, instead of using the B3 crossmember, so the engine is sitting lower. Gearbox is now almost touching frame rail, only 1 - 2mm clearance so will be giving the rail massage. Will take some pics and post in coming days. Turns out the (ford laser auto) motor I'm using is not a B6D, it's a B6ZE. Have bolted the turbo, exhaust manifold to it, and keeping the B6ZE VLIM intake and throttle body for the time being. Using B6T sump. With where engine is sitting, there's enough clearance without modification to brake master cylinder/booster.
Today I removed the rear beams from the 1988 DA 121 and 1998 DW 121. Sorry for poor quality comparison pic!

They are very similar. Bolt holes to chassis line up. DW beam is slightly heavier, most of that extra weight is in the larger diameter brake drums (250mm). Looks like it will add 15mm to rear track width.
Front mounts of the rear beams are set up differently, but bolt holes to chassis all line up -
1988 DA

1998 DW

Front struts look identical between DW and DA. DW lower control arms are identical to Aspire LCA. I'm assuming the front spindles/discs/rotors are also the same as Aspire. .
So front and rear DW suspension/brakes are direct bolt on upgrade to DA 121/festiva. DW 121 has a 50mm lower ride height than DA 121, but is also approx 150kg heavier. Cant confirm until I can drive it, but am expecting a firmer ride with slightly lower ride height compared to a standard DA 121. Should suffice until I can sort the advanced suspension upgrades.Last edited by reddragon; 12-15-2016, 07:13 AM.Comment
-
I've mounted mine so the trans only just touches the frame. I then used the bfh to massage the frame in order to get the desired clearance (I reckon I have 3/8").Originally posted by Advancedynamix View Post
I need to re-measure but I'm pretty sure I'm more than 7mm off centre.1988 MAZDA 121- B6T + G5MR SWAP IN PROGRESS.Comment
-
Maurice, you should be good to go then. After talking with a few other guys, that are making mounts for the g series swap, I've realized that the cross member I used for the LeMons race car was from an 89 auto, and that might be why the tranny ended up being further to the left than I anticipated. If your tranny end cover was right up against the frame rail before clearance, you'll be fine.Driving for me is neither a right nor a privilege. Driving is my passion, as it was for the people who invented the automobile, the people who paved the first roads and the people who continue to improve the automobile. Please respect this passion.Comment
-
Charlie, any advantage/disadvantage to how the later model 121 rear beam attaches to it's mount with a vertical bolt? Heres a better pic


Comment
-
Wow!!!!!Originally posted by reddragon View Post
That doesn't look like it'll have too much articulation!1988 MAZDA 121- B6T + G5MR SWAP IN PROGRESS.Comment
-
Roger that Charles!Originally posted by Advancedynamix View Post
Many thanks for the quick confirmation 1988 MAZDA 121- B6T + G5MR SWAP IN PROGRESS.
Comment
-
I'm trying to think of an advantage and the only thing I'm coming up with is safety, longevity or cost of manufacture. I can't see a performance advantage, but that doesn't mean there isn't one. We didn't get any of those cars here, so I'll have to skip over to AU to test this out.Originally posted by reddragon View Post
A little twist at that joint goes a long way where the axle centerline is. It's common for control arms to have vertical bushings like this. I can't say it's superior though, as this style of bushing seems to fail sooner than the horizontal style.Originally posted by moz View Post
You're welcome.Originally posted by moz View PostDriving for me is neither a right nor a privilege. Driving is my passion, as it was for the people who invented the automobile, the people who paved the first roads and the people who continue to improve the automobile. Please respect this passion.Comment
-
Comment
-
I personally prefer the original da setup.
If you want the bigger brakes but want to retain the original bracket style, you can always get the rear beam out of a wb or wd festiva.1988 MAZDA 121- B6T + G5MR SWAP IN PROGRESS.Comment
-
DW platform is the third evolution of festiva. Lets not get carried away, circle of life aside. But the interchange of this rear beam is probably more important than Simba was in the Lion King.Comment
-
Modified Capri turbo crossmember for G series into 1988 Mazda 121

287mm is measured from side of flange to center of hole
250mm is measured from side of flange to centre of hole
130mm is measured from centre of hole to centre of hole
The hole on bottom right of picture, buried under all those arrows, bolt through this to where corresponding hole on original crossmember goes. The gearshift brace should slide straight on to it's locator bolt. The gearshift linkage should be the right length, but needed to cut it, rotate 90 degrees and then reweld it.
The front 2 holes bolt to the modified lower radiator support. I have tapped threads for the bolts into the support. At it's lowest point, this crossmember is level with the main chassis rails.


Front mount is from Capri Turbo. I ground off the welds, cut the flange down a bit to lower engine, then welded it back on.
Rear mount is standard Capri Turbo rear mount.
Side mount,was sitting a bit crooked in it's bracket, so I ground the weld off one side, bent it a few degrees then rewelded it. .

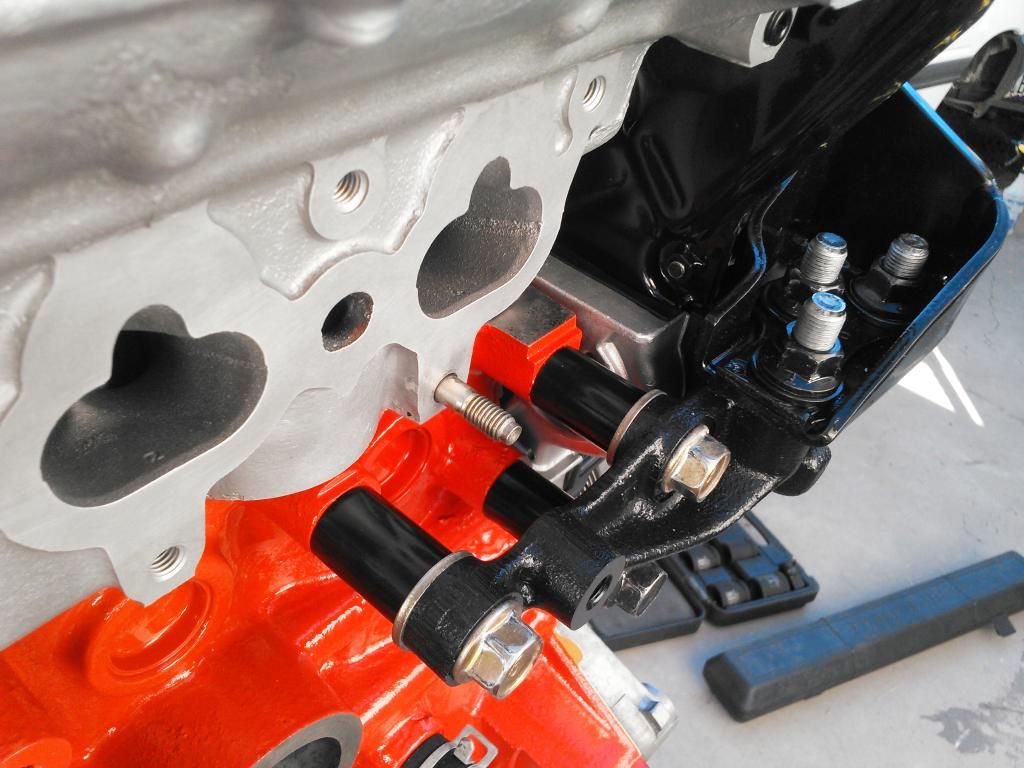
Here I have cut 3 pieces of 25mm diameter 2mm thick steel pipe, 55mm long. Welded these to the standard engine bracket and painted it black, just so it wouldn't be too obvious that spacers were used.Last edited by reddragon; 12-16-2016, 10:07 AM.Comment
-
A Festiva by any other name is still 800KG of better handling!
I'm following the engine mount posts...Last edited by Greywolf; 12-16-2016, 10:31 AM.Most people don't drive what they want at all, and never willComment
-
Subbed!
Sent from my SM-G930T using TapatalkComment


Comment