Announcement

Collapse
No announcement yet.

Front Alignment toe-in specs?

Collapse
X
 
  • Filter
  • Time
  • Show
Clear All
new posts

  • Front Alignment toe-in specs?

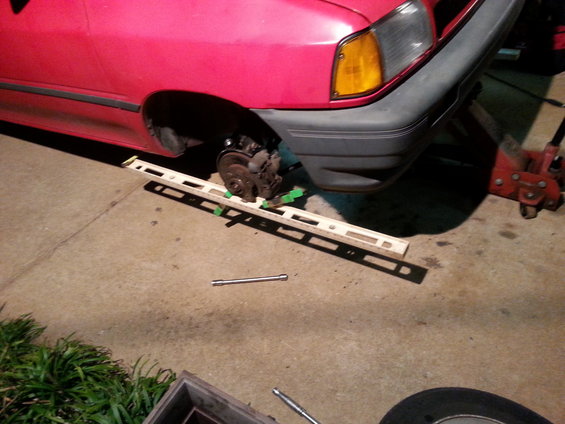
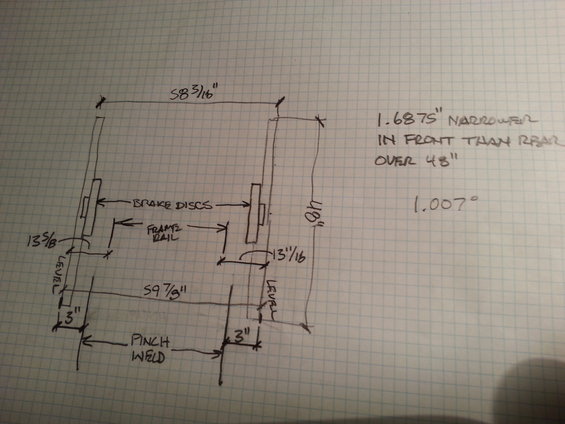
    So I've set up a primative alignment tool consisting of two plastic 48" long levels clamped to the rotors.

    The levels are approximately centered on the rotors and I centered the steering wheel and have adjusted the rear of the level to be 3" from the rocker panel pinch weld.

    I've checked the distance from the framerail at the rear of the rotor to the outside of the level and have 13 5/8" on the driver's side and 13 11/16" on the passenger side.

    The end of the level at the rear is 59 7/8" out to out and at the front is 58 3/16" out to out. The difference is 1.6875" narrower in front to rear.

    I plotted this out in Autocad can came up with 1.007* toe-in.


    1963 Fairlane - future NSS drag car
    1965 Mustang Coupe - A-code car, restoring for/with my son
    1973 F100 longbed - only 22k original miles, 360/auto, disk, PS/PB dealer in dash A/C
    1996 Sonoma X-cab - son's DD
    2002 Grand Prix - daughter's DD
    2003 Sport Trac - 180k, 130k on replaced motor with new timing chains - F/S soon.
    2005 Accord - wife's DD
    2008 Mountaineer - step daughter's DD
    2015 F150 SCrew - DD

  • #2
    holy crap!!!! 1* is WAY too much, but then again, you're measuring the toe at full droop... and that's not how it works. the suspention has to be at ride hight. having it at full droop drasticly changes the geometry. if you have 2 steel rims without tires, mount them and let them sit on blocks of 4x4 wood, then take your measurements. you want to have a total toe-in measurement in the 0.1-0.2 range, or toe-out of 0.06-0.16. a 0* toe setting will make the car a bit squirrely or feel un-planted.
    Trees aren't kind to me...

    currently: 2 88Ls (Scrappy and Jersey), 88LX, 90L(Pepe), 91L, 91GL (Skippy) 93 GL Sport (the Mighty Favakk), 94 (Bruce) & 95 Aspire SEs, 97 Aspire (The Joker),
    94 Justy 4WD, 87 Fiero GT, plus 2 parts cars. That's my fleet.

    Comment


    • #3
      I don't have bare rims otherwise I would have. The plan is to drive it to the tire shop for new tires all the way around (Kumhos) and a 4 wheel alignment. I guess I could put jackstands under the lower ball joints.
      1963 Fairlane - future NSS drag car
      1965 Mustang Coupe - A-code car, restoring for/with my son
      1973 F100 longbed - only 22k original miles, 360/auto, disk, PS/PB dealer in dash A/C
      1996 Sonoma X-cab - son's DD
      2002 Grand Prix - daughter's DD
      2003 Sport Trac - 180k, 130k on replaced motor with new timing chains - F/S soon.
      2005 Accord - wife's DD
      2008 Mountaineer - step daughter's DD
      2015 F150 SCrew - DD

      Comment


      • #4
        meh.... :wince: that's not gonna do it. It'll get you closer but too much weight will be pushed tward the rear with that method. now if there was a jig that you could mount to the hub face and then sit that unit onto the stands, you'd increase the weight transfer to the front and get the geometry closer to ride hight normalicy. think of it like a pipe extention that protrudes from the hub center that you could put the stands under. doing so makes the front suspention do all the work it's supposed to.

        doing it the way you have pictured forces an excessive toe out condition.
        Trees aren't kind to me...

        currently: 2 88Ls (Scrappy and Jersey), 88LX, 90L(Pepe), 91L, 91GL (Skippy) 93 GL Sport (the Mighty Favakk), 94 (Bruce) & 95 Aspire SEs, 97 Aspire (The Joker),
        94 Justy 4WD, 87 Fiero GT, plus 2 parts cars. That's my fleet.

        Comment


        • #5
          So sit the hub on the stands? That would prevent my nifty levels from being used as straight edges.

          I knew it would be wrong, but I didn't know which way. Also, I don't know if the pinch welds or frame sections are parallel to the direction of the car. My other problem is, none of my tires have tread left so measuring the grooves fore and aft doesn't work.
          1963 Fairlane - future NSS drag car
          1965 Mustang Coupe - A-code car, restoring for/with my son
          1973 F100 longbed - only 22k original miles, 360/auto, disk, PS/PB dealer in dash A/C
          1996 Sonoma X-cab - son's DD
          2002 Grand Prix - daughter's DD
          2003 Sport Trac - 180k, 130k on replaced motor with new timing chains - F/S soon.
          2005 Accord - wife's DD
          2008 Mountaineer - step daughter's DD
          2015 F150 SCrew - DD

          Comment


          • #6
            pinch welds SHOULD be parallel, but you should measure to make sure.

            personaly, i think you're making this more complecated than it is. an alignment should be done with a ruler, 2 strings and something to suspend the string with parallel to the body and wheels. this winter, i'll have to make a video on how to do this.
            Trees aren't kind to me...

            currently: 2 88Ls (Scrappy and Jersey), 88LX, 90L(Pepe), 91L, 91GL (Skippy) 93 GL Sport (the Mighty Favakk), 94 (Bruce) & 95 Aspire SEs, 97 Aspire (The Joker),
            94 Justy 4WD, 87 Fiero GT, plus 2 parts cars. That's my fleet.

            Comment


            • #7
              Everyone seems to have a favourite technique for this and I do something similar to you and with a 4 foot piece of aluminum bar stock and a piece of chalk. I set the steering wheel straight first off and then aim the driver's side front wheel for the back. Just in case, I do drop the car to the ground after every adjustment and then measure again. Ultimately (you do know that outer tie-rods can be adjusted in or out via turning the inners while holding the outers?) the toe-in or toe-out should be marginal, and, the car tracks straight when the steering wheel is horizontal. No doubt there are definitive specs for this but I merely try to get as close to '0' as I can get.

              Comment


              • #8
                Well, its going this weekend for the alignment. I was just trying to see how close I can get it. With the aluminum wheels, maybe I should make a set of hooks to put thru the holes and a set of blocks to set the levels off the face of the wheel. Ultimately, a set of trammels and aluminum angle would probably be better.
                1963 Fairlane - future NSS drag car
                1965 Mustang Coupe - A-code car, restoring for/with my son
                1973 F100 longbed - only 22k original miles, 360/auto, disk, PS/PB dealer in dash A/C
                1996 Sonoma X-cab - son's DD
                2002 Grand Prix - daughter's DD
                2003 Sport Trac - 180k, 130k on replaced motor with new timing chains - F/S soon.
                2005 Accord - wife's DD
                2008 Mountaineer - step daughter's DD
                2015 F150 SCrew - DD

                Comment


                • #9
                  New set up, put car down, rolled back and forth, put on set-up, dropped plumb bob at each corner, measured 69 1/8" at rear and 67 7/8" up front.

                  Drafted up in Autocad, .75* on each side. That said, do you add the toe in? So since it's .75* per side is it 1.5* total? I mean if I turned the wheel to get one side at 0*, the other side would be 1.5*. I'm going for the 0.1*-0.2* toe-in.

                  1963 Fairlane - future NSS drag car
                  1965 Mustang Coupe - A-code car, restoring for/with my son
                  1973 F100 longbed - only 22k original miles, 360/auto, disk, PS/PB dealer in dash A/C
                  1996 Sonoma X-cab - son's DD
                  2002 Grand Prix - daughter's DD
                  2003 Sport Trac - 180k, 130k on replaced motor with new timing chains - F/S soon.
                  2005 Accord - wife's DD
                  2008 Mountaineer - step daughter's DD
                  2015 F150 SCrew - DD

                  Comment


                  • #10
                    yeah, toe is additive (+ for toe in, - for toe out). i like what you did there with the level. most important measurement of that set-up you have is between the level and the lip of the rim (front and rear), they MUST be even to give accurate total toe measurements.
                    Trees aren't kind to me...

                    currently: 2 88Ls (Scrappy and Jersey), 88LX, 90L(Pepe), 91L, 91GL (Skippy) 93 GL Sport (the Mighty Favakk), 94 (Bruce) & 95 Aspire SEs, 97 Aspire (The Joker),
                    94 Justy 4WD, 87 Fiero GT, plus 2 parts cars. That's my fleet.

                    Comment


                    • #11
                      I checked with a tape, again, it's going to the shop to get done right, just wanted to get close to perfect as I could. Recognize the spacers holding the levels off the wheels?

                      I took it for a drive and it felt great. The steering wheel is slightly turned to the left when going straight, hoping the shop will correct that.

                      Tomorrow I drop the rear beam and install my new one in. Then, onto the master cylinder replacement on the '73 F-100, possibly adding power brake booster as well.
                      1963 Fairlane - future NSS drag car
                      1965 Mustang Coupe - A-code car, restoring for/with my son
                      1973 F100 longbed - only 22k original miles, 360/auto, disk, PS/PB dealer in dash A/C
                      1996 Sonoma X-cab - son's DD
                      2002 Grand Prix - daughter's DD
                      2003 Sport Trac - 180k, 130k on replaced motor with new timing chains - F/S soon.
                      2005 Accord - wife's DD
                      2008 Mountaineer - step daughter's DD
                      2015 F150 SCrew - DD

                      Comment


                      • #12
                        Originally posted by FestYboy View Post
                        i like what you did there with the level.
                        I think it may be borderline genius. Right at dead center of the wheel, and the plumb bob gets it to the ground the same. If you get it equal distance from the lip, like you said, that should be plenty close enough.

                        Stock Festy on 12's are supposed to be, what, 1/8 inch of toe in on each side? Set it. Go to shop, double check. If it is right, never pay for another alignment!

                        To double check your self, you can roll it back a bit, roll it forward straight, bounce the bumper a few times, set it all up, and measure again. THEN have a shop check it.

                        I THINK I got that right
                        Contact me for information about Festiva Madness!
                        Remember, FestYboy is inflatable , and Scitzz means crazy, YO!
                        "Like I'm going to suggest we do the job right." ~Fecomatter May 28 2016.

                        Comment


                        • #13
                          FREAKING FROZEN TRAILING ARM BUSHING BOLTS!!!
                          1963 Fairlane - future NSS drag car
                          1965 Mustang Coupe - A-code car, restoring for/with my son
                          1973 F100 longbed - only 22k original miles, 360/auto, disk, PS/PB dealer in dash A/C
                          1996 Sonoma X-cab - son's DD
                          2002 Grand Prix - daughter's DD
                          2003 Sport Trac - 180k, 130k on replaced motor with new timing chains - F/S soon.
                          2005 Accord - wife's DD
                          2008 Mountaineer - step daughter's DD
                          2015 F150 SCrew - DD

                          Comment


                          • #14
                            Originally posted by Larry Hampton View Post
                            FREAKING FROZEN TRAILING ARM BUSHING BOLTS!!!
                            Too bad we aren't in the arena!

                            Dude, are you equipped to handle this?
                            Contact me for information about Festiva Madness!
                            Remember, FestYboy is inflatable , and Scitzz means crazy, YO!
                            "Like I'm going to suggest we do the job right." ~Fecomatter May 28 2016.

                            Comment


                            • #15
                              I was going to just go to LKQ and get a new mount, but judicious amounts of PB blaster and two 2.5lb hammers and I was able to persuade the offending bolt out. Cleaned it up with wire cup brush, taped the threads and painted it black. Used 80 grit sticky back on a smaller drill bit to ream the rust out of the new axle's bushing and lubed that bolt up with anti seize. Its all back together, rear brakes bled, gonna do the fronts tomorrow so it'll have all new brake fluid.

                              It'll get a 4 wheel alignment and 4 new Kumho 12's. I'll bet no one knew that when using an Aspire beam and axles with modified Festy backing plates and Festy drums that you have to use Aspire dust caps and they're too deep for the aluminum wheel centercaps. Thinking of taking my 4 worst caps (I have 8, two sets of wheels) and remove the metal clip and make some new caps.
                              1963 Fairlane - future NSS drag car
                              1965 Mustang Coupe - A-code car, restoring for/with my son
                              1973 F100 longbed - only 22k original miles, 360/auto, disk, PS/PB dealer in dash A/C
                              1996 Sonoma X-cab - son's DD
                              2002 Grand Prix - daughter's DD
                              2003 Sport Trac - 180k, 130k on replaced motor with new timing chains - F/S soon.
                              2005 Accord - wife's DD
                              2008 Mountaineer - step daughter's DD
                              2015 F150 SCrew - DD

                              Comment

                              Working...
                              X