Several reasons. Based on Advancedynamix's R&D, much strengthened front end for better handling and the ability to move the radiator forward. Rad forward allows moving the engine forward allowing more power to be put to the ground during all conditions through better traction.
After getting the stock support off it became obvious to me the need for more strength and/or a stiffer front end.
It is also removable for easier engine removal/work etc. plus more room for intercooler. Got a couple ideas on that one already.
-
You need a lathe or a jig to grind the shanks down! But having the proper drill helpsLeave a comment:
-
Went to Fastenal and all they had was one for 1/2". No worries, my cousin is letting me borrow her drill. Dropping it off in the morning, drill after work, then take it back in the evening. I will have some more pics tomorrow night.Leave a comment:
-
Dangit !!! If there is anything I hate more than anything else: not having the right tools for a job. I understand needing the proper sized drill bit which I got today. Only when I got home that I realized I don't have a HD 1/2" drill to make the holes needed. Hmmmm maybe a trip to Lowes is in order, though that will cut into car funds. I was really hoping to have the lower brace done this evening. RUBBISH !!!!!Leave a comment:
-
Omg! Gomez. Talk about divine timing!!!
I'm going to be doing this soon too, and have been looking for a how to guide. Thank you for posting
What size angle iron ate you using?
Could you document how you relocate the rad?
Very happy to have seen this. You've made my dayLast edited by moz; 04-07-2014, 02:47 AM.Leave a comment:
-
I do intend on doing the exact same mod so seeing this gives me more ideas on how I will do mine
Leave a comment:
-
It will be removable. I just had to stop here because I didn't have a drill bit beg enough for the 14 mm bolts to hold it on. Also thinking about a couple 1/2" locating pins on each side. Once the bolts are in I will weld the cross brace to these. It is as close to what Charlie has that I can come up with. It will allow moving the rad further forward and thus the engine.
It really is amazing how much each side of the front end flexes w/o the lower support in place. Makes it much easier to see what Charlie is talking about how good this mod really is.Last edited by Gomez; 04-06-2014, 08:06 PM.Leave a comment:
-
Are you basically going to use just that section of angle iron for the lower rad support? I'm assuming it'll be removable as well?Leave a comment:
-
Once I get done with this the plan is to get the car back on wheels. I need to send the Teins back for a revalve and then to Charlie for some modding. I am trying to find the rear drums Charlie recommended but ain't happening. As soon as I find a set I will get them redrilled. All of the new bushings and stuff are on their way. Pretty much waiting on some machine work to get 'er rollin'. Hopefully in the next month or two it will be on all fours once again.
I did some calculating and some talking with the wife. It looks like the finished product will be around December. That's including engine work and all of my other trimmins'. So that will give me a couple extra Ohio months to finish things up. lolLeave a comment:
-
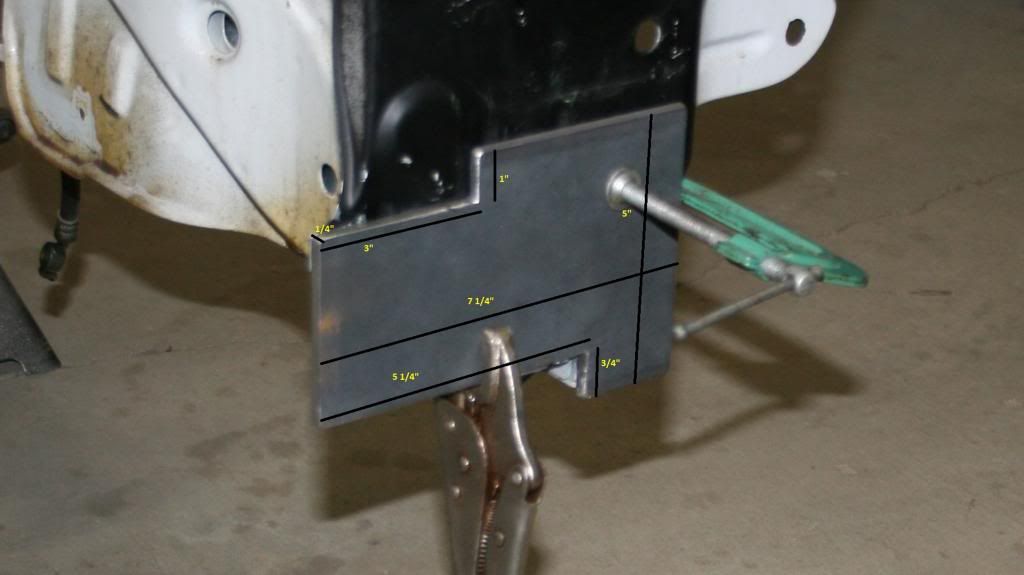
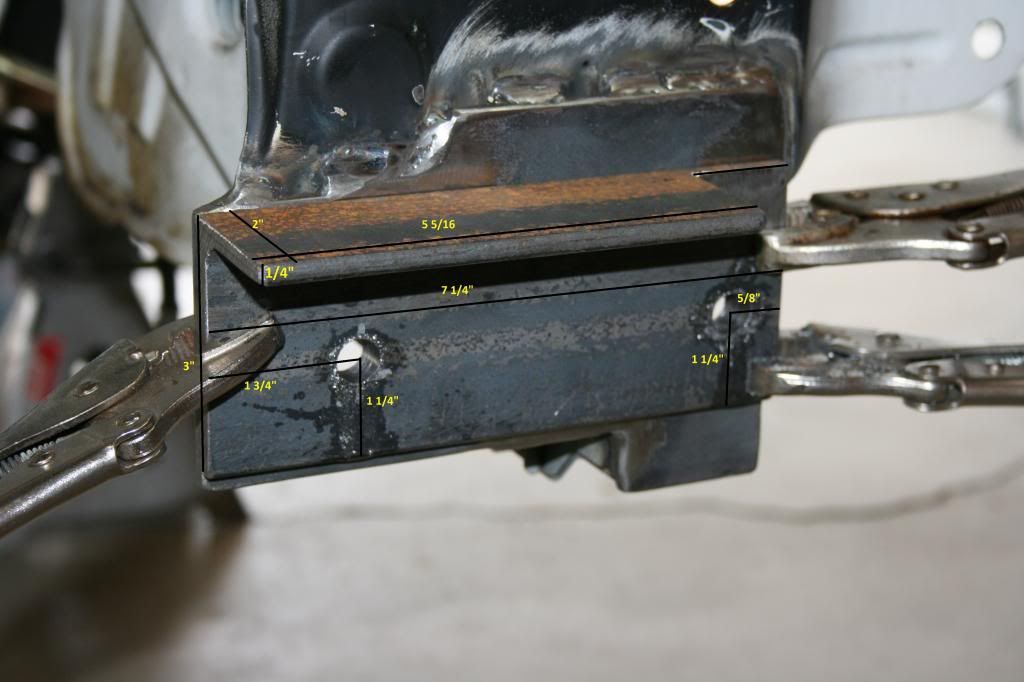
Start of lower radiator support

some dimensions. these are the numbers that worked for me. use them as a guideline if you want to tackle it. right and left needed
I will be working on it again shortly (tomorrow or Tuesday when I get a bigger drill bit for the mounts). I will get more pics as welding gets done. My welds aren't the prettiest. I was gonna hire a welder coworker but I really want to do it all myself.Leave a comment:


Leave a comment: