Announcement

Collapse
No announcement yet.

rmoltis build thread 96 aspire

Collapse
X
 
  • Filter
  • Time
  • Show
Clear All
new posts

  • today i got some car parts sent out to be worked on.

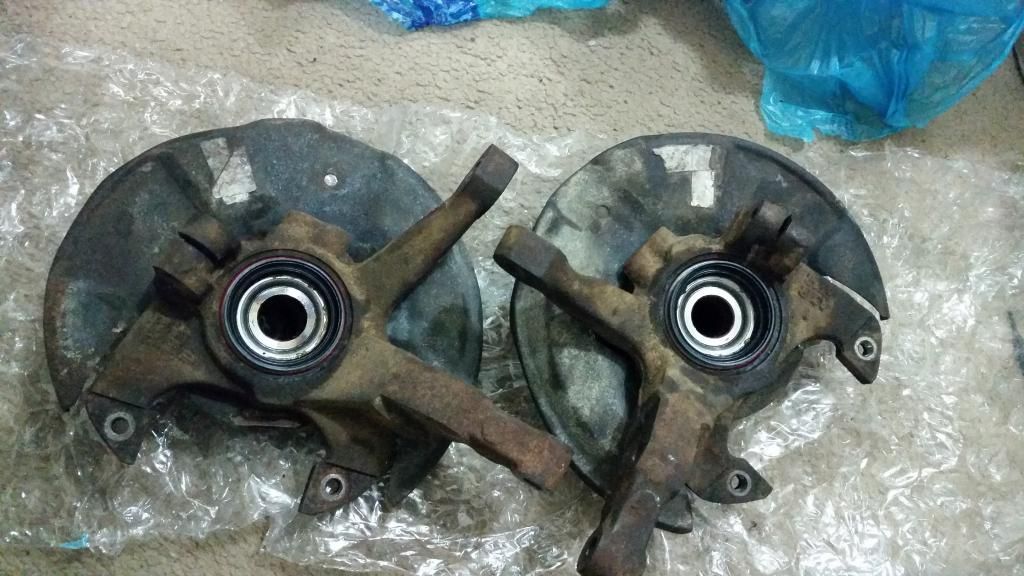
    i took both hub/knuckle assemblies and sent them out to be professionally rebuilt.
    which means they should make a new preload washer for each side to match the new bearings.
    they will also sandblast and paint them for me so that they might have the chance to survive another 20 years lol.

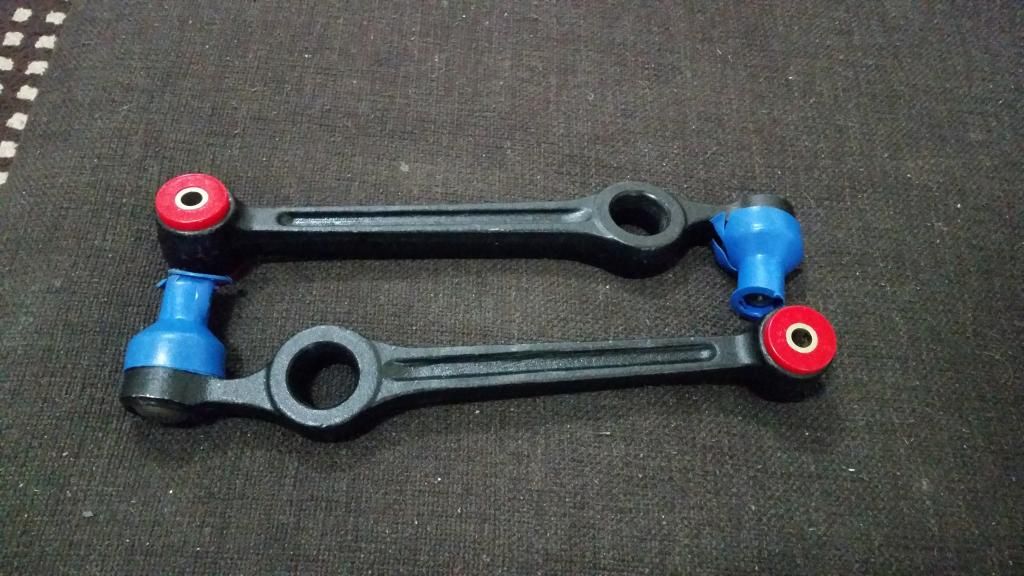
    i also bundled my new control arms in there.
    so that he can press out the new oem inner bushings and sleeve .
    then press in the new nolathane inner control arm bushings and sleeve.

    once those items are done and mailed back to me it will probably be after the christmas holiday trip to seattle i am taking for a few weeks.
    from there i will have almost everything i need except for coil spring isolators all around ((front+rear)+top&bottom).

    things keep slowly moving forward.
    i am very anxious to get this whole project finished, aligned, then test driven .
    ive just been to busy with work, and the cold weather.
    Last edited by rmoltis; 12-18-2014, 12:22 PM.
    Running 40psi.....in my tires.


    http://aspire.b1.jcink.com/index.php?showtopic=611&st=0

    Comment


    • Received my rebuilt knuckles today.


      I've never had my front knuckles rebuilt before.
      they look great and rotate smoothly.
      I bet they will make a difference in how the car coasts or rolls.
      Especially since the rears were done after I bought the car.
      how long would you guys says it would last for before I should check it again.


      And my new control arms with the new Nolathane inner bushings and sleeves pressed in.


      My outer control arm bushings are in the aspire at my friends garage or else
      I would have test fitted them for this picture.
      I'll get that picture later.
      Last edited by rmoltis; 01-20-2015, 03:10 PM.
      Running 40psi.....in my tires.


      http://aspire.b1.jcink.com/index.php?showtopic=611&st=0

      Comment


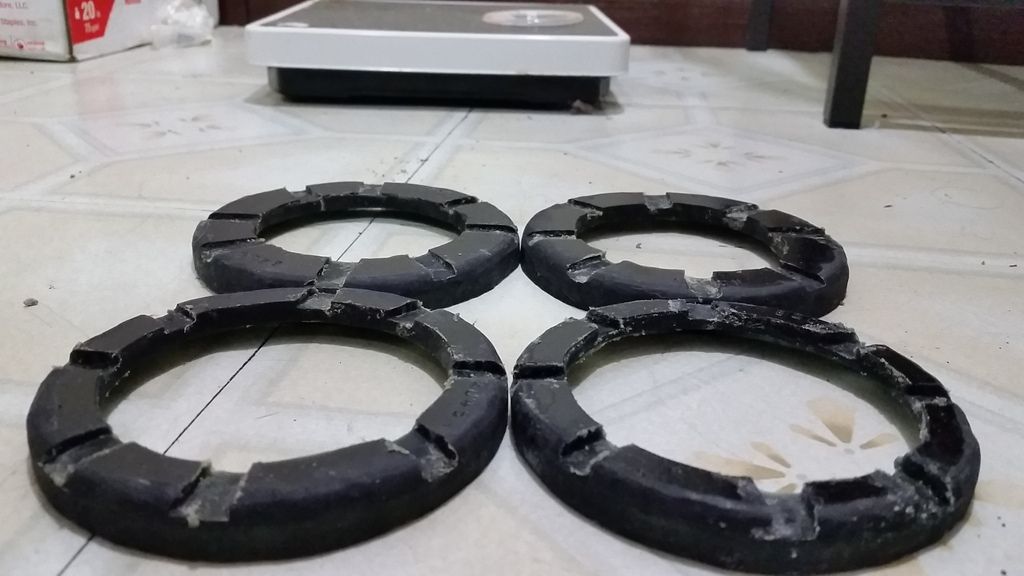
      • Ive been searching for these for quite some time now and have come to terms with the fact that there are none left.

        I have been looking for comparable replacements that can be made to work/universal.

        I tried energy suspension first because they have an assortment of universal coil spring isolators in polyurethane.

        Unfortunately none of the universal isolators dimensions were a close match to the oem ones sitting in front of me.
        I would find one with 1 or 2 correct parameters but there would always be one off that made in incompatible or even able to be trimmed.

        But i think i have found my best bet.
        They are "coil spring pads" they are made of elastomers which should have plenty of give to absorb "nvh"
        But yet stiff enough to be usefull.


        The inner circle hole is smaller than oem,
        the outside diameter is bigger than oem,
        but the thickness at 12mm is as thick as my oem ones, or pretty close anyways.
        all of this means i can trim them to size.
        Could probably even have them machined to hold the spring in some grooves.
        But I'm good with them just being flat.

        Hope this information can help others possibly looking for an obsolete part.
        When i get them trimmed up and installed after they arrive. i will post some pics.
        Last edited by rmoltis; 02-02-2015, 01:25 PM.
        Running 40psi.....in my tires.


        http://aspire.b1.jcink.com/index.php?showtopic=611&st=0

        Comment


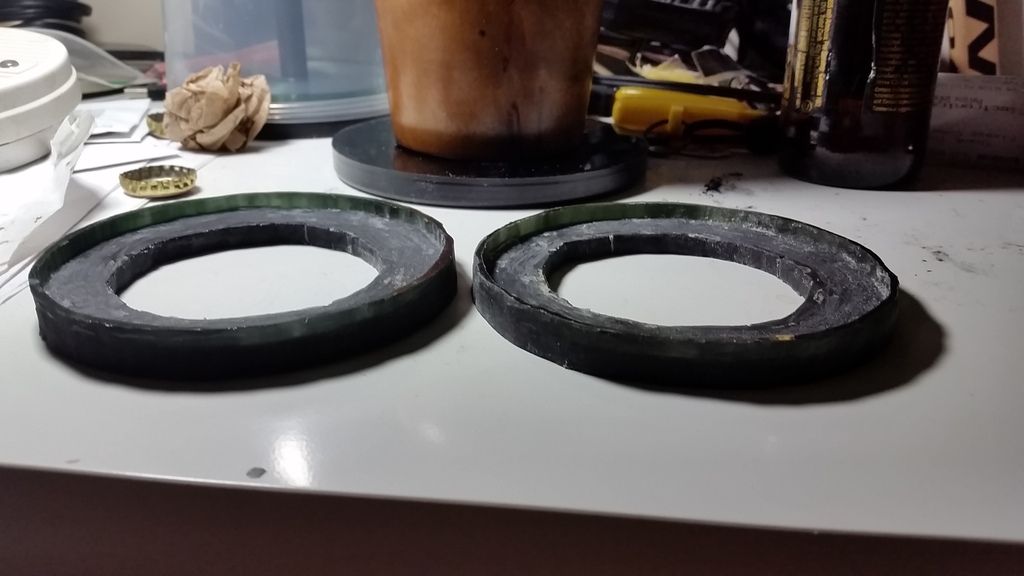
        • So I finally had some time today to get a sample started with these pads.
          I decided to start with one of the front upper isolators.

          I started by getting i.d. gages to measure spring perches and a set of calipers for measuring the struts and other things.

          Then once all measurements were down and on paper I proceeded to use a razor blade line to mark the inside and outside diameters of the circle.
          as well as the raised wall thickness on the sides.

          I took my dremel with the little router end attachment.
          set the depth relative to the thickness of what I wanted the pads to be.
          The. I started from the inside outwards.
          I did this to have a stable platform for the router head to stay flat on as I worked my way outwards.
          I used a water bottle with a pinhole drilled in it to keep the elastomer cool while working.
          I would squeeze spray the water.
          Then once the rough carving was done.
          I proceeded to do the fine edges of the traced circle.
          Especially since this part has tolerances.

          Then after all that I took a jigsaw with a plastic cutting blade and turned it up on medium high speed.
          I cut the outer circle flush first.
          Then I cut the inner circle last.

          Once cutting was done I took my dremel head and carved everything flat and smooth.

          And here is the finished product. It only took me a few hrs to make lmao. Just 5 more to go.
          Best part is that these are an upgrade over stock. It is stiffer yet still squishy like rubber.
          Should last a long time.


          I will be test fitting them tonight or tomorrow. And will fine tune it's shape to fit before installation.

          Who says people don't make things by hand anymore!
          Last edited by rmoltis; 04-13-2015, 07:19 PM.
          Running 40psi.....in my tires.


          http://aspire.b1.jcink.com/index.php?showtopic=611&st=0

          Comment


          • So that is to avoid noise? It's interesting anyway.
            Last edited by sketchman; 04-13-2015, 07:51 PM.
            Any difference that makes no difference is no difference.

            Old Blue- New Tricks
            91 Festiva FSM PDF - Dropbox

            Comment


            • The coil spring isolators are for isolating noise and vibration.
              But their main function is.

              Most springs aren't machined flat where they lie against the spring perch.
              And what happens when the spring gets compressed is that it distributes it's forces unevenly upon the spring perchs.
              Which can cause deformation of perches in the long run.

              The isolators job is to help distribute these forces more evenly in a circle upon the perch.

              Also if I can avoid the metal to metal contact between the springs and the struts and perchs.
              I can help reduce the chance of wearing through the paint and having my springs or struts, or body rust out sooner.
              And these stiffer springs I'm installing lose maybe 1/4" even though they are standard height. So these pads I engineered with 1/4" thickness on top and bottom to help compensate.


              On a side note I test fitted it tonight and it fits like a glove.
              Last edited by rmoltis; 04-13-2015, 08:18 PM.
              Running 40psi.....in my tires.


              http://aspire.b1.jcink.com/index.php?showtopic=611&st=0

              Comment


              • Got a 2nd one done yesterday as well as touching up/smoothing out the first one.
                Just need 4 more rear uppers and lowers.
                Although I am considering just making a set of 4 uppers.
                It would shave 6hrs off the "machining" process.


                Now that I've done my 2nd one and have noticed that this process is easily repeatable.
                My 2nd one has almost the exact same dimensions as the first.
                (These can't be perfectly made by hand and eye) they come out a little crude compared to oem parts.
                But the tolerances are perfect and the test fitment was spot on.

                I'm excited to see my long journey to get a set of these made is coming to an end.
                Last edited by rmoltis; 04-16-2015, 06:53 AM.
                Running 40psi.....in my tires.


                http://aspire.b1.jcink.com/index.php?showtopic=611&st=0

                Comment


                • Got started on my rear upper isolators. I got 1 done today.
                  I started using a bigger version of the same bit I've been using in my dremel.
                  And it seems to be working more effectively.
                  Since the cutting surfaces are wider,
                  It smooths flat wider areas that it touches.
                  So the finished product comes out smoother with straighter edges than the smaller one did.

                  The one on the left is the new one. It came out with the highest quality so far.

                  Running 40psi.....in my tires.


                  http://aspire.b1.jcink.com/index.php?showtopic=611&st=0

                  Comment


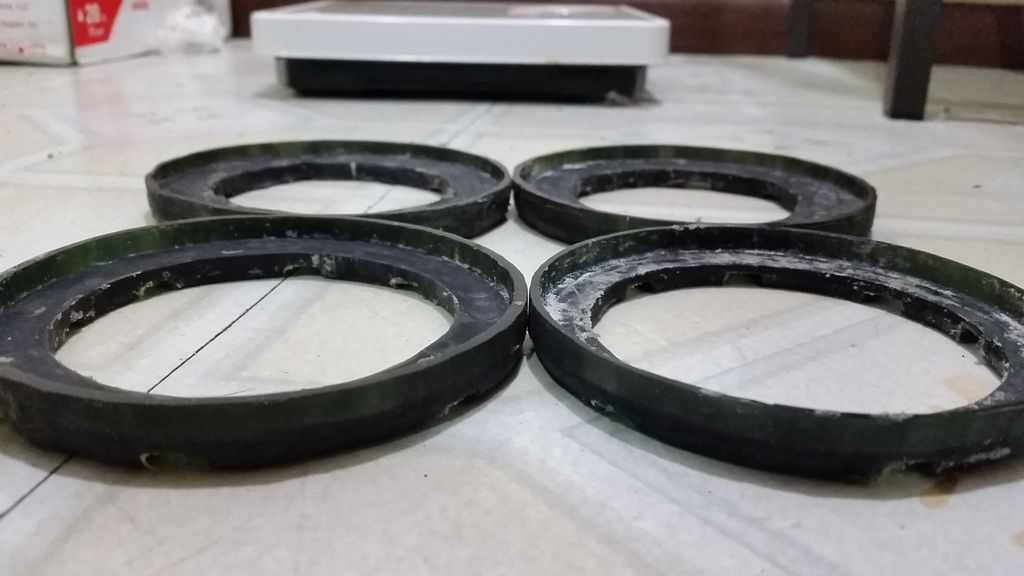
                  • I finally got some spare time to finish up the last isolator.
                    Now I have all 4 done.
                    I rounded the bottom edges and cut some little trenches into the top side of them all.
                    It reduces the amount of dampening material contacting the perchs.
                    Which at slow speed should help absorb smaller vibrations.
                    While the rest above it is still solid for everything else driving.


                    The little trenches were the only part that I did by eye without measuring or placing them.
                    So they are slightly crude lol.
                    Last edited by rmoltis; 04-22-2015, 08:01 PM.
                    Running 40psi.....in my tires.


                    http://aspire.b1.jcink.com/index.php?showtopic=611&st=0

                    Comment


                    • Those look great. Now make molds and sell them.
                      Any difference that makes no difference is no difference.

                      Old Blue- New Tricks
                      91 Festiva FSM PDF - Dropbox

                      Comment


                      • So now that my coil spring isolators have been finished.
                        I put together my strut assemblies.

                        All new parts.
                        Struts, strut bellows, strut mounts, bump stops, elastomer isolators, bearings, king springs, and nuts.


                        The isolators were a perfect fit and look as though they will do a great job.

                        Things will keep moving forward one thing at a time.
                        Last edited by rmoltis; 04-23-2015, 07:52 PM.
                        Running 40psi.....in my tires.


                        http://aspire.b1.jcink.com/index.php?showtopic=611&st=0

                        Comment


                        • Looking good! Your patience and attention to detail are excellent.
                          Driving for me is neither a right nor a privilege. Driving is my passion, as it was for the people who invented the automobile, the people who paved the first roads and the people who continue to improve the automobile. Please respect this passion.

                          Comment


                          • It was a nice day outside and I had no plans.
                            So I went ahead and put some work into my aspire.

                            I started with removing both axles.
                            Went over to the passenger side. Used my big pry bar. And it slid right out.
                            Then I went over to the driver side. Went to pry it. Nothing happenned.
                            Lots of hammering and tapping and prying and wedging before anything happenned.
                            It maybe took an hour or 2 to get it out man what a fight it put up.

                            I finally solved the problem by taking my small pry bar and going through the opening in the transmission support beam and I put 2 1x2 boards stacked up underneath it. And put them in line with the direction I needed to pry.
                            I wedged the pry bar between the wood underneath it and the axle head I was prying on got it to stand vertically.
                            The wood had enough give to get the pry bar handle squeezed onto it.
                            And it held it in place for me under pressure while I tried other things.

                            Eventually at the end while it was still wedged and standing vertical.
                            I took my 12lb sledgehammer and gave the pry bar handle a few good whacks at its farthest point for maximum leverage and impact , figured I could break it loose.
                            It did it ended up popping right out with quite some force and the whole thing fell on the ground.

                            I felt so satisfied lol.

                            Here are the culprits of all my stress for that brief point in time.


                            Next step was installing the control arms along with their new Nolathane polyurethane bushings over the swaybar before bolting them in.


                            Next step was strut assemblies. I made sure to use new bolts where the struts connected to the knuckle assembly. The nuts were still in great shape so I reused them
                            After strut assemblies I proceeded to install the rebuilt knuckle hub assemblies.


                            Here is a nice shot of the passenger new axle along with everything assembled except for the brake system.


                            And here is the driver side axle.


                            And here is a shot of the new Nolathane poly swaybar to frame bushings.
                            I made sure to grease them up good. And will bracket them down
                            as soon as I can order some new nuts for the brackets.


                            All in all it was a good night. I still have some select bolts still not put in place or ordered yet which will be fitted later and torqued down at the end.
                            But the components I am for sure done with have been torqued down today.

                            Next step will be ordering new fasteners, then proceeding to button up the front end.
                            Followed by making my way to the rear suspension.

                            Also I have my transmission drain plug out now for measurement.
                            And I am going to order a dimple magnetic drain plug magnet to replace it.
                            It will come in the mail in the near future I hope.

                            Enjoy guys.
                            Last edited by rmoltis; 04-25-2015, 09:31 PM.
                            Running 40psi.....in my tires.


                            http://aspire.b1.jcink.com/index.php?showtopic=611&st=0

                            Comment


                            • I just ordered my dimple worlds strongest drain plug magnet for my transmission.

                              It was m14x1.5x10 actual size but the site only had m14x1.5x12
                              Which an extra 2mm i think wont be a problem.

                              Cant wait. Once it is here i can refill the trans with new fluid.
                              Running 40psi.....in my tires.


                              http://aspire.b1.jcink.com/index.php?showtopic=611&st=0

                              Comment


                              • Gathered all my bolts and nuts today from my car.
                                They were all separated into labeled ziploc bags for ease of reinstallation.

                                I went to fastenal today and ordered any fasteners I needed to get replaced. All grade 10.9.
                                They will be here within the week. Which will enable me to get the front end buttoned up.
                                As well as the new bolts to get my rear shocks installed into the beam.
                                Running 40psi.....in my tires.


                                http://aspire.b1.jcink.com/index.php?showtopic=611&st=0

                                Comment

                                Working...
                                X