Announcement

Collapse
No announcement yet.

The Canadiana build thread

Collapse
X
 
  • Filter
  • Time
  • Show
Clear All
new posts

  • #31
    So, a bunch of parts that have arrived lately. mostly off rockauto.
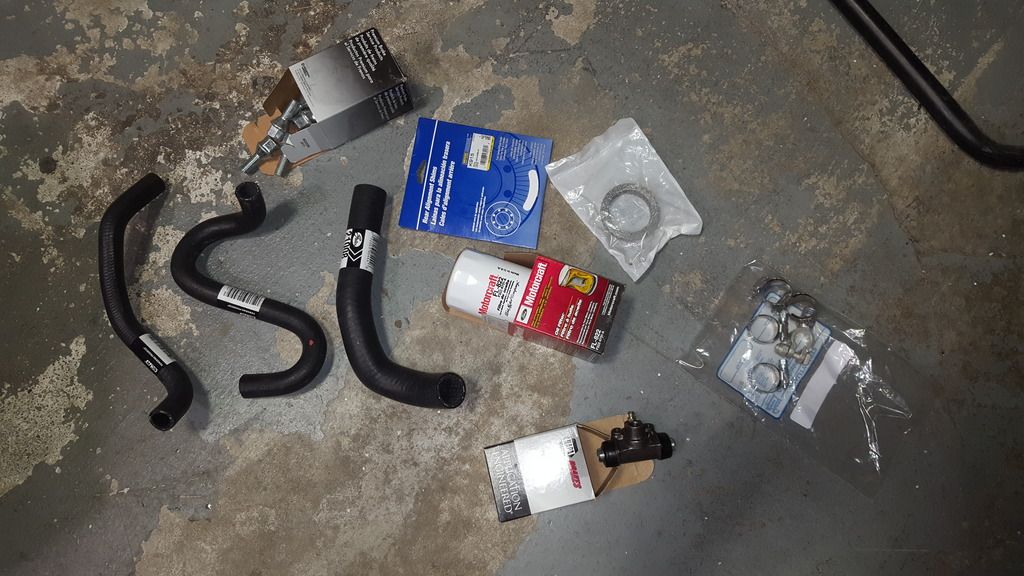
    The big order that was supposed to be everything but wasnt....


    The next order that was mainly for those lug nuts which i had forgotten in the last order. hoseclamps were from a local place because oem ones were expensive and a long wait to get.


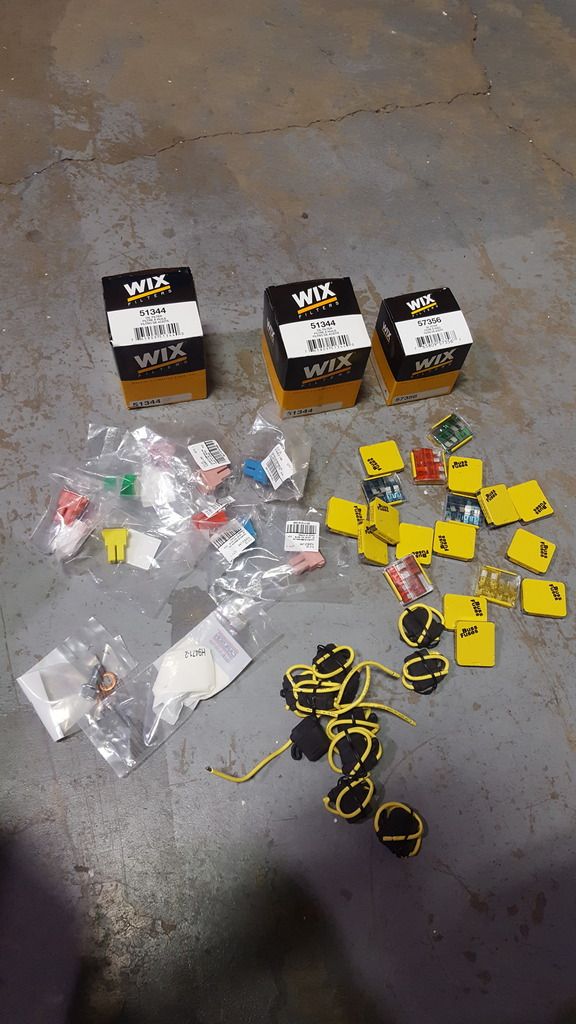
    Then literally the day after that i realized rockauto was super cheap on name brand fuses and switches so i got like 100 fuses which was dumb, more fuseable links than i needed, inline fuseholders for the car and trailer and some oil filters for the festiva because they shipped cheap. actually the small one is for my civic.


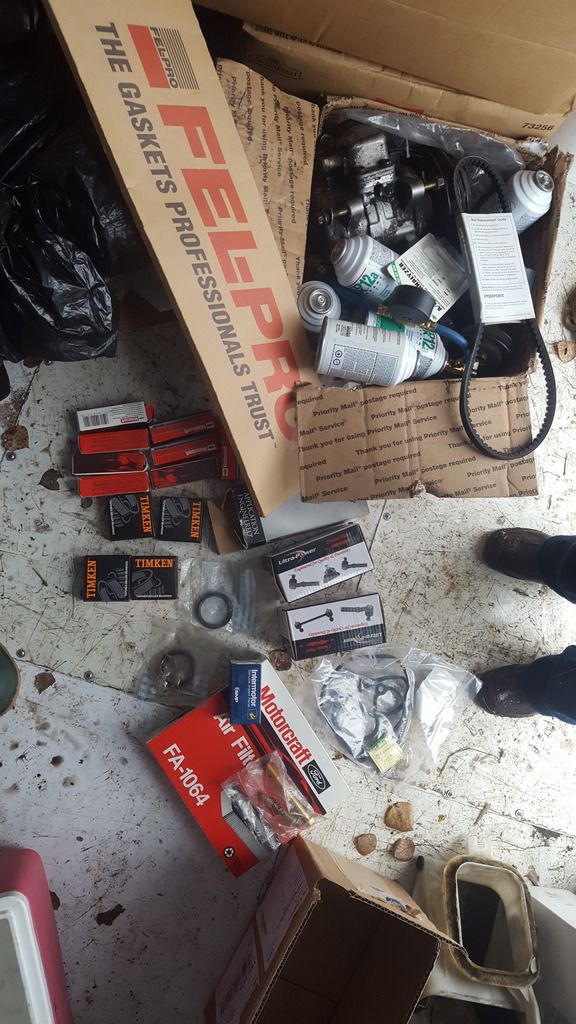
    These parts were actually bought before that first order because someone else was ordering from rockauto and the shipping wasnt too bad. also had been hoping to get those bearings into the rear drums a while back.


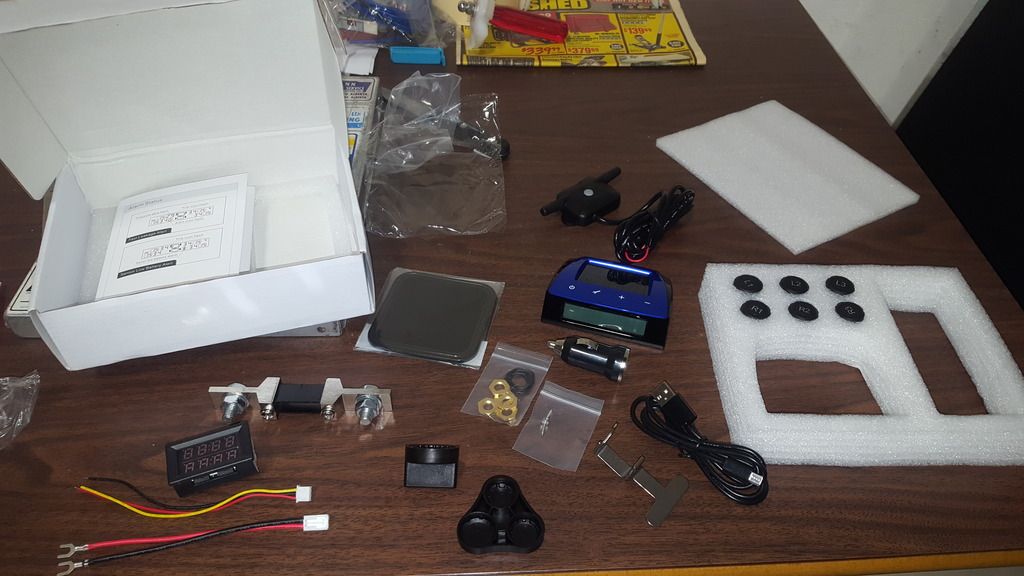
    Ebay purchase! tpms for 6 wheels and an ammeter.


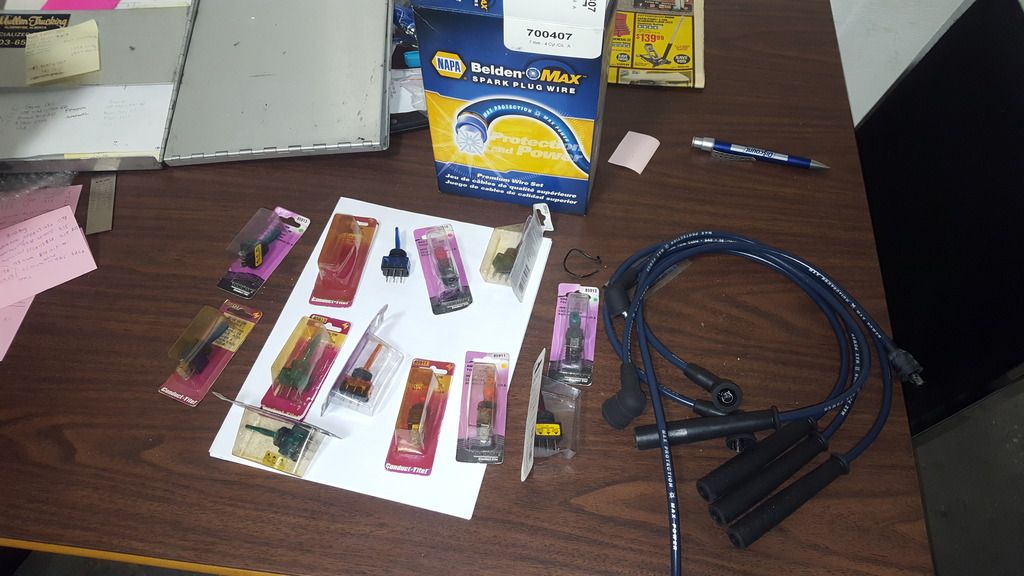
    My switches and spark plug wires arrived finally today! those switches look like they have been in the sun for 20yrs... but should work! super cheap at rockauto.


    Still waiting on my rear suspension, tires, strut mounts and a/c wiring to get here, but its coming along!

    Originally posted by william View Post
    Now that I think about it I also went to a bigger battery when my system was in the car. This kept my fuse from blowing along with cleaning up the fuse block. I think this was to do with having more battery resurve when the amp was drawing hard.
    The exta battery you where going to add should keep the fuse from blowing as well.

    Sent from my SAMSUNG-SM-G900A using Tapatalk
    Thanks, i have a big battery, proper fuseable links and have cleaned the terminals. When i have time i will try again!

    Sent from my SM-G920W8 using Tapatalk
    Last edited by ryanprins13; 01-31-2017, 07:26 PM.

    Comment


    • #32
      Havent updated for a bit. 3 weeks or a month ago i installed the new radiator, hoses and 16psi cap. I did my best to clean out the overflow bottle, it looked like something nasty had been growing in there. Then I verified my temperature gauge readings. Here is a few photos.


      So here was what the readings came out as. I unplugged my rad fan to let it heat up. 'Gun' reading was with the IR gun average temp on the radiator. The atkins probe was securely zip tied to a very clean thermostat housing. The sensor for my 'dash gauge' is where the fan switch used to be.
      The instrument cluster reading.... top means top bar of 'normal' range. Bump is the bulge on the bottom of the thermometer picture on the cluster.
      50/50 coolant mix is supposed to boil at 265f @15psi. Looks like when the instrument cluster needle gets onto the red your looking at 240f. For safetys sake you probably dont want to go over that but shouldnt be too scared to go up to it if your coolant is good and your moving, not idling.


      The tools I used.


      Sent from my SM-G920W8 using Tapatalk

      Comment


      • #33
        Originally posted by ryanprins13 View Post

        Are the brass fittings on the lower portion of the new radiator to remain plugged?

        Comment


        • #34
          Not necessary, those are for the auto trans fluid cooler.
          Trees aren't kind to me...

          currently: 2 88Ls (Scrappy and Jersey), 88LX, 90L(Pepe), 91L, 91GL (Skippy) 93 GL Sport (the Mighty Favakk), 94 (Bruce) & 95 Aspire SEs, 97 Aspire (The Joker),
          94 Justy 4WD, 87 Fiero GT, plus 2 parts cars. That's my fleet.

          Comment


          • #35
            Originally posted by Shin Hayata View Post
            Are the brass fittings on the lower portion of the new radiator to remain plugged?
            They will. Thats the cooler for the automatic transmission as mentioned above. I have a manual trans so i wont be using them. Auto trans radiator is larger because of this so i will get better cooling.

            Sent from my SM-G920W8 using Tapatalk

            Comment


            • #36
              Ah, ok. I figured that they were related to the type of transmission in the car.

              Comment


              • #37
                So the next weekend I decided not to do the gray interior because it would look weird with the black carpet. So I bought black paint and re-sprayed some of the panels.


                Then i soldered my battery cable connections, cleaned the terminals on the fuseable link box and installed new fuseable links.
                It was a pain to get the one clip out of that fuse box and i cracked it a bit.


                Then I cleaned my overflow bottle as best I could, it was disgusting inside, like things had been growing in it for a decade or so. Then I swapped seat backs because I dont like the ones this car came with.

                Then on another weekend I cut my switch panel on the cnc router, glued it togeather and got most of it wired. I didnt have all my parts yet though. Its farther together now but Ill update photos of that once the cover is cut and installed.


                I also wired all my grounds for the stuff the switches are running. tested my inverter with a bunch of big stuff. Belt sander plus angle grinder and then a 1500 watt oven.


                It wouldn't run this though, I was disappointed lol


                During the next week I made a return fitting for my bypass filter to go into the valve cover. There was an easier way but I didnt have time to order the parts by the time I remembered that so I did this:


                That saterday I fianally recieved a whole bunch of parts I had been waiting for. Rear suspension, tires from california I think, rio strut mounts and a/c parts. I cleaned my ac stuff, spent 2 hrs I think straightening the fins on the condenser and evaporater as best I could.


                Then I took my front rebar and bumper off, installed the a/c pulley on the crankshaft which was more work than I had anticipated, tapped out the mounting holes for the tensioner and compresser brackets that were full of crud and cleaned the engine in that area well. installed my idler and compresser.


                Then I took my alternater off and cleaned it because it was greasy.
                Installed the condenser and then spent a couple hours figuring out where the hoses, solenoids and wires went.

                Took my valve cover off and installed bypass return plumbing. The monday was a long weekend and I spent 18hrs on the car. I got the bypass filter installed except for one fitting I was missing and stores were closed... :/ This is a photo of it later when it was finished:


                I cleaned the valve cover, replaced the gasket and distributor o-ring. Pulled one spark plug out and it was great still. Old spark plug wires were toast so I replaced them. This engine had way more power than my red festiva with wires like this, I cant wait to see what its like with good wires!


                Looks like it hasnt seen regular oil changes...


                I had gotten the wrong o-rings so I couldnt properly install my a/c. I just put all the pieces togeather and ordered another o-ring kit. I made a mistake in ordering and it will be a month or 3 before I get them though. I finished wiring the a/c except for the gas pedal switch, I dont know how that goes yet. front steel rebar is different for automatics and manuals and I decided I wanted to keep the a/c fan so I cut my bumper, painted it and re-routed the fan wires. Photos in this thread post #4:
                Post your Festiva or Aspire repair and maintenance issues. - USE THIS FORUM FOR ANY TECHNICAL RELATED POST (IE. How do I change my oil?, How to remove axle from tranny?, etc)

                Automatic and manual bumpers different?

                Then i installed my catch can but Its in a different spot so I need new hoses.


                Then I finished wiring that dash panel because I had finally gotten all my parts. I still need to get a cover cut for it.

                Comment


                • #38
                  The next weekend (feb 25 by the way) I brought my car into the shop friday night and removed the headlights and blinker lights. Then saterday morning I swapped those onto my old daily and took the good ones off of it. But all 6 blinker lights i had were corroded up bad. So I picked the best 2 and wire brushed them with a dremel and then soda blasted them. Put newer (less corroded) bulbs in them and greased everything up with dielectric grease. Tried to glue that seal on the blinker lights but it didnt really work. That took an incredible amount of time, lol.
                  Then I installed a slightly louder horn. ( But not my air horn, no room on this car...)
                  I went to install the hoses to my catch can but the bracket broke! So I had to take it off so I can fix that later.


                  There was a fair bit of dirt and sand in my intake tubing as well as oil so I cleaned that all out.
                  Then took my inverter apart to change a few things. I installed my Inverter and went to wire it so I could switch it on and off from my dash panel. I first tried to do it so I could use both the dash panel switch and the one on the inverter but that resulted in a ton of burnt wires in the inverter. So an hour later I had them all fixed... and installed the seat finally.


                  Then I replaced my rearview mirror and got my instrument cluster and bezels back in. So much nicer to have that!
                  Then I got most of the wiring done for my radio but didnt quite finish.

                  During the next week I got my tires installed on the rims and balanced, planned how to centre my festiva front struts inside the rio mounts, bought the parts I needed and made what I wanted on the lathe.

                  Comment


                  • #39
                    So that Friday (march 3) I cleaned up the shop and leveled a spot on the floor with my employers laser level. Very handy to be able to borrow that.


                    I brought the car in and finished leveling as the boards kinda compress or who knows what happened.
                    I checked alignment with no weight In the car first. I have an angle cube and straightedge to check camber. Im having an issue with it giving me different readings when i flip it around like in the photos below. Toe plates for toe and I had intended to do a string alignment as well just to verify everything and see what that was like but I had forgotten string... I had to substitute 22 awg wire for string .


                    I checked the alignment first with no weight, then with drivers weight, then drivers and passenger weight and finally fully load like with trailer. Thats 176 pounds in each front seat, 150 pounds where the rear seat would be and 250 pounds behind the rear seat to mimic stuff in the trunk and tongue weight.


                    Ill put photos of all my measurements at the end but empty I had
                    about 0 deg camber on the front
                    -0.5 deg on the rear
                    1/16th toe in on the front using toe plates, 3/16 using the wire
                    5/16ths-3/8 toe in on the rear

                    full load:
                    -0.25 deg camber front
                    -0.5 deg camber rear
                    0 toe with plates front, 1/16th in with wire
                    3/4inch toe in rear with plates, 3/8 with wire, so one is wrong...

                    I checked the thrust angle but realized later that I didn't make 100% sure front tires were perfectly straight and its hard to measure by yourself anyway.
                    Then I took my lower control arms off and headed home. Got home at 2am

                    Saterday I slept in till 8 then went outside in -15c or so and a blizzard to swap the lca's off my parts festiva. The ones I took off the red festiva were only 2 or 3yrs old, 45k miles I think and are done and worn out. not bad, but their no longer good, which is disappointing. They will have to do for this summer and I will get new ones in the fall. They were in better shape than the ones on the Canadiana so I used them.
                    Then I started on the front suspension! I did the drivers side first- removed old stuff and slotted strut holes to get 2.55 degrees camber adjustment on the bench. (second side pictured ended up being 2.65)


                    I had to use the old and very worn out rubbers on top of the spring because I just couldn't get the spring to center nicely on the top hat with the new ones I bought.
                    So I used a new kyb strut, old spring, new bump stop with a little cut off the top and bottom, old dust boot with bump stop cut out of it, old rubber, old top hat, old plastic bushing on top of it, 7/16 grade 5 washer on top of that, kia rio strut mount and the lug nut I machined .


                    Just did a couple quick shots on the impact to tighten lug nut. It is absolutely amazing how easily this spins!!!! The old setup took a reasonable amount of effort to turn the strut, watch this video of how easily the rio one spins!


                    I installed the new MAS inner tie rod end. old one was very very hard to get off. The boot was also broken which i hadnt seen earlier. Will have to get new ones. I put the inner clamp on the first accordian piece to keep it water tight if that makes sense. When you steer all the way the one way then the outer end of the boot slides up the well greased tie rod a bit. I didnt clamp it there. Looks like the tie rod was rusting because water got in the boot. I greased the new one well in the hopes of keeping water out.


                    Installed new aspire outer tie rod end, red festivas lca installed, manual transmission aspire hub and brake caliper.
                    I cut the tab off the new brake hoses I got from rockauto. ordered aspire ones and they sent me festiva ones... installed them and a new banjo bolt with copper washers. Bled the brake, intalled tire. Stopped for something to eat and it was 7pm. I decided to take a gamble that I could get the passenger side done way faster. car had to be out of the shop by the end of the day. I did same on passenger side except i skipped the tie rod ends. I had a terrible time trying to get sway bar end on. brake bleeding went well on that side because i used antisieze and teflon tape on the bleed screw. (vacuum brake bleeder).
                    Then I was going to kick it outside but my alignment was visibly way off so i turned both in as far as i could but it still looked like toe in. It had to go out though so I drove it out, cleaned up the shop and got home at 2am again.


                    The rims i got just so happened to have the correct hubcentric spacers!


                    The following week I asked some questions on the forum here and discovered my tie rod ends were too long.

                    Saturday March 11 My MAS inner tie rod ends were 1/4in longer each than the old ones and the old inner and outers were cranked right tight togeather for 1/32 toe in. I miscalculated and cut each inner tie rod end 1/2 inch shorter, installed inner and outer passenger side ones which I didn't get to last week. I Used blue loctite on the passenger inner one but I hadn't on the other side. Should be fine though, I cranked it real tight.
                    3 different tie rods, 3 different lengths...

                    (Used an old nut as a guide for cutting)


                    I installed the urethane sway bar-to-rad support bushings I bought from the festiva store. My metal clamps that hold them on were rusted real bad though, I need to find better ones. This was after using a hammer and chisel and wire brush on a drill.


                    Bleeding the drivers side brake hadn't gone well last week so I put antisieze and Teflon tape on that bleed screw as well and it went perfect except I might have sucked the reservoir dry...


                    Sent from my SM-G920W8 using Tapatalk
                    Last edited by ryanprins13; 03-22-2017, 07:30 PM.

                    Comment


                    • #40
                      Then I did an alignment.
                      I started with my tie rod ends tightened in all the way and had 3 inches of toe out. I ended up turning each in 0.3inches in the end, so just cutting 1/4inch off these inners would work.

                      I set my toe to 1/32in with the toe plates and then tried with the string and got 7/16ths toe in. couldnt figure that out.
                      I spent a lot of time puzzling over that and adjusting it.
                      I didn't have enough camber and it was uneven side to side. So I removed the drivers side and ground the holes bigger.
                      alignment again.
                      my drivers side hub seems to have a lot of play in the bearing... when I put a gauge on the bottom of the tire its 25thou
                      drivers front tire has 10thou runout
                      passenger front tire has 28thou runout but zero bearing play.


                      had about -1.25deg camber each side now but the toe was still weird. I ended up deciding to go with the string alignment which gave a reading of 7/16ths toe out with my toe plates.
                      It was real late by then so I sat down to eat and sent dragonhealer a message about the strange happenings with my toe measurements since we had been talking about the suspension. He replied almost immediately to say that my track width had changed and go with the toe plates. I had spent hours messing with my alignment and never once gave a thought to my rear tires still being 145/12's and the fronts being 165/14's with different offsets. So I went pack and changed it to 1/32 toe in using the toe plates.
                      Setting my toe took forever each adjustment because I didnt have my front tires on turnplates. I had to roll the car back and drive it foreward every time.

                      Then I installed my radio and bezel. That took forever because I forgot I had to grind off the screw at the back of where the radio goes in order for it to fit. Spent quite a while struggling with that :/ Installed the black plastic seat panels and kick panel that I painted. installed steering wheel cover, took it for a quick drive. cleaned up and got home just after midnight. alternator doesn't work when its cold but works every time i started it inside the shop.

                      Sent from my SM-G920W8 using Tapatalk

                      Comment


                      • #41
                        The next week I spent planning out my rear suspension and ordered bolts for the rear struts and hose clamps.
                        I also ground down my bump stops to fit inside the coilovers.
                        watch the video to see an easy way to make your bump stops narrower.
                        The rear suspension is aspire KYB's made into coilovers with 150 pound springs that are 10inches long.


                        Sent from my SM-G920W8 using Tapatalk

                        Comment


                        • #42
                          Holy crap you work fast

                          Comment


                          • #43
                            Originally posted by dliverance View Post
                            Holy crap you work fast
                            Thanks. Its not quite as quick as it seems if you look at the dates im trying to include but i am spending like every spare minute on it. [emoji14]
                            Wasnt updating this because i was working on it but now i have questions but figure i need to explain what i did before asking them. Im super slow at typing so this stuff takes me forever.
                            Got one more update and then i can ask my questions! Lol.

                            Sent from my SM-G920W8 using Tapatalk

                            Comment


                            • #44
                              That Friday march 17 I picked up bolts and clamps from greggs distributors before work, after work I got started on removing the rear suspension. As in cutting it off... I made a detailed how-to writeup of what I did with photos which is here:
                              Post your Festiva or Aspire repair and maintenance issues. - USE THIS FORUM FOR ANY TECHNICAL RELATED POST (IE. How do I change my oil?, How to remove axle from tranny?, etc)


                              if you have removed rusted rear suspension before and have anything to add to that thread please do.
                              In short I cut off the drivers side lower rear strut bolt with a sawzall, removed drivers side axle to body bolts, cleaned them and replaced their lockwashers. Removed spindle and cleaned up its threads. Couldnt get brake line off.
                              That took 5hrs, I think I got home at 11:30 though.

                              Saturday I installed everything I took apart on the drivers side. I don't like how the coilover mounts to the body. Would be just fine if I wasn't going to tow a ton of weight. I talked to dragonhealer about it for a while and have some options to try out now.
                              You can see in this photo how all the weight will go through that small rubber to a concentrated area of the body.


                              Then I Removed strut on pass side with 3in air cut off wheel. Removed that spindle, cleaned up threads and reinstalled. Installed strut. Cleaned both brakes, regreased bearings, sanded drum and shoes. Reinstalled drum. Drums are in great shape, brakes and hardware are too. Bearings not and spindles are scored up for some reason.


                              I have new drums, shoes, bearings, seals and hardware but going to do that next fall, i dont have time now and will have to either replace or fix up the spindles first.

                              Put my 12 in tires back on and then installed my coolant splice so I can have my temp gauge and oem fan switch still. Didn't wire my manual switch yet though.


                              Bled coolant and then drove 30-40km. First decent drive since starting on this!
                              Had the new 14in archilles on the front and the new 145/12's on the back. Took a downhill cloverleaf onramp thats fresh pavement and was comefortable at over 90km/hr around it. It didnt have much body roll at all. It felt almost like the back wanted to come loose but i figured i was wrong. With my other festiva on a similar but uphill onramp the front tires start plowing at 85kmh and i could do 90 but it felt like the car was gonna roll always. The car drove perfectly smooth until i took that corner, It was shaking just slightly after I finished the onramp and the rest of the way back.
                              Lots of Bearing noise, I think from the rear. Lots of wind noise too though because interior not installed amd drivers window came out of the track.
                              Steering felt good. Quite squeaky in rear and much stiffer but kinda nice. I braked hard a couple times and sped up real quick a bunch, took some bumps and jerked the wheel around a bit all in an effort to settle the suspension.

                              Back at the shop I checked the alignment.
                              Moved front toe, It was 3/32 inch toe in and when i adjusted it it ended up a zero. I figured i would see what zero toe felt like to drive.

                              Ride hight Front is 1/2inch higher and rear is 3/8 higher when the car is empty as compared to blown struts and oem springs that were in before.

                              Rear springs are 10inches long. when top nuts tightened and the car is on the ground with no weight in it the rear spring is compressed 1 5/8inch, so its 8 3/8 long.
                              There is 3/4inch of travel to bump stop with car empty in rear.
                              About -0.5 degrees camber in the rear and 5/16inch toe in.

                              Put 400 pounds in the back and 350 pounds in the front and the ride hights lower by 3/4inch on the front wheels, 1 5/8inch at the back fenderwells. Measured at tow hitch to floor it drops 2.5inches from empty hight which is 2.5 inches higher than with stock suspension. Looks much better if you compare it to the same photo with stock suspension!


                              Rear spring hight is 7 1/16, so 3in drop total and 1 5/16 from empty.

                              Camber in front goes .35 degrees more negative while camber and toe in rear do not change.

                              I measured the angle change of the rear beam.

                              With the alignment measured I loosened the rear bearings until they had a little play so I would be sure it was or wasn't them making the noise. I Installed my old 175/70 R13 tires on the rear.

                              Went out, did the same loop and i started the onramp at 80km/hr and the back end instantly came loose. Swung out the entire length of the cloverleaf. Was a little scary till I realized the front wasn't going anywhere.
                              Zero toe felt no different on that short trip. Car shakes slightly more, most likely rear tires aren't balanced that great. Bearing noise less for sure but hard to tell if its actually gone or where its coming from. Tons more road noise with the 13in tires, no interior in the back, it had gotten incredibly windy out and my drivers window was off its track....
                              I got back, cleaned up the shop and did a forum post on removing rear suspension. think I got home at 1.30am

                              This is how it looks now.


                              Sent from my SM-G920W8 using Tapatalk

                              Comment


                              • #45
                                I wasnt sure if i should include this or not, but it may help out someone else doing an alignment, so If anyone is interested this is what i recorded while doing my alignment.

                                First day stock everything and blown struts. measured alignment it had:


                                Then alignment with knuckles and front tires changed without driving it:


                                After changing rear suspension and driving 40km or so:


                                Sent from my SM-G920W8 using Tapatalk

                                Comment

                                Working...
                                X