-
Yesterday I made a brace for the engine/transmission cross member. It did it because the front mount location under the radiator rusted out and the cross member was sagging.2nd time this has happened too me.The brace was an easy fan and I will do this to all my festivas as preventive medicine, maybe it's my imagination but it seems to make it corner better like a lower strut brace on a MK1 VW. -
If you're going to cut the top off, be sure and put a frame under it before you do any cutting so you won't end up with a flexi-flyer.Originally posted by Trencher View Post
Leave a comment:
-
Today I put a dope interior paint in and fixed the rust holes with some flex seal, cant wait to chop the top off!
I need to find a better way to make the back of the seats look better, I spray painted the back of the backseat and it just didn't turn out rightLeave a comment:
-
Oh boy, today was too revealing...
I have said before that the guy who used to have my current toys took a lot of short cuts, and did quite a bit of non-mechanically skilled modifications that that were not even up to ghetto standards.
I know why there was so much slop in my shifter now:
Out of two complete shifters, there were a total of (the remains of) about six shift linkage bushings, or just barely enough to put ONE shift rail together....
One of the bolts that secure the bushings was not the stock item with a shoulder down its length to the threads - it was an ordinary if sorta long quarter twenty (and with a missing bushing), so besides the gap where the bushings should have been, it was over an eighth inch too narrow anyway.
All I have left to do now is to attach the bottom of the steering shaft to the stub at the firewall, and torque the lugs.Then it goes to Bailey's Tire and Racing for a fast alignment
New bushings are on the way from the Festy store, but now I need to find a specialized bolt or a sleeve to deal with the quarter twenty substitute bolt to redo the other shift rail.
~ I also need to find rubber bushings for the stabilizer bar of the linkage. One on the blue car was missing at the transaxle end...
The other maintenance action was the steering rack and tie rod end replacement, but that's like I said nearly buttoned down.
I hate doing things the first time - it always gets so messy and bloody. After that things go better
** I definitely will be doing the Honda Civic SHORT SHIFT modification
*NOVICE NOTE: A "quarter twenty" is a 1/4 inch diameter bolt with twenty threads per inch. 'HEAD' size is usually around 3/8 inch, the metric equivalent of a bolt with a ten mm head - about an M-6
11-06-019 - $60 for a complete alignment, and now I'm looking at the tranny swap. Second gear is pretty well gone,
But as a test drive I went to base and picked up prescriptions. It's TIGHT, it may be a while loosening up.
And there was barely enough threads on the tie rods to align it after cutting them off, only one thread left on one side between the lock nut and the square part of the shaft. The other side was flush!Last edited by Greywolf; 11-06-2019, 01:21 PM.Leave a comment:
-
I somehow fixed my Aspire's rear hatch lock cylinder, which inexplicably wouldn't take the key at Starbucks. I didn't get anywhere trying to get a small screwdriver or paperclip in- although the clip at least went in. No I had to take the damn inside trim off and unclip the whole unit- by then I was expecting I'd have to try to order a replacement
Yet BEHOLD! Once I fiddled a little with it in my hands, some small tiny bit fell out of the only place on the edge it could have possibly gotten there somehow and with that the cylinder turns normally again-
I'm glad I still have my micro car, but old cars can sure be a pain.
Below- NOT Aspire part
s-l500.jpgLast edited by harpon; 10-26-2019, 06:19 PM.Leave a comment:
-
I kicked my backside out into the driveway and got through the old steering rack removal, which I hoped I could do without disturbing either of the old tie rod ends because I had to measure exactly how far apart the ball joint bolts were (until I run it to an alignment place I know).
I'm also going to pull the shift linkage - right away I saw where a whole trailer load of play was getting into the movement. It looked like the owner before me (OBM?) used some undersized brass tubing in the joint tubes that never did fit well. I wonder if there's a hard plastic tube resistent to heat that would fit it? Rubber tubing might work, but for how long? I've seen ides about it on here, I wonder what the best trick is, that tightens it up to a track spec???Leave a comment:
-
Since I had to drop my gas tank because my fuel pickup sock disintegrated, I decided to swap out the old rusty bolts with some stainless wide flange M8 ones that I bought on the bay.

Leave a comment:
-
Here is the old cast iron Escort master cylinder bolted to the Festiiva vacuum chamber,
I thought you would like to see how much clearance there is between the battery,
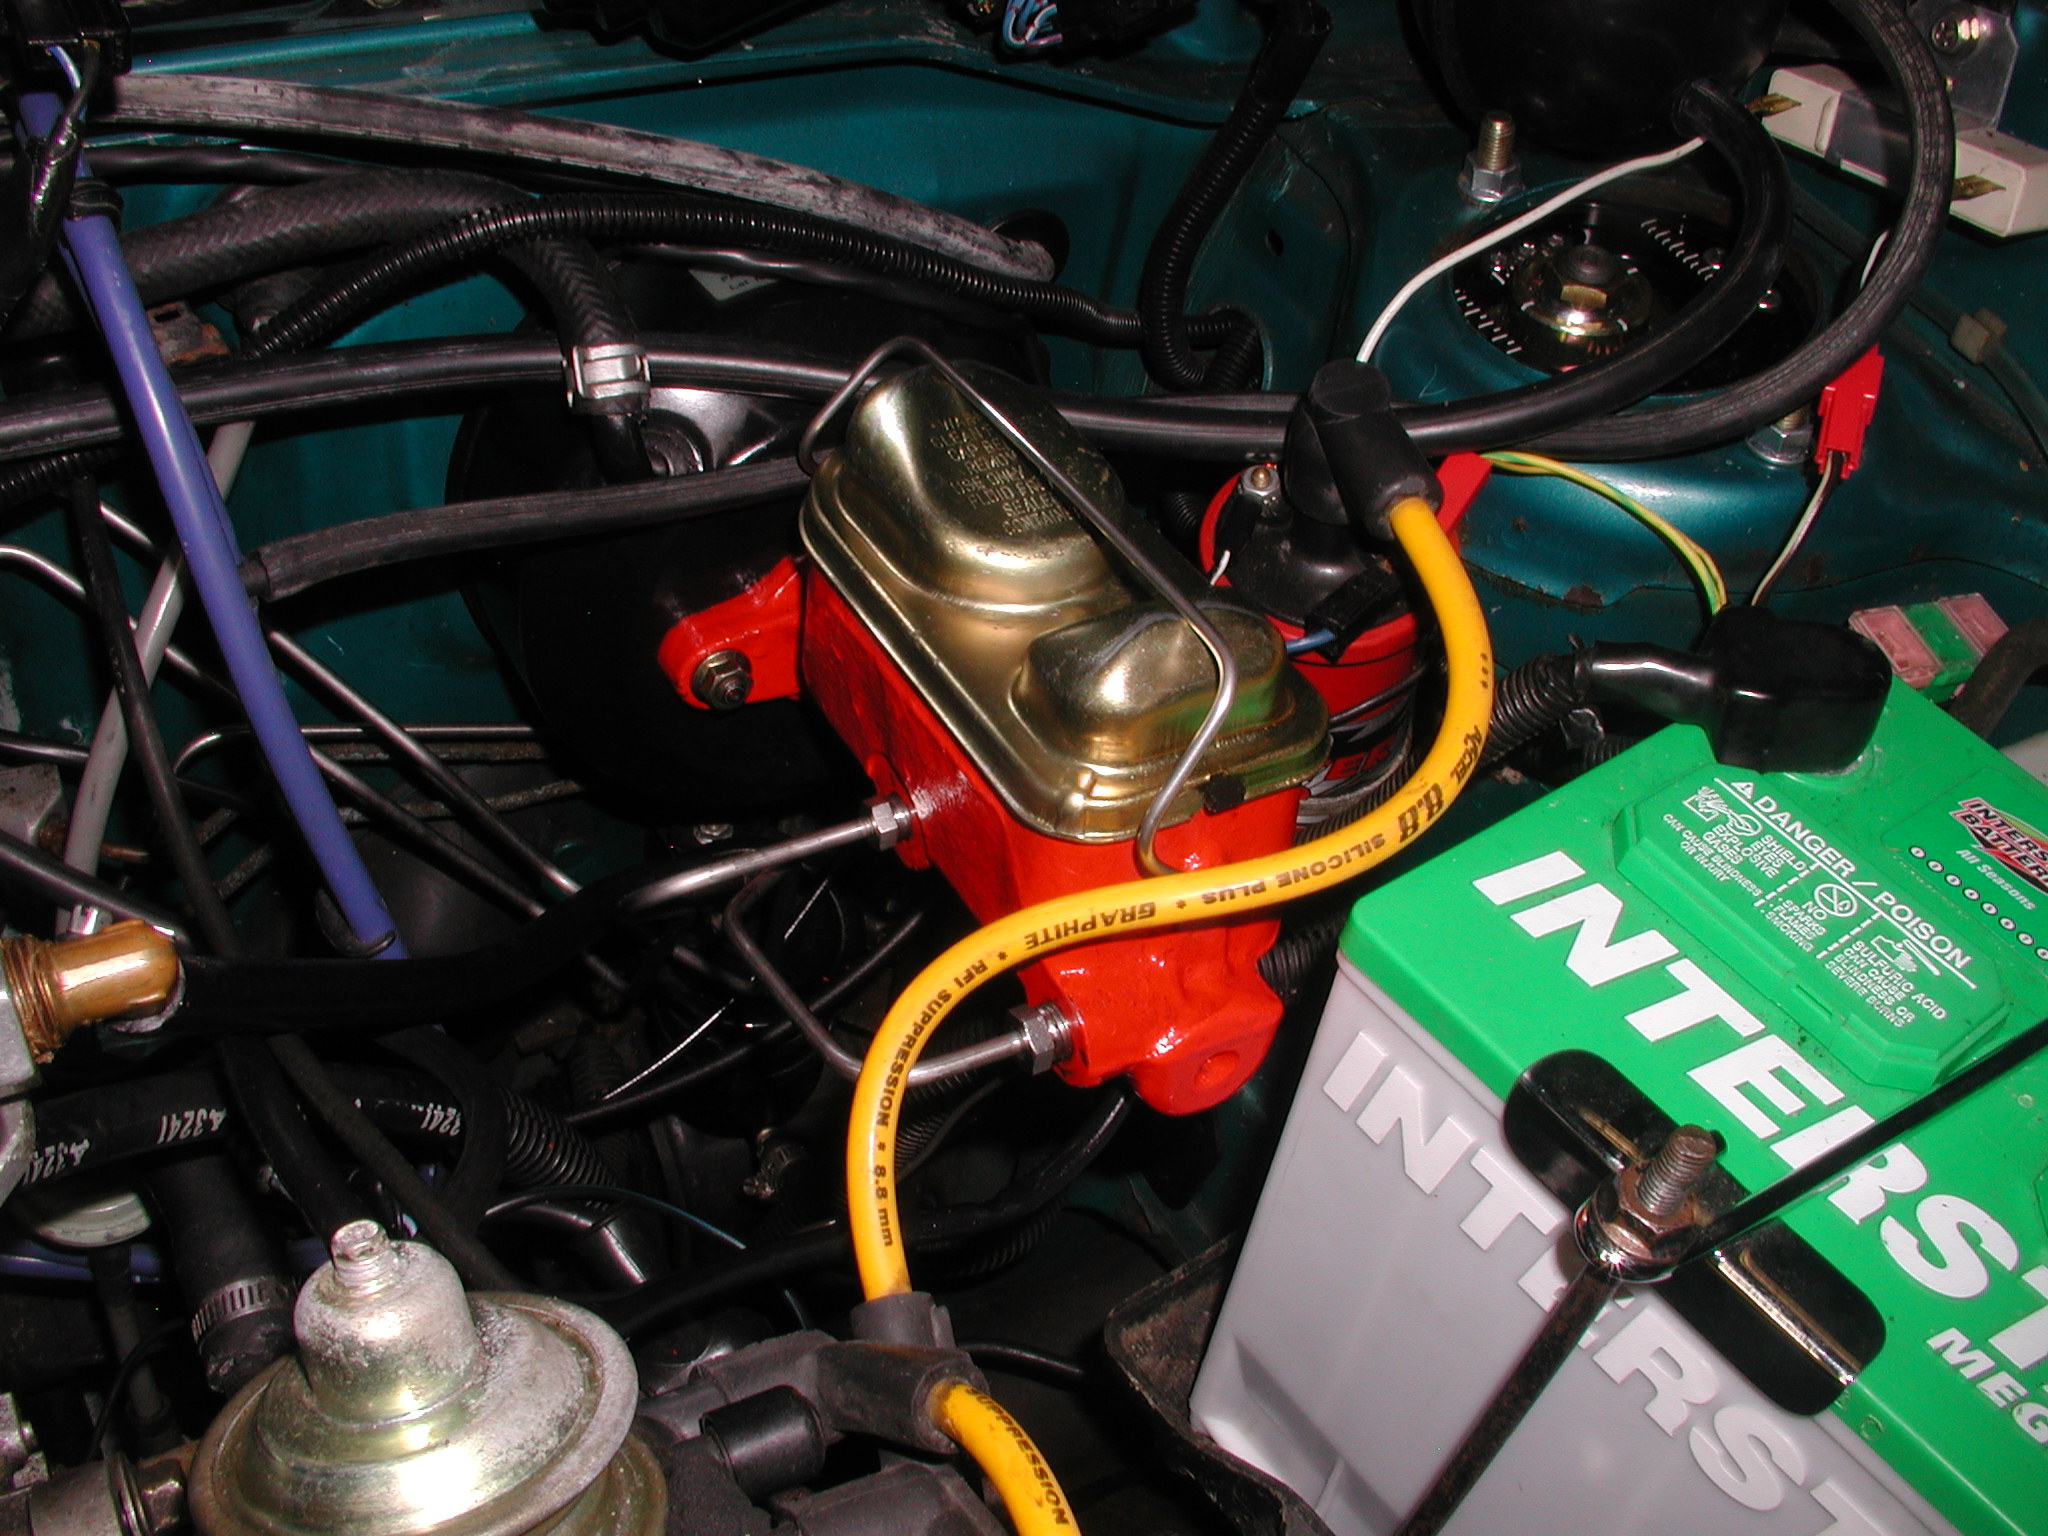
Leave a comment:
-
I had the tip of my Festiva pushrod precision welded to retain the Escort rubber that centers the pushrod in the bore
The mcro welding was done by Advanced Laser and Microwelding in Mississauga.
Nice.

Leave a comment:
-
Finally got around to installing my air/oil separator...
.IMG_20190715_153201884.jpg
Hose on the left comes from the valve cover, hose on the right comes from the factory block vent, center hose vents to the intake between the VAF and the turbo. There's a hose coming off the bottom that drains to the factory inlet on the oil pan.Leave a comment:
-
KeyCylWare.jpg
My solution to swapping out key cylinders is to use an upgraded bolt that is easy for ME to remove
But I doubt any car thief has the sockets for
I now have keys for both my mad rides, and will soon have another cylinder with a new key set
My youngest was a locksmith for a while, and his advice was that if you can bring a thing like the above to a locksmith shop you can get a key done for around $50
If you had to have a key made on site while you showed your ID and registration to the man...
It would be over $150
Member STUDEBAKER let me rob the above out of one of his donor cars
In exchange, I helped him drag it to his back lot...
(THANK YOU!)
* It is explained elsewhere here at the forums how to remove the "PERMANENT" bolts that hold this part to the column
The logic behind my selection of bolts is simple:
It is easy to order a socket bit set that fits those fastener heads, but a car thief will not have them
That metal (stainless) is extremely resistent to chisel points and blades
The shape of the head is rounded and low profile
The sockets for it fit much nicer than a wrench or socket in a tight place
That's what makes it a diamond choice
Anything that slows a chop shop down gives a LO-JACK more time to work
***sssnnniikkkerrrezzz***
You can order those and the bits that fit them all over the place
Here is the AMAZON link:
https://smile.amazon.com/gp/product/...?ie=UTF8&psc=1
The bits you can find easilyLast edited by Greywolf; 07-07-2019, 09:37 PM.Leave a comment:
-
It's on the street!
I DID IT!!!
` and it rips like a deranged chain saw on wheels...
Leave a comment:
-
The Blue Choo Choo is about on the street
91 with a B6T that needs a ton of smoothing out, but I decided sometimes it's quicker and better to upgrade what is right under my hip pockets than to have a garage queen
I'll give it one more tweak, and hang the tag on the back, I think it needs some battery cable TLCLeave a comment:
-
Rear drums, bearings, shoes. It's great last year I repacked the bearings and turned out I didn't torque the nut to spec so the passenger bearing started eating itself.Leave a comment:
Leave a comment: