Announcement

Collapse
No announcement yet.

Rosie - My 1992 Gl Automatic 2016 Project

Collapse
X
 
  • Filter
  • Time
  • Show
Clear All
new posts

  • #46
    Originally posted by bravekozak View Post
    How do you take the fan blade off the motor?
    I unscrewed the nut and tried to wiggle the blade off.
    No luck.
    It was difficult to get mine off. You can see from the pictures there is a rectangular metal piece that fits over the motor hub.
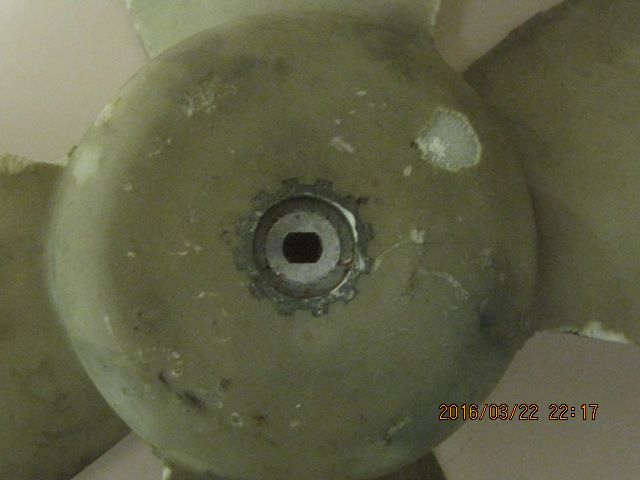
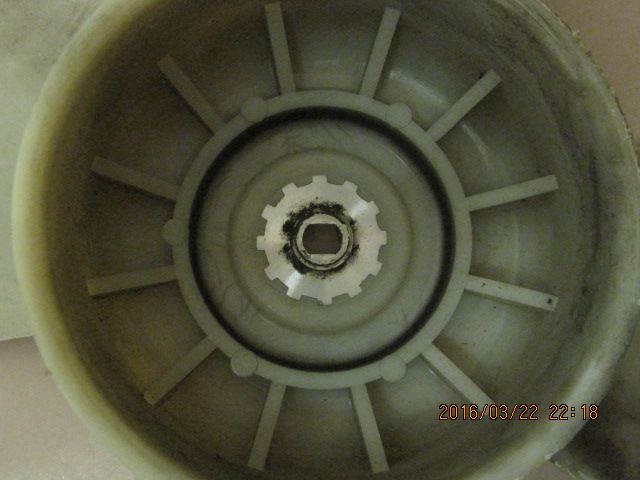
    I think the black residue you see in the picture may have been some kind of tacky adhesive but mine came off when I
    held it up by the blade and tapped with a small hammer on the hub with the nut still on but loosened.

    Comment


    • #47

      A beautiful day in the 70's I go up at 6:30 this morning and did lots of work on Rosie
      Power washer would not start so I took the carburetor apart and cleaned it and it started fine then.
      After spraying a cleaning solution on and letting it sit for a while, using hot water I power washed the engine, transmission and back of the engine bay on the left side.
      Installed the front fender braces with newly painted red bolts on the bumper side and nice black ones on the inside and used antiseize on the bolts..
      Untaped and re taped the AC wires that come through the fire wall
      Untaped and re taped a few more engine control wire groups.
      I think all are re taped now and all the contact have been cleaned with my dremel tool.
      Put the AC drain tube back in the fire wall.
      Painted the metal area under the battery tray red.
      Installed the windshield washer bottle holder in the left fender well.
      Removed the front brake calipers and hung them up by the hose holder bracket.
      Loosened all of the front suspension bolts except the axle nuts (sprayed more PB blaster on them)
      I made the mistake of removing the brake pads and tossing them before I loosened the axle nuts.
      See the picture of how I hold the rotor to loosen the axle nut.
      Will try the axle nuts again tomorrow.
      Removed the front brake calipers and hung them up by the hose holder bracket.
      Upload 12 more pictures to the Rosie Project Photobucket library.

      Comment


      • #48
        ^^^ You'll want to put the pipe wrench on the other way so the handle is on the ground on the other side of the hub. Otherwise when you go to loosen the pipe wrench will just flip up into the bumper.

        Ian
        Ian
        Calgary AB, Canada
        93 L B6T: June 2016 FOTM
        59 Austin Healey "Bugeye" Sprite

        "It's infinitely better to fail with courage than to sit idle with fear...." Chip Gaines (pg 167 of Capital Gaines, Smart Things I Learned Doing Stupid Stuff)

        Link to the "Road Trip Starting Points" page of my Econobox Café blog

        Comment


        • #49
          Yes thanks... that's a better Idea. I was standing on the handle while using my power handle with pipe extension to pull up.

          Comment


          • #50
            Impact gun!
            Also just putting the tire back on, putting the wheel on the ground, chocking the tire and using a breaker bar should do it. Make sure the stake nut is punched all the way back. Sometimes its still holding on a tiny bit farther back.


            Sent from my iPhone using Tapatalk

            Comment


            • #51
              Another beautiful day in the 70's Didn't get up until 10 this morning (stayed up late).
              Thanks Ean for the tip about the wrench (don't know why I didn't thing of it), It worked great and the axle nuts came off easily.
              Thanks also for your tips ryanprins13... I usually break these with the tires still on but I'm doing so much to Rosie, I missed it.
              More work on Rosie today (Uploaded several more pictures to photobucket):
              Both axles slipped easily out of the hub. The boots on the left axle were split at the transmission and steering knuckle. I jerked on the left side and it snapped right out. After I got it out the tripod pulled free of the transmission side housing (I'm using that part to plug in the transmission until I get an axle back in. Tried to jerk the right side out but it wasn't as easy. I used a large screw driver to pry it and it snapped right out though.
              Removed all the front suspension parts, the exhaust manifold with the downpipe attached, and the catalytic converter. I already had a new right side CV axle for an automatic (bought two on a special deal when I first bought Trixie a few years ago). I put in a order for a new left one to RockAuto today (Plus new output shaft seals). I already have new lower control arms and sway bar bushings.
              There are back and front photos of inside the cat.. I think it still looks OK.
              Last edited by 1990new; 03-24-2016, 07:28 PM.

              Comment


              • #52
                03/25 Nice day partly cloudy, breezy and near 80.
                New front struts arrived from RockAuto today.
                It was a job, but I got the rebuilt steering rack back in Rosie today.
                To make it easier, I slid the U joint piece up in the boot and lowered it down on the rack shaft and the bolted it on.
                Installed the WSW tank, the overflow radiator tank, ground to frame, connected electrical wires on left engine bay, reattached the 3 relays. (I remember taking it off but I cant find my round vinyl cover for the main power wire connection ..white to black-red, will find it before I do that connection.)
                Broke the beads on the bad tire that I need to remove.
                Uploaded 5 more pictures.
                Last edited by 1990new; 03-25-2016, 06:30 PM.

                Comment


                • #53
                  03/27/2016 Rained steadily all day today and intermittently yesterday. Didn't do anything outside to Rosie but I got the exhaust manifold and down pipe ready to install.
                  Good news is...all this heavy rain and no leaks in the sunroof.
                  Removed the heat shield screws but had to drill out two and rethread them.
                  The O2 sensor came out fairly easily after I broke the top off, used a 22mm socket with power handle. (Had sprayed it with PB blaster inside and out yesterday).
                  The down pipe attachment nuts came off surprising easy.
                  Cleaned up all the front strut pieces and got the new struts ready to go back in. Thought about trying to find new strut bearings but in the end just cleaned these up and re greased. They still looked good.
                  Uploaded 6 more pictures to photobucket.

                  Oh.. and I found isolators to re attach the fuel filter holder on ebay (from china). I bought 8 for less than $10.
                  Last edited by 1990new; 03-27-2016, 10:03 PM.

                  Comment


                  • #54
                    03/29/2016 Nice weather the past couple of days. Got a lot more done on Rosie:
                    Installed the steering column, ignition, column multi switch, instrument panel, rear wiper and defroster switches, instrument panel bezel and steering wheel. (The bottom part of the multi switch cover was missing when I bought Rosie)
                    All inside wiring is now connected.
                    Changed the transmission filter and gasket. Cleaned around the transmission a good deal more.
                    Cleaned more around the front of the engine below the head.
                    Cleaned and painted the transmission fluid cooling connection pipes and painted them black.
                    My new transmission output seals and the left cv axle will arrive tomorrow.

                    Uploaded 10 more pictures.
                    This is how I temporarily secured the sunroof until I can find new attachment hinges and handle.

                    Comment


                    • #55
                      03/30/2016 Stayed up late last nigh and didn't get up til noon. Another nice day cloudy in the 70's.
                      Painted some bare metal parts under the hood with glossy black oil paint using a brush.
                      Bolted the transmission fluid cooling tubes to the transmission.
                      The Fedex delivery of the left cv axle and axle seals arrived about 2:30 from Rockauto.
                      I also ordered two outer tie rod ends (for later use ) and two transmission filler tube o rings.
                      Removed and installed new transmission axle seals.
                      What I could see of the inside of the transmission looks really clean.
                      Cut the grass and blew the leaves out of the driveway.
                      Wire wheeled all the nuts, bolts, washers and springs for the front suspension, front brakes,
                      down pipe, cat, and exhaust pipe.
                      Upload 8 new pictures.

                      http://s1222.photobucket.com/user/19...osie%20Project
                      Last edited by 1990new; 03-30-2016, 10:20 PM.

                      Comment


                      • #56
                        04/01/2016 Cloudy the last couple of days but pleasant 70s weather.
                        03/31 work on Rosie:
                        Removed the front brake calipers and started to clean them but decided to use the much better calipers that I took off Trixie instead; Ordered a new O2 sensor for Rosie from Rockauto
                        Work 04/01: cleaned up the garage some, threw away old parts and organized my tools a little better. Removed the lower timing cover and determined that there appears to be no oil leaking from the front seal so I won't be changing it. Cleaned up the engine mount nuts and bolts and replaced them. Removed the valve cover in preparation for installing the rebuilt head. Started raining late this afternoon. Since I wont be removing the crank pulley, I'm now ready to start putting the front suspension, steering knuckles cv axles and brakes back on.

                        04/02/2015 Rained last night and early this morning but was nice and in the 70's by noon.
                        Cleaned up the old calipers and brake hoses that I had taken off Trixie and the dirty alternator that was on Rosie.
                        Installed the cv axles, struts and lower control arms, the brakes on the right side.
                        I had a heck of a time getting the left cv axle in.* I had to hit pretty hard on the shaft to get the
                        circlip locked.. finally went in... I hope I didn't do any damage to the transmission insides.
                        Just have to install the left brakes, the sway bar and front tires and she will be back on the ground.
                        Next comes head removal and install the rebuilt one.*
                        Last edited by 1990new; 04-02-2016, 08:53 PM.

                        Comment


                        • #57
                          thanks for the updates, your doing a great job, when no one else wanted this car you could see the potential and took on the job. when your done and happy with the final product, put it up for FOTM you have my vote.
                          An idea can turn to dust or magic, depending on the talent that rubs against it.

                          Comment


                          • #58
                            I had thought about giving Rosie a shot at FOTM when I finish the project... Thanks for the encouragement Karl.. I definitely will put her up.

                            Work on Rosie Today (Beautiful blue skies today with a high of 78):
                            Installed left brake calipers, sway bar, cat, fuel filter, purge canister, all the bracket and wiring connections on the left strut tower, and filled the transmission with fluid (no leaks).
                            Also centered the steering rack and connected the tie rod ends with eyeball alignment.
                            Put the front wheels on, removed the jack stands and lowered Rosie to the ground.
                            Removed the thermostat, reconnected the thermostat housing and connected a radiator hose to it.
                            Hooked up heater hoses to engine and pointed them down toward the ground.
                            Connected a garden hose to the radiator hose at the thermostat housing and ran water at full force through the engine for about five minutes.
                            Uploaded 18 more pictures to photobucket today. Tomorrow I plan to remove the old head and install the rebuilt head.
                            Last edited by 1990new; 04-03-2016, 07:49 PM.

                            Comment


                            • #59
                              PB Blaster is a definite must have in any arsenal of old(er) car tools. There is something else that works real good on very stuck bolts - a 50/50 mix of transmission fluid and acetone. The trans fluid breaks up corrosion & lubricates, and the acetone part helps it get into small crevices.

                              Looking good!
                              Most people don't drive what they want at all, and never will

                              Comment


                              • #60
                                Originally posted by Greywolf View Post
                                PB Blaster is a definite must have in any arsenal of old(er) car tools. There is something else that works real good on very stuck bolts - a 50/50 mix of transmission fluid and acetone. The trans fluid breaks up corrosion & lubricates, and the acetone part helps it get into small crevices.

                                Looking good!
                                Thanks... and Thanks for the tip about transmission fluid and acetone. I have used PB blaster for several years now.

                                04/04/2016 Another beautiful day in the 70's with low humidity. We are having a real Spring this year instead of jumping right into Summer.
                                Today I installed the rebuilt head, manifolds, and distributor. Also put my tag on Rosie so she is now legal to drive on the road. Uploaded two more pictures. Several little things left to do in the engine compartment before I can start Rosie up..maybe tomorrow but possibly Wednesday. Still have to strip and recover the seats though.
                                Uploaded a couple more pictures to photobucket.
                                Last edited by 1990new; 04-04-2016, 07:21 PM.

                                Comment

                                Working...
                                X