Announcement

Collapse
No announcement yet.

Rosie - My 1992 Gl Automatic 2016 Project

Collapse
X
 
  • Filter
  • Time
  • Show
Clear All
new posts

  • #76
    Originally posted by bravekozak View Post
    I prefer to use hogrings, just like the original.
    I bought a hog ring tool and some rings but I still prefer the zip ties. I can connect them easier where the material is pulled down in the inside and also put them all in loosely around the edges and then pull them tight at different places as I get the covers arranged correctly.

    Rosie Log:
    04/12/2016 Got up at 8:30 A cloudy day had rained during the night, rained a little during the day but no rain most of the day.
    Finished wire wheeling and painted the back seat seat back and the right front seat base.
    Cleaned up all the hardware from the seats so it is ready to reassemble tomorrow. All seats will be done except for the drivers seat.
    There was a crack in the right front seat side molding which I fixed with oatey fix it stick putty epoxy. Worked great, I will post a picture of it tomorrow when I take picture of the completed seats. I put one coat of paint on that piece of seat molding tonight.
    Did a compression test on Rosie Compression results:
    1 2 3 4
    153 150 150 130
    Cylinder 4 is the one with the chip out of the top rim of the cylinder.
    I also put 4 ounces of seafoam in the oil to see if it would make any difference after I run it a few hundred miles.
    Comment


    • #77
      04/14/2016
      Nice day in the high 60's today.
      Work on Rosie today:
      Found the cable for the passenger seat release and installed it. Installed the passenger seat.
      Found the left side headlight grille attachment bracket and installed the grille.
      Cleaned up Rosie's right front allow wheel and took a good tire off one of my metal rims and installed in on the alloy. Tires now all match wheel and size wise and are good.
      Drove Rosie around the block this evening. When I took all the shifter linkage apart I did not get it reinstalled correctly. The transmission is not shifting out of low when I'm in drive and I have to shift it part way between R and P to get it in reverse. I will need to work on adjusting it.
      Only the drivers seat is left to clean up. I uploaded 22 more pictures so you can see it's still dirty.
      Still need to fix the interior and instrument panel lights. Tag light also is not working.

      Still need to do another compression test with the engine completely warmed up and while holding the accelerator pedal all the way in. I'll do that tomorrow and post the results.
      Last edited by 1990new; 04-14-2016, 08:22 PM.

      Comment


      • #78
        Did the compression test today with the engine hot and while holding the accelerator to the floor.
        Not much different that the first time when the engine was just a little warm and I did not hold the accelerator down.
        1 – 155 2 – 154 3 – 150 4 - 145

        Today I fixed Rosies wiendshield wipers, straightened out her washer sprayer and washed all three Festivas.
        Drove Rosie around the block. She runs good but is still smoking.

        Comment


        • #79
          04/17/2016 Beautiful day today in the low 70's
          Got the tag lights to working (tightened the little brackets that hold the lights in) and fixed the issue with the seat belt motor on the passenger side.
          There was a little piece of plastic broken off that stopped the seatbelt before it was all the way down and the
          motor kept coming on trying to seat it all the way down. Removed the piece of plastic and that fixed it.

          The problem with the interior light is loss of contact between the aluminum strips in the light where they mate to the copper strips where the ball bearing switch is. . I had installed a light that I had on the shelf for some time and apparently there is corrosion between the contact points that is preventing the electrical connection. I will try to drill out the rivets without destroying the white plastic so I can clean them and then rivet them back together. It's the only standard size light I have and I can't put in an Escort light because of the sunroof.

          I'm still trying to solve the brake light problem. It stays on all the time unless I press the brake pedal. For some reason the pedal switch appears to be working backwards.
          Last edited by 1990new; 04-17-2016, 03:28 PM.

          Comment


          • #80
            Brake light problem is fixed. I was using a clutch switch instead of a brake switch.

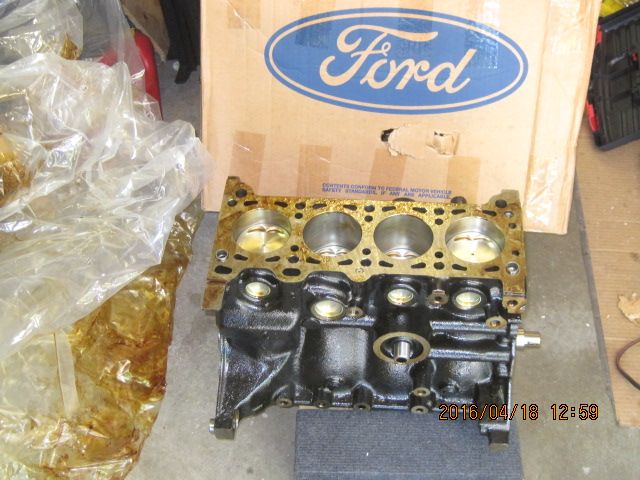
            Here's how I decided to solve Rosie's engine smoking problem.
            An NOS short block. I also have a new oil pump and a new water pump.
            With all the work and new parts I've put into her so far, I just had to have this.
            Advise on best way to go about doing the swap appreciated.


            Last edited by 1990new; 04-18-2016, 02:25 PM.

            Comment


            • #81
              During the past 3 days I've been gathering many parts to get the new engine ready to put in Rosie.
              Got the bottom cover for the column multiswitch and ignition and the fan blade installed .. thanks to
              a very generous but anonymous project Rosie supporter. (There are some super nice member on fordfestiva.com)
              So far I have most everything I need to get the engine ready to drop in without using many parts from Rosie's current engine.
              Today I picked up the crank key at a local Mazda parts department and got the lower timing cover and crank pulleys installed.
              (Used super strength locktite and torque as recommended to make sure the short nose crank doesn't get wallowed out.)
              I installed the oil pump and water pump yesterday.
              Found some nice water pipes in my stash and cleaned them up so they look like new.
              I will be using a nicer intake assembly and exhaust manifold that I had on the shelf so I can leave Rosie's old engine mostly intact.
              Two thinks I still need are an oil pan, oil pickup tube and oil dipstick tube.
              If the weather is nice Saturday I'm going to drive down to Savanna to see what I can get those off the 92 Festiva at LKQ there.
              Uploaded 20 more pictures to the photobucket Rosie Project library.
              http://s1222.photobucket.com/user/19...osie%20Project
              Last edited by 1990new; 04-21-2016, 09:22 PM.

              Comment


              • #82
                Picked up the new crankshaft bolt at Mazda today, removed the old one,
                cleaned the inside threads and the bolt with brake cleaner, used locktite red and
                torqued the new bolt to 100ftlb.
                Completed cleaning of the intake assembly, installed new injector seals and cleaned up
                some hoses. Now it is ready to go on the new engine.
                Removed the bottom pan on Rosie. Crank casting number on her engine is B301
                The new engine is A301 and both are the short nose crank. Not sure what this means?

                Uploaded 10 more pictures.
                Last edited by 1990new; 04-23-2016, 08:39 PM.

                Comment


                • #83
                  Disregard what I said in the last posting about crank casting numbers.. they both read A301.
                  Not sure where I go the Idea the Rosie's current engine had B301 on the crank.

                  The oil pump is removed, cleaned and installed on the new engine.
                  The bottom pan is cleaned and has a first coat of paint. I will put on a second coat tomorrow.
                  Just need to get the oil dipstick tube out of Rosie's engine so I can put it in the new one.
                  Can some suggest ways they have done this?
                  Alos Is there anything else I need to do before I put the bottom pan on?

                  Comment


                  • #84
                    Try using a drift pin of the exact size. Have someone turn one for you on a lathe if you can't find the proper size. Worst case scenario: You bend it trying to pull it out and have to wait for another one to come from Four Green.
                    Last edited by bravekozak; 04-24-2016, 06:40 PM.

                    Comment


                    • #85
                      Originally posted by bravekozak View Post
                      Try using a drift pin of the exact size. Have someone turn one for you on a lathe if you can't find the proper size. Worst case scenario: You bend it trying to pull it out and have to wait for another one to come from Four Green.
                      I could do that but I just though of an easier way. It's a steel tube in an aluminum casting.
                      If I plug the bottom of the tube, heat the aluminum oil pump I'm guessing it will expand enough
                      to pull the tube out. I may need to pour a little cold water in the tube to prevent it from expanding as fast as the aluminum.
                      I could put it back in the new oil pump by putting the tube in the freezer, heat the pump around the hole, put the cold tube
                      in and let the aluminum shrink back around the expanding tube.
                      Think that might work?


                      On another note: I was hoping to be able to switch the engines without pulling the engine and atx out
                      together, but it looks that can't be done. This is the first time I've pulled an engine on an automatic Festiva.
                      Last edited by 1990new; 04-24-2016, 09:17 PM.

                      Comment


                      • #86
                        04/25/2016
                        The last couple of days I have been getting ready to remove the old engine and put in the new.

                        I cleaned and painted the bottom pan and brace for the bolts. Also cleaned up and painted some brackets for the exhaust and starter.
                        Today I picked up the cherry picker and Rob helped me load, unload, and get into position to removed the engine. Everything is loose except the transmission cross member and I will take that loose first thing and the morning and pull the engine. I'm going to put everything I can on the new engine before I install it so it should be ready to connect all the wires, fill the ATX and Radiator and start it up.

                        Comment


                        • #87
                          04/26/2016
                          Beautiful day in the low 80's.
                          Got the engine and transmission pulled. Removed the right axle but did not remove the left one.
                          Separated the engine from the transmission, removed the pulleys, water pump and oil pump.
                          Heated the oil pump with a propane torch where the dipstick tube is and was able to twist the tube a little, tap on the oil pump and the tube came out nicely. I put it in the freezer so it will go in the new oil pump tomorrow easily. Removed the old vacuum modulator and started to put the new one in but it did not fit, threaded part was smaller than the original. I will let RockAuto know about it and try to find one locally.
                          Drained the fluid out of the torque converter. It took several time of turning it over to let fluid drain to the center and then turn it back over to drain into a jar. It contained just a little more than a pint.
                          Service manual says to clean out with cleaning fluid and then rinse with atx fluid before refilling, but I thing I'm going to skip that. The fluid really didn't look dirty at all.
                          Check the diameter of the torque bushing and the diameter was right at .5 mm less than max.
                          Cleaned the cross member rally good and remove the rear mount as I will put a new one on it.
                          The cross member bushings are pretty worn looking. I'm going to look thru my stash and see if I have better ones.
                          I took several pictures (17) which I uploaded.
                          http://s1222.photobucket.com/user/19...osie%20Project
                          Last edited by 1990new; 04-26-2016, 06:41 PM.

                          Comment


                          • #88
                            04/27/2016
                            A bit of frustration today.
                            In addition to the vacuum modulator not fitting, the rear transmission mount that I ordered from RockAuto back in February is too narrow.
                            It looks almost identical to the old one but it will not go around the transmission housing and cannot be bolted on... I'll just use the old one.
                            Needless to say, I'm unhappy with RockAuto at this point.
                            Today I did the following:
                            Put 1/2 quart of transmission fluid in the torque converter, put it back on the transmission and mounted the transmission to the engine.
                            Put the head on, poured a quart of oil over the head, installed the valve cover, intake manifold (I had left the exhaust manifold on), starter, right motor support and alternator on the the engine.
                            Lined up the crank and cam and installed the timing belt.
                            I'm just going to put the old rear transmission mount on the transmission and install the new engine in Rosie.
                            Last edited by 1990new; 04-27-2016, 10:07 PM.

                            Comment


                            • #89
                              Originally posted by 1990new View Post
                              ... the rear transmission mount that I ordered from RockAuto back in February is too narrow.
                              It looks almost identical to the old one but it will not go around the transmission housing and cannot be bolted on... I'll just use the old one.
                              Needless to say, I'm unhappy with RockAuto at this point.
                              As frustrating as it is to get the wrong stuff I've had good experience with returning parts at Rockauto.

                              Ian
                              Ian
                              Calgary AB, Canada
                              93 L B6T: June 2016 FOTM
                              59 Austin Healey "Bugeye" Sprite

                              "It's infinitely better to fail with courage than to sit idle with fear...." Chip Gaines (pg 167 of Capital Gaines, Smart Things I Learned Doing Stupid Stuff)

                              Link to the "Road Trip Starting Points" page of my Econobox Café blog

                              Comment


                              • #90
                                Originally posted by fastivaca View Post
                                As frustrating as it is to get the wrong stuff I've had good experience with returning parts at Rockauto.

                                Ian
                                I've had good luck with RockAuto over the years but getting two parts on the same order that are listed a fitting but do not is not good.
                                Trouble is I ordered these in February and it's beyond the 30 day return period..which they say is strict. I'm not as much concerned about the little bit they cost as I am that they are still listing the parts as fitting the Festiva when in fact they do not. So someone else is going to order them and be disappointed.

                                Comment

                                Working...
                                X