Originally posted by Advancedynamix
View Post
-
This seems so obvious, so awesome, yet I don't remember hearing anyone else say that they did this. 8) -
Built juniors hitch today! It's a class 4 with a mixture of neanderpauls design. It's going to look good. Not sure it will be as strong a towmaters but it will work.Leave a comment:
-
It is nice, and I appreciate it a lot because I spent years making due with whatever I could find, and I'm always prepared to do that again if I have to.Originally posted by gauge_half_inch View PostLeave a comment:
-
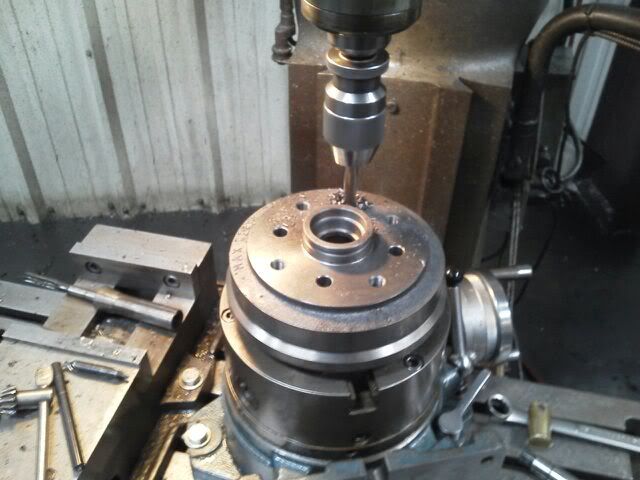
Must be nice to have access to that kind of equipment, I did mine with a 1/2" drill bits and a carbide burr... Lol it all works though....Leave a comment:
-
Lol, thanks! Just took the picture with my phone.Originally posted by htchbck View Post
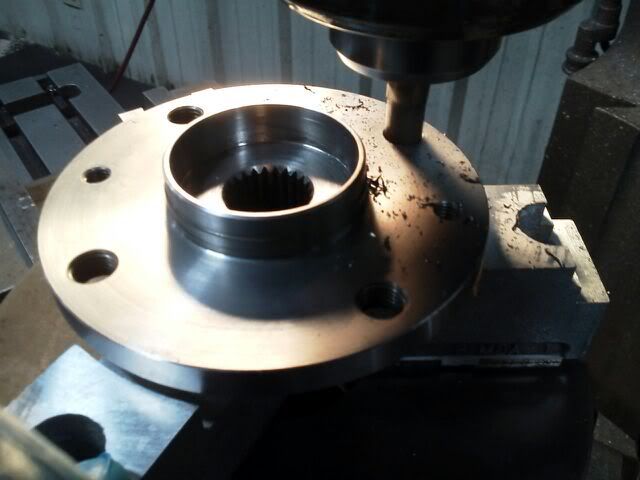
Here's one of the drums. I converted my festiva rear brakes to 4x100. Finished them up this morning.
Leave a comment:
-
It wasn't today, but Saturday on my wife's car I:
1. Installed a R&P I had removed from a parts car. Cleaned it up and lubed it, used the boots off the wife's old R&P.
2. Replaced the exhaust from the front of the resonator to the rear of the car with the one from the parts car, the old exhaust had several holes and the resonator and been replaced with something that looked like another muffler, it was huge.
3. Repaired the headlight switch, a PO had used a cheapie fog light switch in the dash wired directly to the battery. At first I thought it was the stalk, but it turned out to be the plug module, I replaced it with the parts car one.
4. Replaced the factory front speakers with a pair of VOLT 4" speakers with yellow propylene cones. I didn't cut the plugs off, I made some jumpers that I soldered to the new speakers and crimped some spades to plug into the plugs.
5. Plugged the right rear tire, it had a nail hole so I put a plug in it, I'll take it and get it patched when I get it aligned.
I found out last night that I accidently unplugged the brake light switch and can't get the ATX out of park, will fix that tonight, then drive the car back and forth so I can get the alignment straightened out a bit more before I take it to get it aligned at the shop.
I towed Thing 2 home last night. I had sold it to a coworker, he broke the timing belt on it. Wouldn't let me fix it, took it to a shop, $600 to replace the timing belt and water pump, then found out the tensioner was screwed up, cross threaded and the oil pump cover is messed up, then the bill was going up to $1200. He's giving it back to me, I'll fix it and probably resell it.Leave a comment:
-
^^ I love how even your picture of drilling out a hole in a hub looks like it belongs in a magazine, so clean and shiny and perfect lighting lol.
Leave a comment:
-
Picked up my moms "new" head from Elliott (HondaSlayer). Thanks again.
Sent from my PC36100 using TapatalkLeave a comment:
-
Hooked up the heater core using stock hoses on the B8, fixed a leak at the coolant temp senderLeave a comment:
-
Found a cooling fan motor to try... its either out of an '89 Accord or an '88 Civic. Pretty sure I can fit the motor itself into the festiva housing, hopefully the festiva fan will bolt to the motor, otherwise I have to mod the fan to fit the housing to.Leave a comment:
-
Dropped of my new B6 at the machine shop, it has some bad pitting where the oil rings stop on #2&3, hope they can bore it out and save it.Leave a comment:
-
just did my roof to insulate the insides to make the car cooler in summer and warmer in winter...
very simple procedure..
What you'll need...
1 x roll of Aluminium Bitumen Flashing. (The wider the better, approximately 10 meters long and width of a minimum of 150mm - minimum 100mm the wider the better 350mm if you can get it as you will read why later.)
3 x pieces of 24cmX96cm 10mm Foam Rubber with Adhesive backing.
1 x piece of 34cmX96cm 10mm Foam Rubber with Adhesive backing.
What to do.
Remove all plastic screws from roofliner (look like little white plastic screws with holders to attach to roof.)
Remove all plastic guards from around the car (including near windshield, door trims and from rear of car.)
Remove door stripping around edges of car doors.
Finally, the fun bit, remove all handles and rear view mirror from roof and gently peel roof liner off roof and make sure all "sticky pads" have been either detached from roof liner or are stuck to roof liner. it helps if 2 or more people are working together to remove liner as this helps the roofliner from bending and becoming bent.
now the easy bit.
I will stress this most importantly... MAKE SURE YOU MEASURE TWICE, CUT ONCE.. The measurements i had were 15cm Wide by 105cm lenght strips and had 8.5 all together. This might be different for each car worked on but should be at least in that range.
Now, what you do is line spaces on the roof, between the pillars with the Aluminium Bitumen Flashing. it is quite easy to work with and this is the main part of keeping the heat out of your car. Make sure you position it correctly as well as i find this stuff much harder to remove if you happen to really stick it to the roof and for whatever reason needs to be readjusted. Stick flashing to front side of car and use a card such as a credit card to press flashing to roof. Start in the middle of the roof and drag credit card towards the back of the car remove and prevent any air bubbles from forming under the bitumen work towards the outside of the car do this in two halves (either left to right or right to left, doesn't really matter) and do this in the cold weather as this allows the bonding process to be much quicker and will make for a much stronger bond as the bitumen will harden quicker. What you should end up with is a flat look with minimal wrinkles and no big bubbles at all. repeat this for all sections of the roof and work from front to back, working each section Front to back as this will keep the work uniform and looking nice as well as keeping the work even.
If you want, wait at least 1 day to make sure the Bitumen Flashing has bonded the way you want and you are happy with the job. This allows for the next part of the job.
Now take the rubber stripping and follow these steps (simple bit):-
The 3 smaller strips (24cm X 92cm) are for the first three sections (front to back of car)
The 1 smaller strip is for the final section (34cm X 92cm) is for the rear section (rear of car).
So to clarify:- Front 24 24 24 34 Rear.
once this is fitted, Put everything back in reverse order and you should find that your car is warmer in the cold and also cooler in the heat as well due to the space between the roof and roof liner now being filled with bitumen flashing and heatproof foam rubber occupying the space rather than air. a minimal amount of weight will be added to the car for all the speed demons out there and you should find also that noise will also be cut down slightly due to the foam also being a noise-proofing device also which is also good for stereo nuts out there as well.
total cost of project was around 90$
Flashing can be purchased from all good hardware stores and it must have Bitumen backing (check plumbing supply stores or department) and Foam Rubber from any craft store or Rubber supply outlet)
Hope this helps you guys out in colder and hotter climates
Next Job, evening out the doors to keep insulation more "even" and car warmer as stock without heater.
Also, for stereo nuts, this is also to help with bass and a more even sound across the car as external noise shouldn't be able to penetrate too much into the car either.Last edited by jawbraeka; 04-10-2012, 08:20 AM.Leave a comment:
-
Mounted my 155/70 13s on 4x100 wheels. Flushed coolant and did an old school alignment.
Sent from the bathroom via crapatalkLeave a comment:
-
Yo here's a link to pics of my light setup, This is with the highbeams and bonus lights on, I put the covers on because otherwise it was a white light mess http://s1189.photobucket.com/albums/...t=P4090783.jpgLeave a comment:
Leave a comment: